Manage datasets
In Opik 2.0, datasets are project-scoped. Make sure to specify a project_name when creating datasets so they are associated with the correct project.
Datasets can be used to track test cases you would like to evaluate your LLM on. Each dataset is made up of a dictionary
with any key value pairs. When getting started, we recommend having an input and optional expected_output fields for
example. These datasets can be created from:
- Python SDK: You can use the Python SDK to create a dataset and add items to it.
- TypeScript SDK: You can use the TypeScript SDK to create a dataset and add items to it.
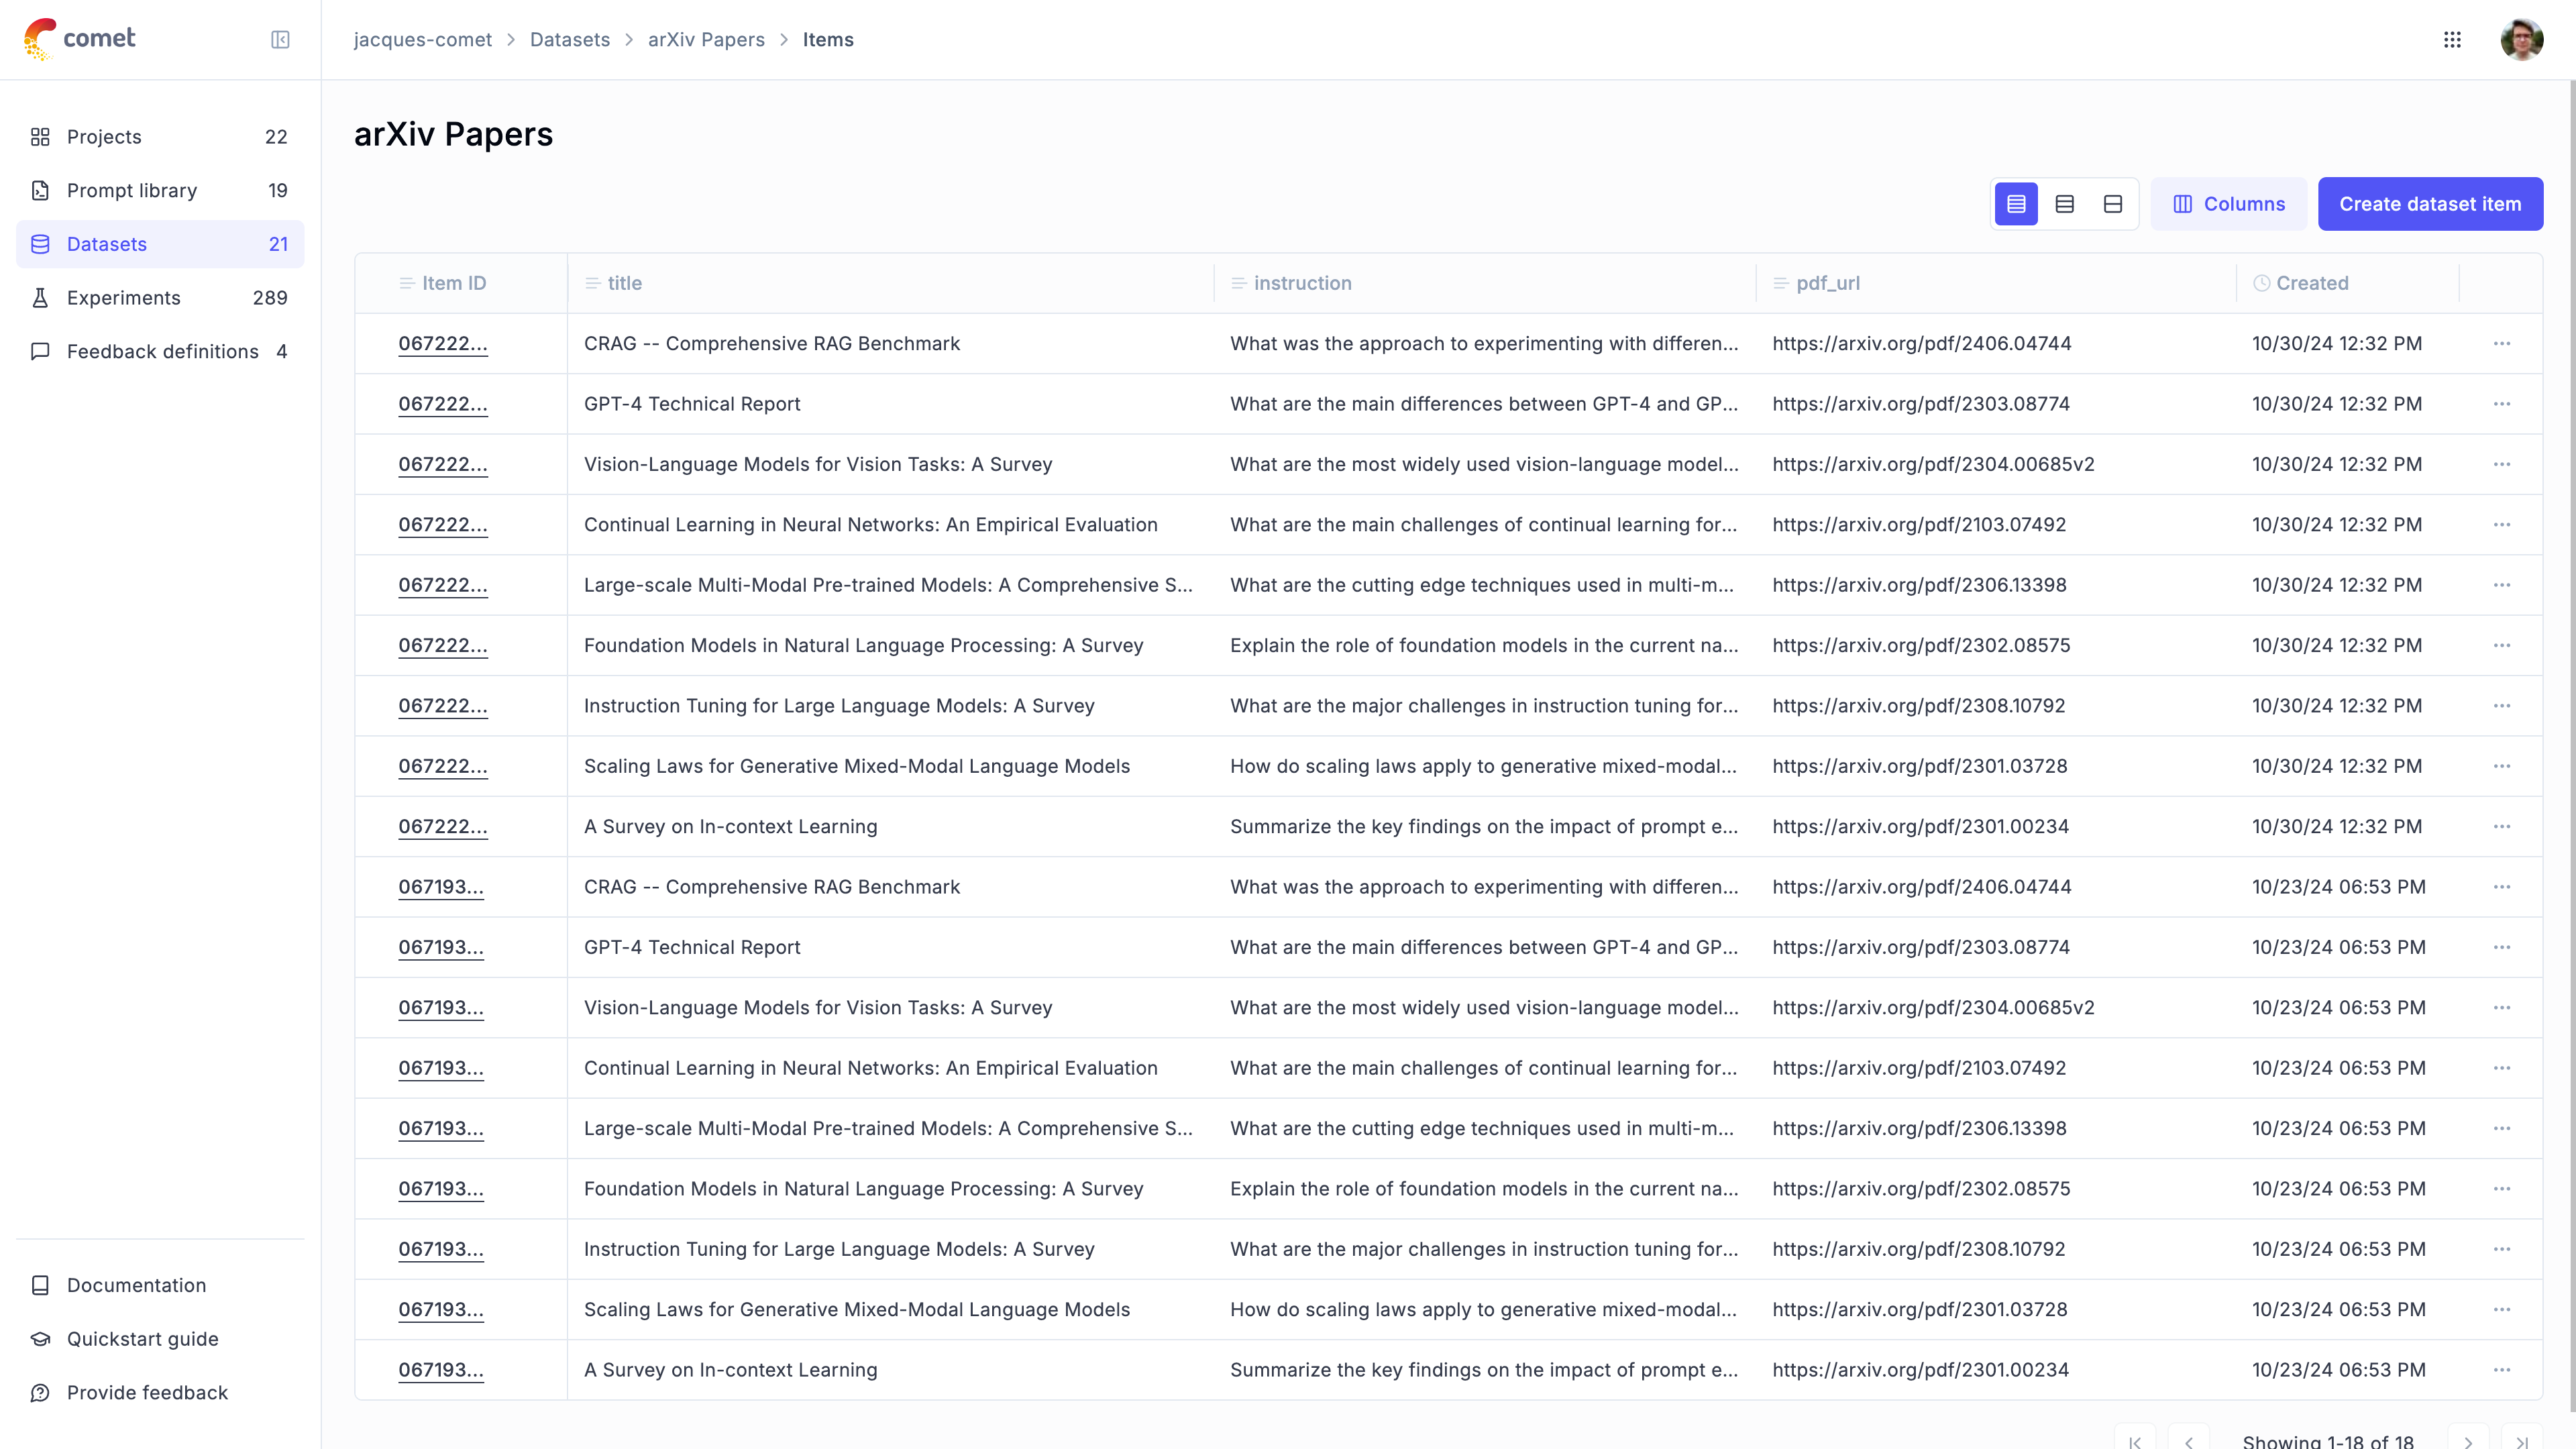
- Traces table: You can add existing logged traces (from a production application for example) to a dataset.
- The Opik UI: You can manually create a dataset and add items to it.
Once a dataset has been created, you can run Experiments on it. Each Experiment will evaluate an LLM application based on the test cases in the dataset using an evaluation metric and report the results back to the dataset.
Create a dataset via the UI
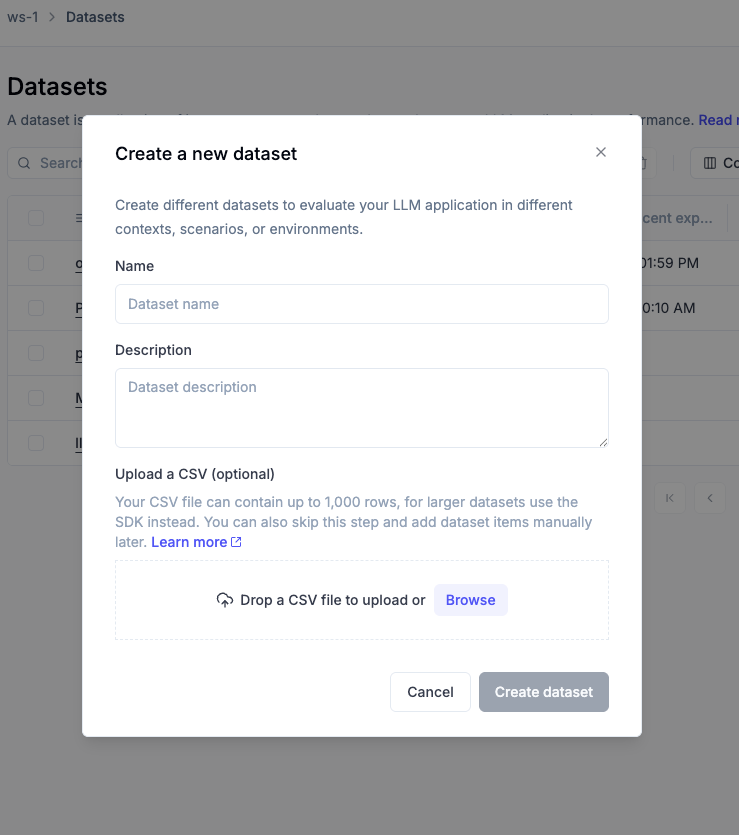
The simplest and fastest way to create a dataset is directly in the Opik UI. This is ideal for quickly bootstrapping datasets from CSV files without needing to write any code.
Steps:
- Navigate to Evaluation > Datasets in the Opik UI.
- Click Create new dataset.
- In the pop-up modal:
- Provide a name and an optional description
- Optionally, upload a CSV file with your data
- Click Create dataset.
If you need to create a dataset with more than 1,000 rows, you can use the SDK.
The UI dataset creation has some limitations:
- File size is limited to 1,000 rows via the UI.
- No support for nested JSON structures in the CSV itself.
For datasets requiring rich metadata, complex schemas, or programmatic control, use the SDK instead (see the next section).
When you create a dataset with a CSV file, this creates the first version (v1) of your dataset. All subsequent modifications will create new versions automatically.
Understanding dataset versioning
Dataset versioning in Opik creates immutable snapshots of your data. Every time you modify a dataset—whether adding, editing, or deleting items—a new version is automatically created. This ensures complete reproducibility, provides an audit trail of all changes, and allows easy rollback to any previous state.
Each dataset version contains:
- Version name: Auto-generated sequential name (v1, v2, v3, etc.)
- Change description: Optional note describing what changed
- Tags: Labels for categorizing versions (e.g.,
production,baseline) - Item statistics: Count of items added, modified, and deleted
- Timestamp and author: When the version was created and by whom
Once a version is created, its data cannot be changed—any modification creates a new version instead. Restoring a previous version also creates a new version with the same data, preserving your complete version timeline.
The special latest tag always points to the most recent version.
When running experiments without specifying a version, latest is used by default.
Working with draft mode (UI)
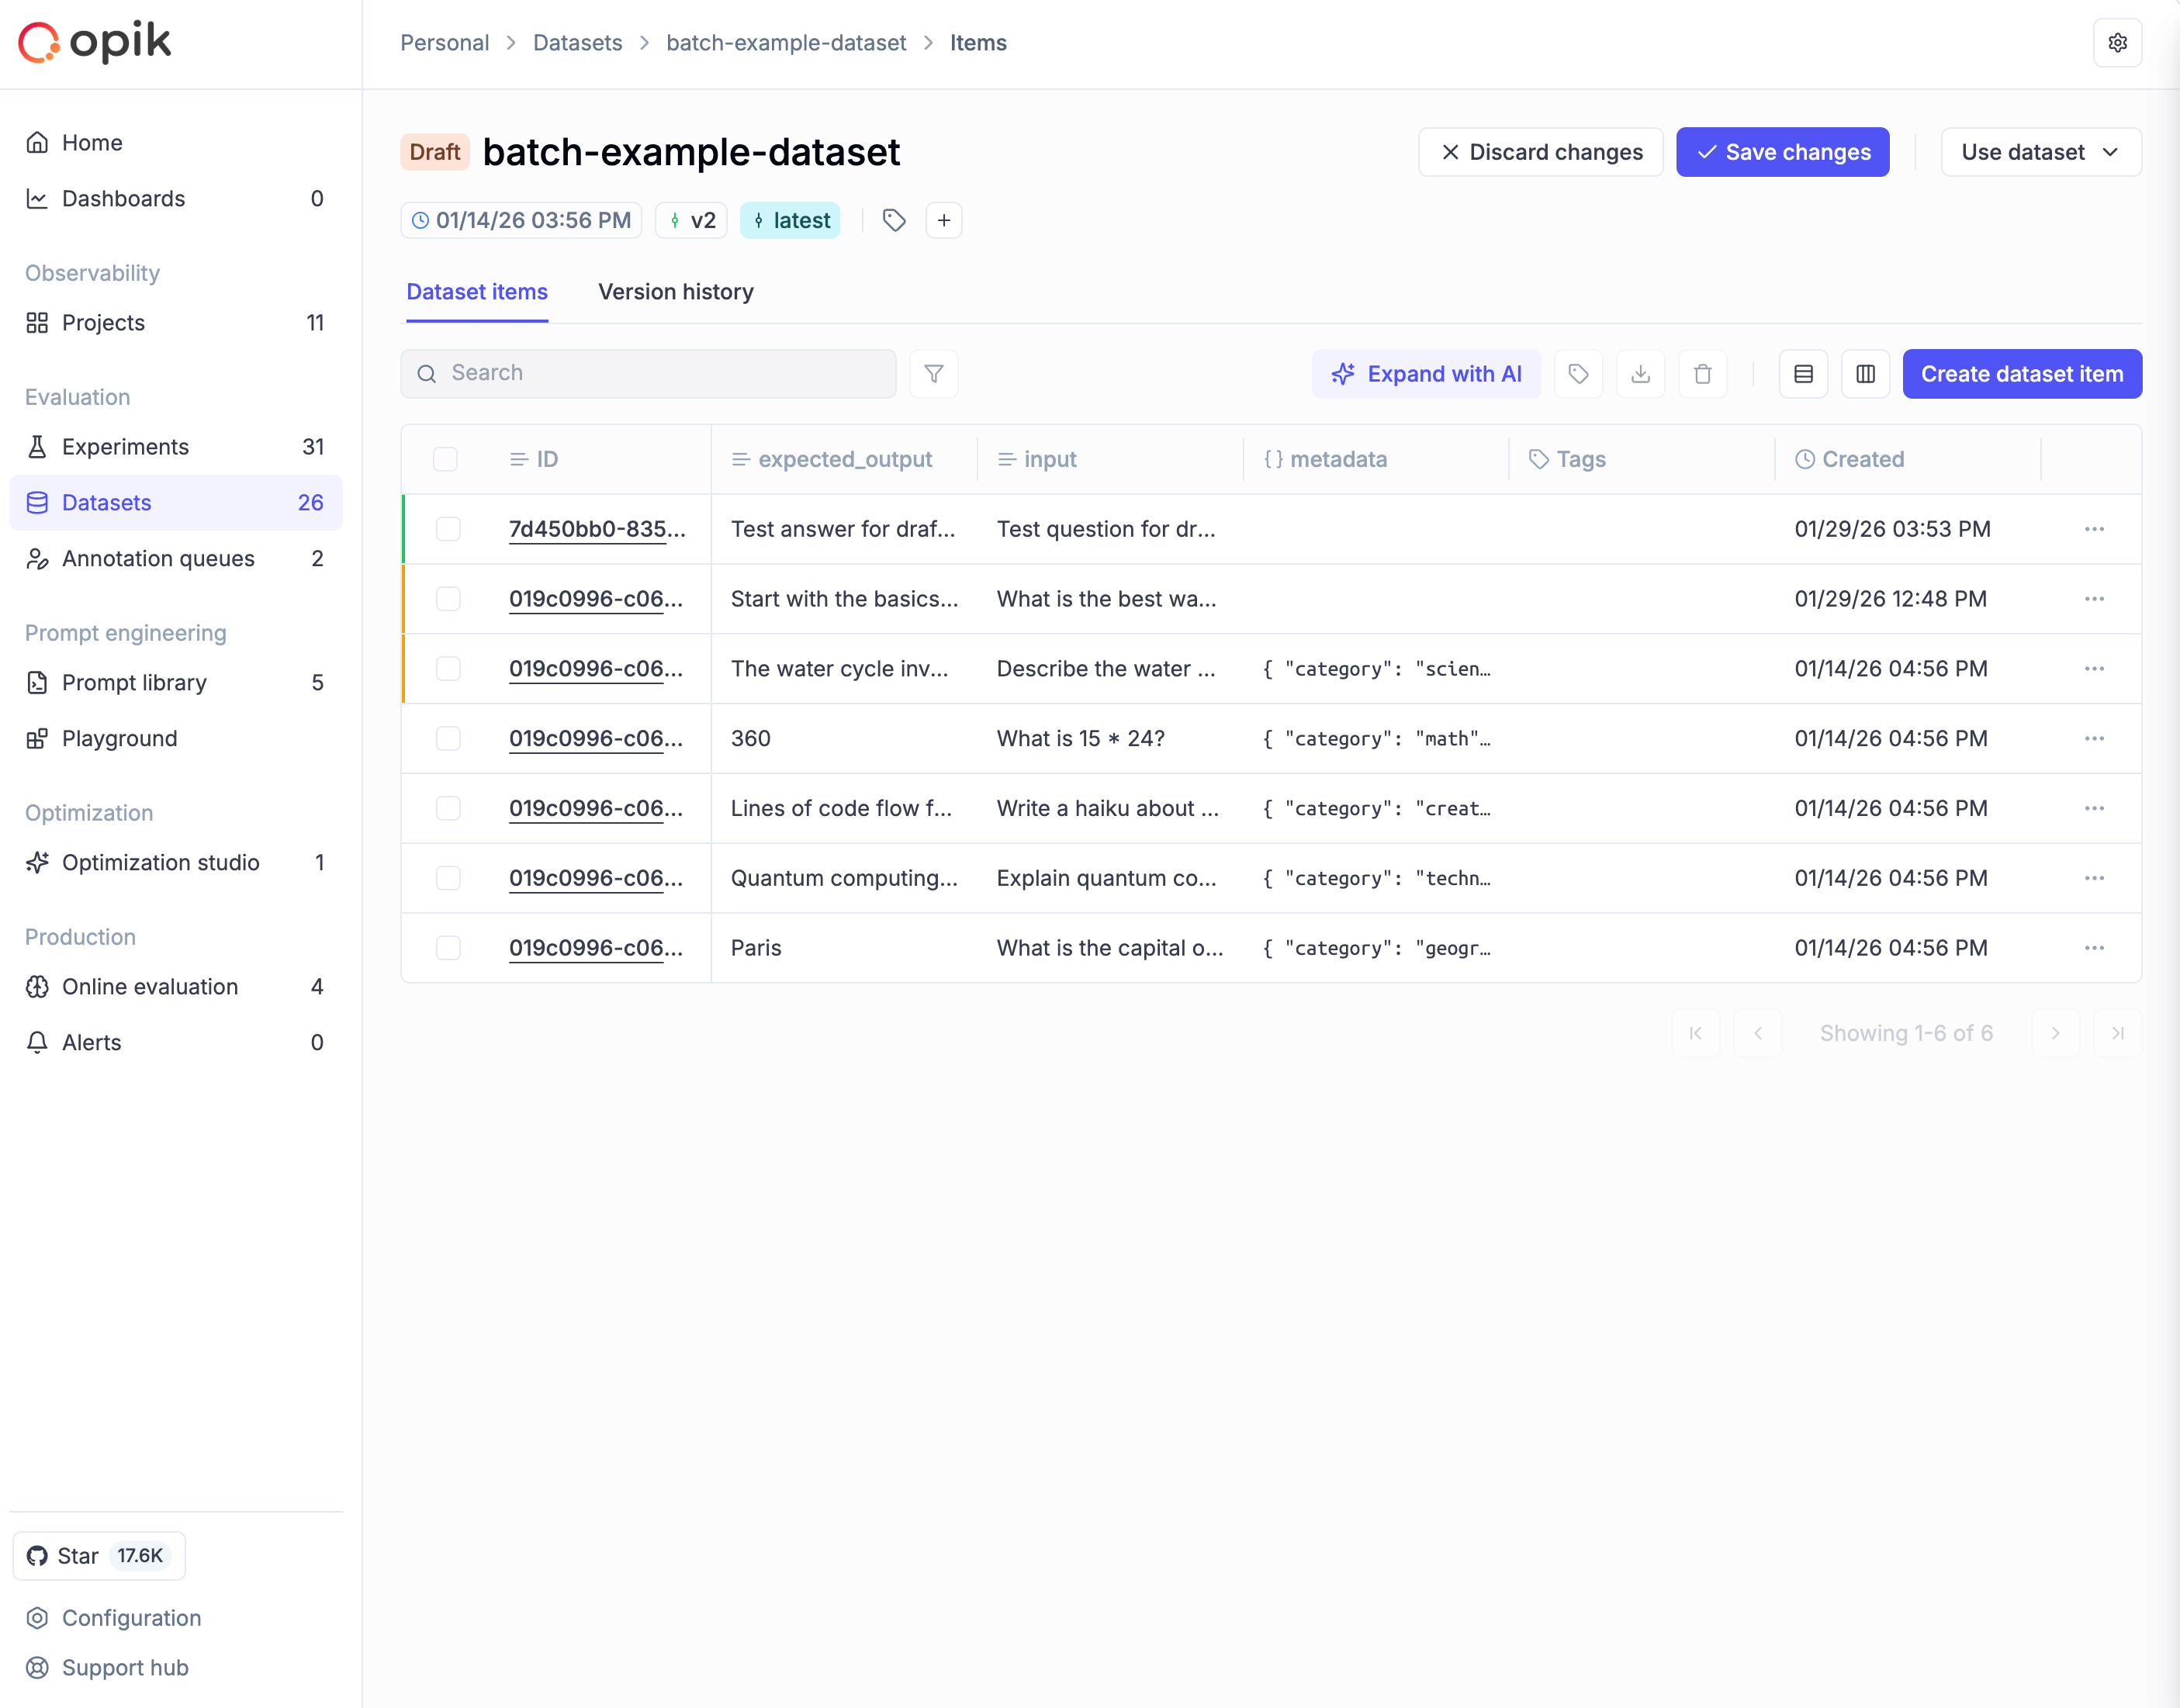
When making changes to a dataset in the Opik UI, all modifications go into a draft state first. This gives you a staging area to review changes before committing them as a new version. The draft is visible only to you, and AI-generated samples from “Expand with AI” also go to draft for review.
When a dataset has unsaved draft changes, an orange “Draft” tag appears next to the dataset name, and Save changes / Discard changes buttons appear in the toolbar. Items show colored borders: green for newly added items, amber for modified items.
Saving or discarding changes
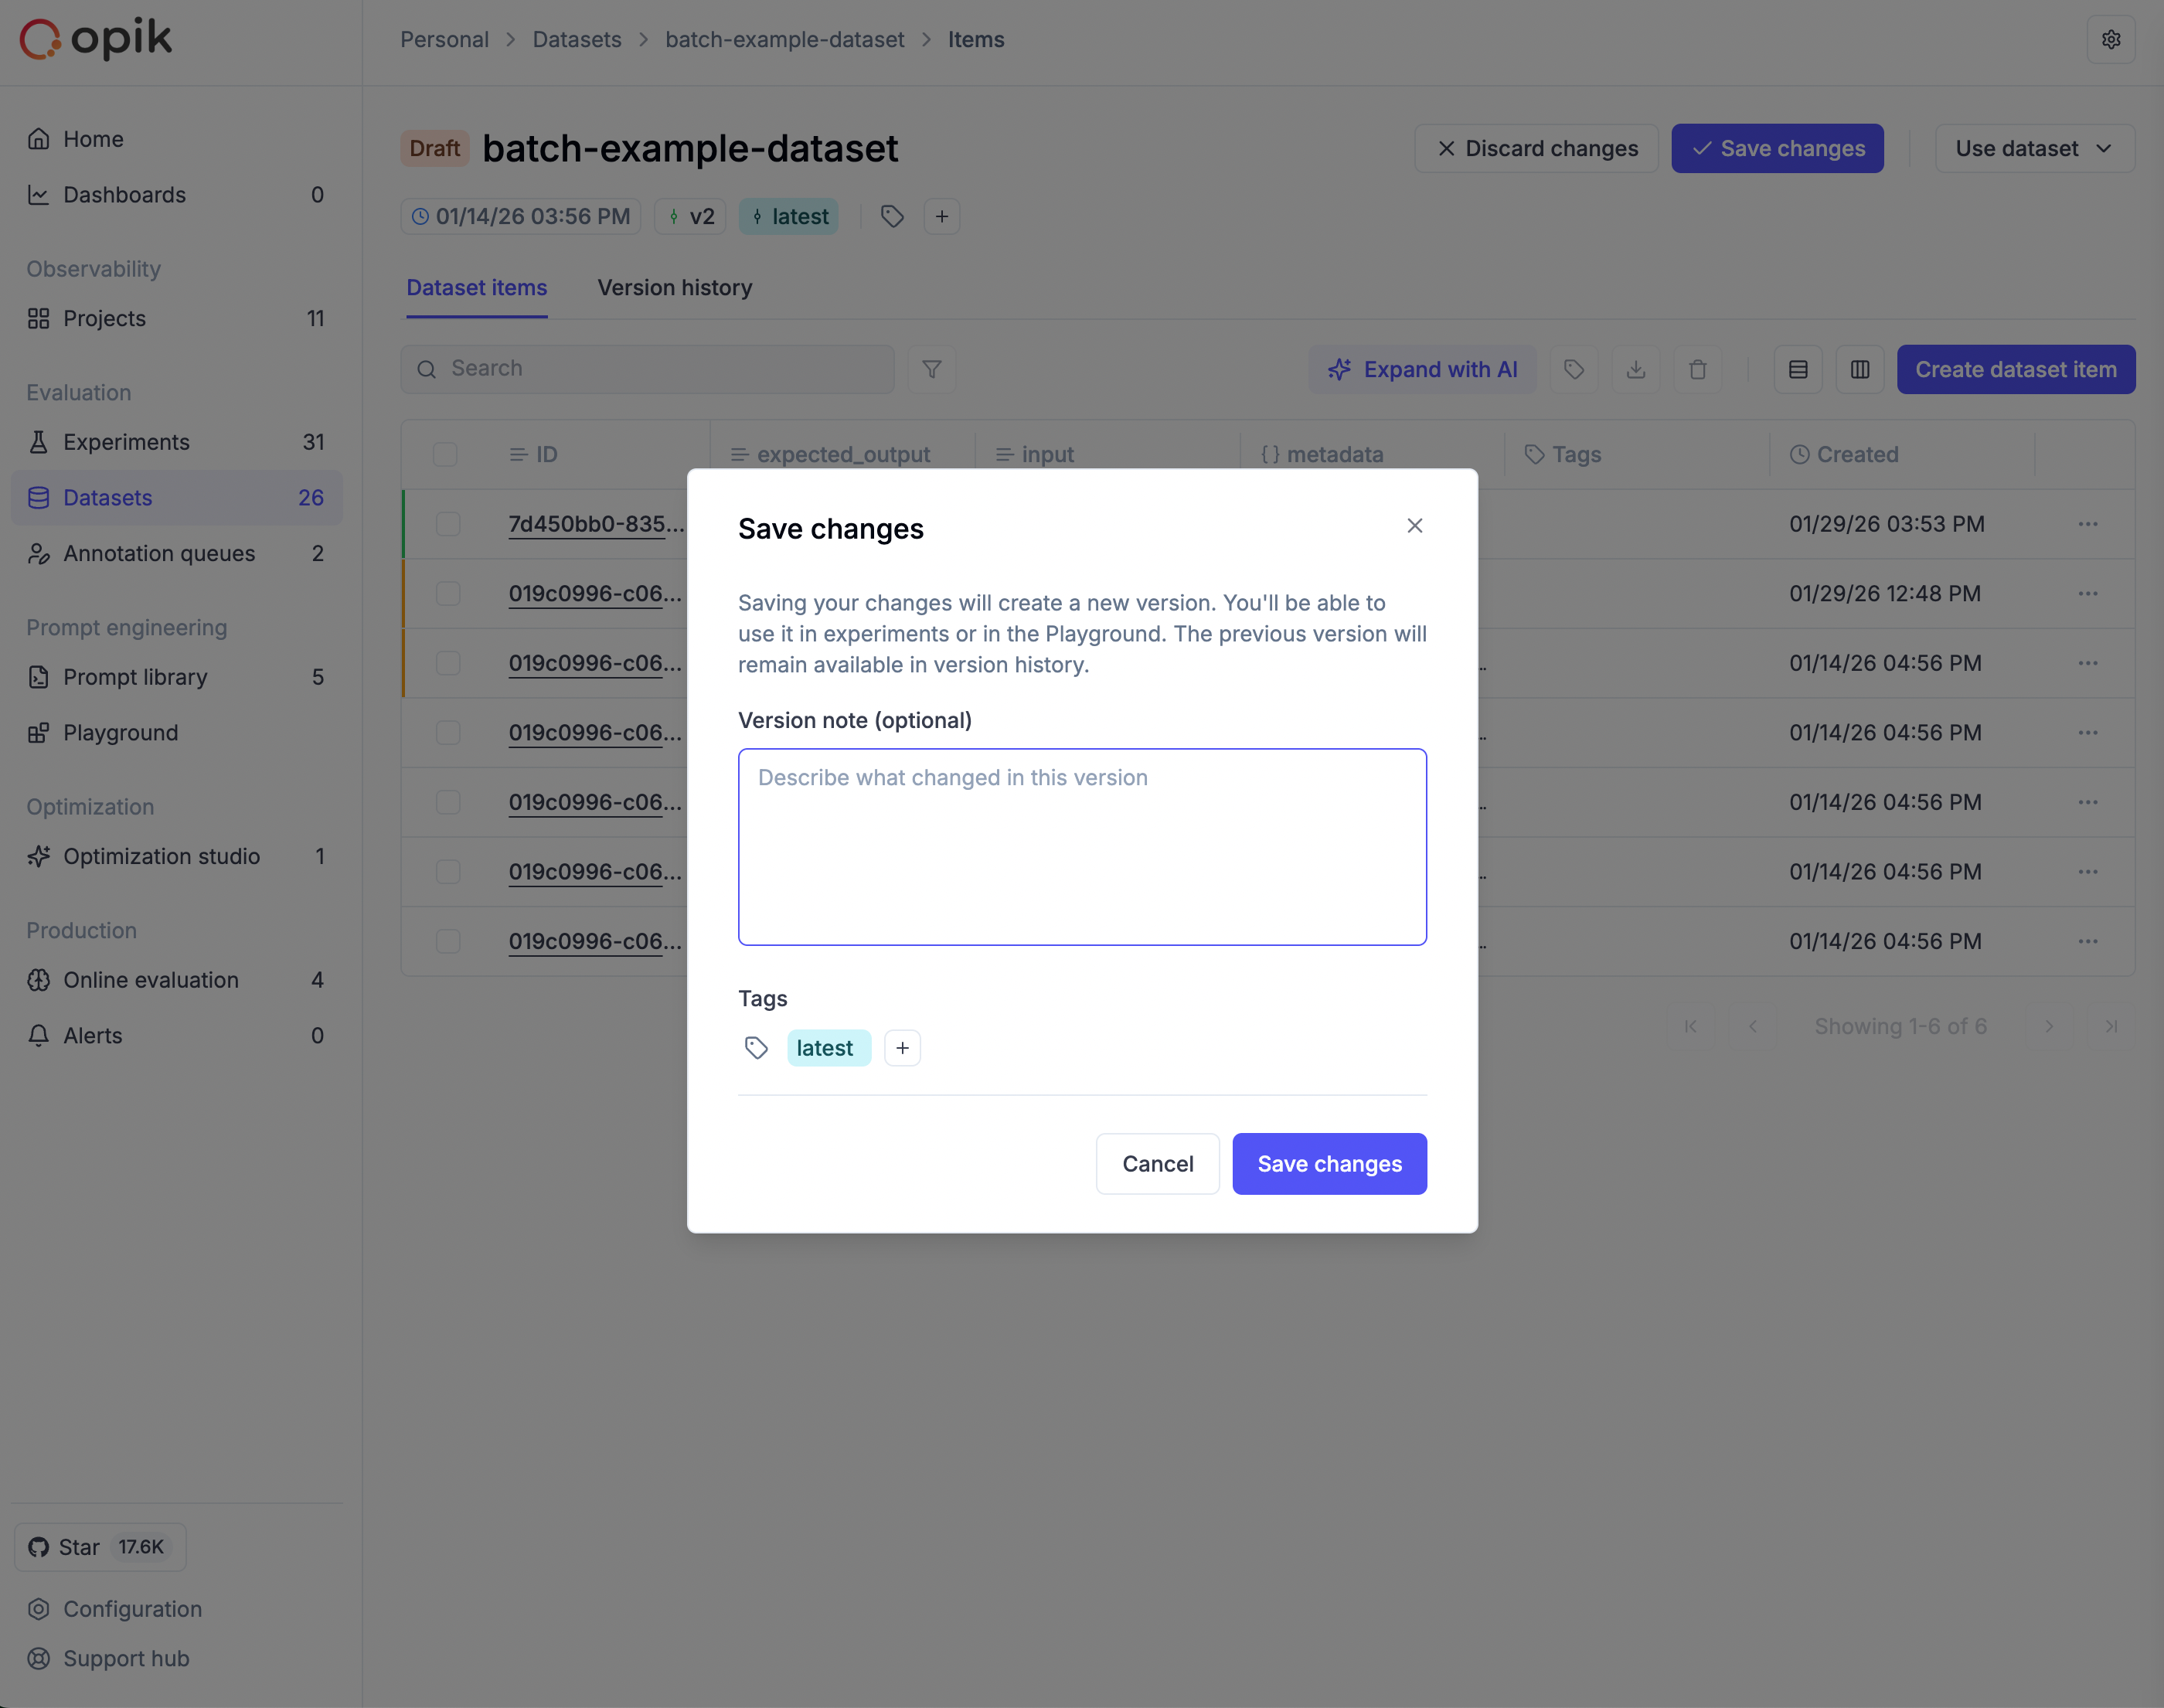
To commit your draft as a new version:
- Click Save changes in the toolbar
- Enter a version note describing what changed
- Optionally add tags to categorize this version
- Click Save
To abandon your draft, click Discard changes and confirm. If you try to navigate away with unsaved changes, Opik displays a warning to prevent accidental loss of work.
Use draft mode to batch related changes into a single, well-documented version.
Version history
To view the complete timeline of dataset changes, navigate to your dataset and click the Version history tab. The table shows each version’s name, change summary (items added/modified/deleted), version note, tags, item count, and creation timestamp.
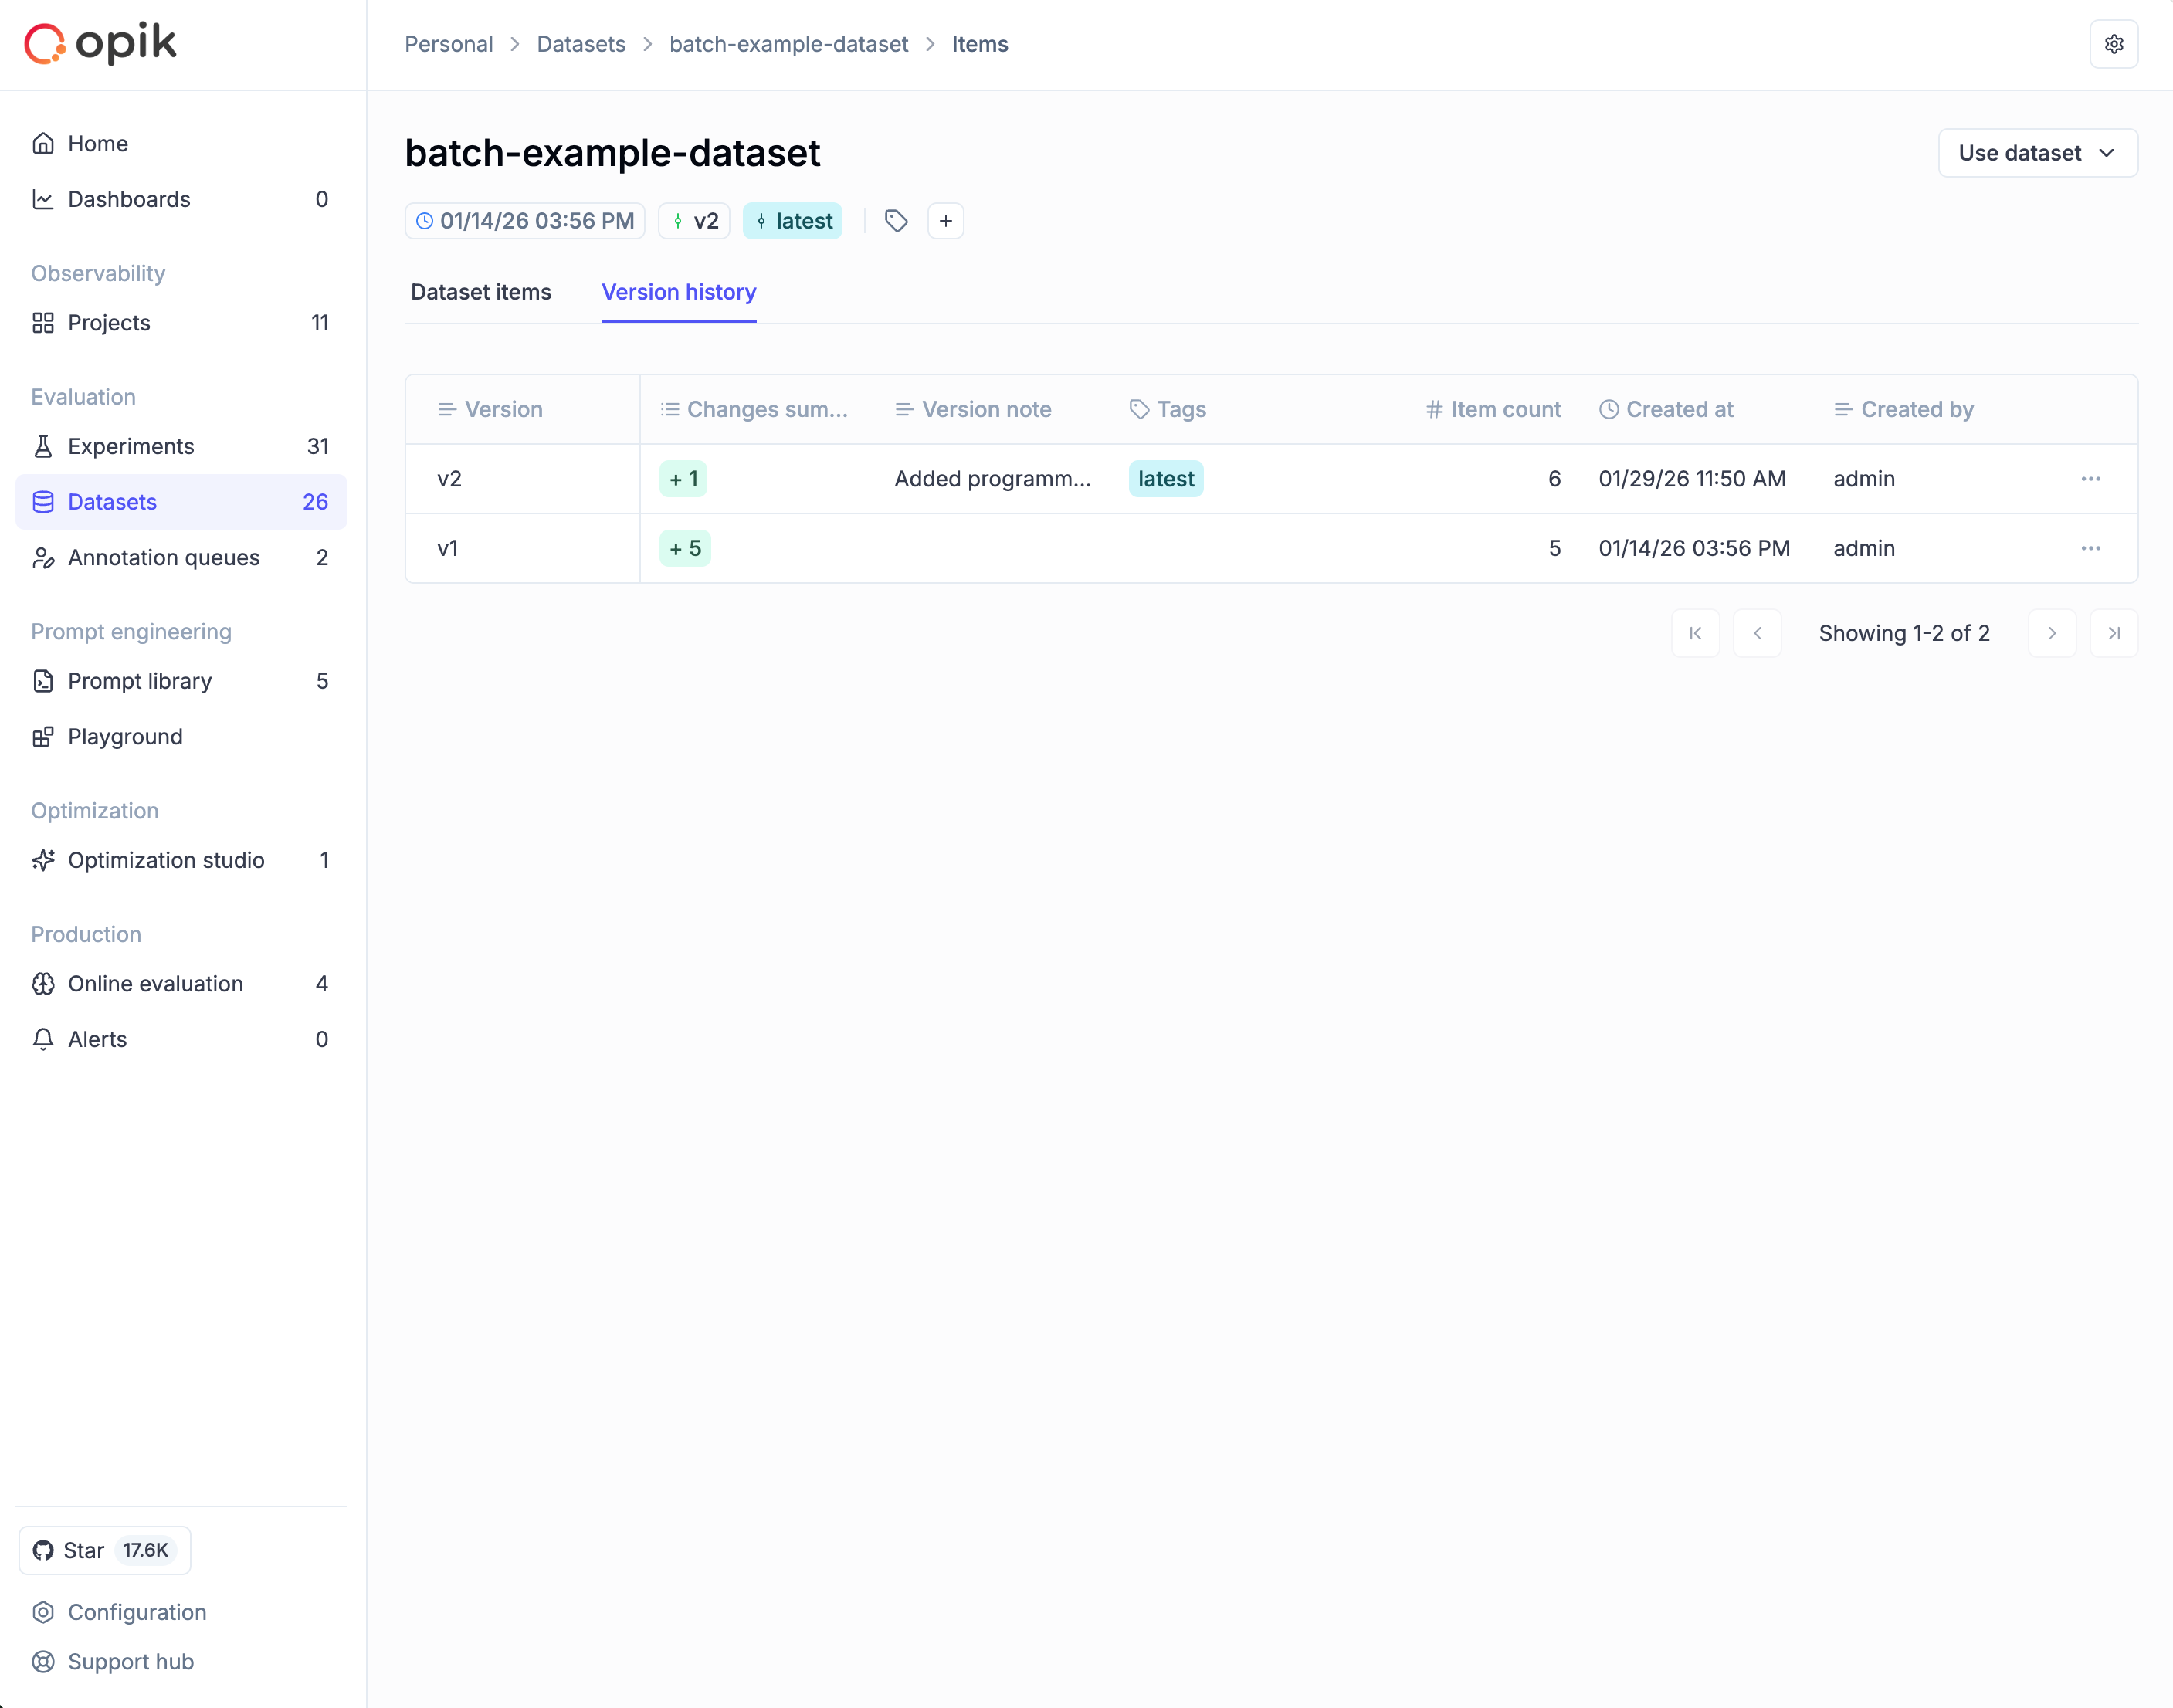
From this view you can:
- View items: Click a version row and select View items to see the exact data at that point in time
- Restore: Click the ⋮ menu and select Restore this version to create a new version with that data
- Edit metadata: Click the ⋮ menu and select Edit to update the version note or tags (the data itself remains immutable)
Restoring a version creates a new version with the same data. No history is lost or overwritten.
Managing dataset and version tags from the SDK
The Dataset object exposes get_tags() to read the current tags, but does not yet provide a dedicated setter. To write tags programmatically — for example to drive an env:prod / env:stage promotion workflow — use the REST client exposed on the Opik client.
There are two tag surfaces, depending on what you want to scope the tag to:
- Dataset-level tags apply to the dataset as a whole and persist across versions. Use
update_dataset— this replaces the existing tag list. - Version-level tags apply to a specific dataset version. Use
update_dataset_version— this is additive (it adds to the version’s existing tags).
client.rest_client is a thin wrapper around the public REST API. The underlying endpoints are stable, but the Python wrapper itself is not guaranteed to be backward-compatible across SDK versions. A first-class Dataset.set_tags() / Dataset.add_version_tags() helper is on the roadmap — this snippet is the supported interim path.
You can then filter dataset items by these tags via get_items(filter_string=...) using the tags contains operator.
Adding traces to a dataset
One of the most powerful ways to build evaluation datasets is by converting production traces into dataset items. This allows you to leverage real-world interactions from your LLM application to create test cases for evaluation.
Adding traces via the UI
To add traces to a dataset from the Opik UI:
- Navigate to the traces page
- Select one or more traces you want to add to a dataset
- Click the Add to dataset button in the toolbar
- In the dialog that appears:
- Select an existing dataset or create a new one
- Choose which trace metadata to include:
- Nested spans: Include all child spans within the trace
- Tags: Include trace tags
- Feedback scores: Include any feedback scores attached to the trace
- Comments: Include comments added to the trace
- Usage metrics: Include token usage and cost information
- Metadata: Include custom metadata fields
- Click on the dataset name to add the selected traces
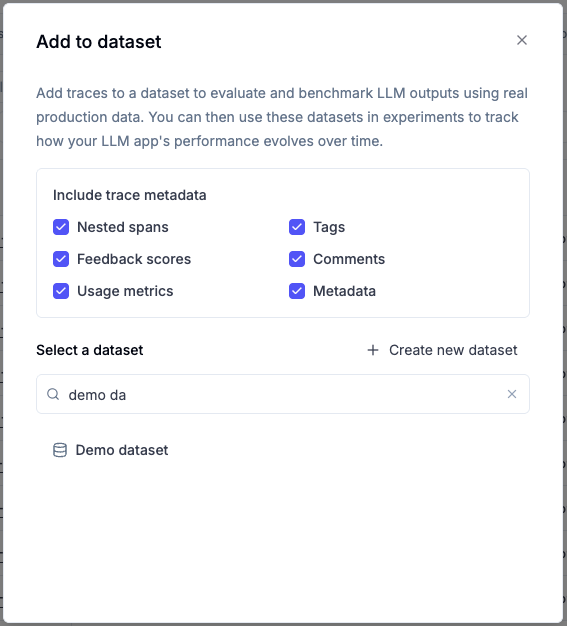
By default, all metadata options are enabled. You can uncheck any options you don’t need. The trace’s input and output are always included.
What gets added to the dataset
When you add a trace to a dataset, the following structure is created:
- input: The trace’s input data
- expected_output: The trace’s output data (stored as
expected_outputfor evaluation purposes) - spans (optional): Array of nested spans with their inputs, outputs, and metadata
- tags (optional): Array of tags associated with the trace
- feedback_scores (optional): Array of feedback scores with name, value, and source
- comments (optional): Array of comments with text and ID
- usage (optional): Token usage and cost information
- metadata (optional): Custom metadata fields
This rich structure allows you to:
- Evaluate complex multi-step workflows by including nested spans
- Filter and analyze based on tags and metadata
- Use existing feedback scores as ground truth for evaluation
- Preserve context through comments and annotations
Creating a dataset using the SDK
In Opik 2.0, datasets are project-scoped. Specify a project_name to associate your dataset with the correct project.
You can create a dataset and log items to it using the get_or_create_dataset method:
If a dataset with the given name already exists, the existing dataset will be returned.
Insert items
Inserting dictionary items
You can insert items to a dataset using the insert method:
Opik automatically deduplicates items that are inserted into a dataset when using the Python SDK. This means that you
can insert the same item multiple times without duplicating it in the dataset. This combined with the get or create dataset methods means that you can use the SDK to manage your datasets in a “fire and forget” manner.
When using the SDK to insert items, a new dataset version is automatically created.
If you insert items in multiple batches within a single insert() call, they are grouped into one version.
Once the items have been inserted, you can view them in the Opik UI:
Inserting items from a JSONL file
You can also insert items from a JSONL file:
Inserting items from a Pandas DataFrame
You can also insert items from a Pandas DataFrame:
Deleting items
You can delete items in a dataset by using the delete method:
Deleting items creates a new version of the dataset. The deleted items remain accessible in previous versions through the version history, ensuring you never permanently lose data.
Downloading a dataset from Opik
You can download a dataset from Opik using the get_dataset method:
Filtering datasets programmatically
You can filter dataset items using the filter_string parameter on the get_items() method or when
running evaluations with evaluate_prompt(). This allows you to work with specific subsets of your data.
Basic filtering
Filter syntax
The filter string uses Opik Query Language (OQL) syntax. Supported columns include:
Filter examples
Running experiments with dataset versions
When you run an experiment, Opik automatically links it to the specific dataset version that was used. This ensures complete reproducibility—you can always know exactly which data was used for any experiment.
Automatic version association
Every experiment records which dataset version it used:
- When running from the UI or SDK without specifying a version, the
latestversion is used - The experiment results page shows the associated dataset version
- You can click the version to see the exact data that was evaluated
This association is permanent. Even if you later modify the dataset, your experiment results remain linked to the original version used.
Selecting a specific version in Playground
When running experiments from the Playground:
- Open the Playground and configure your prompt
- In the dataset selector, choose your dataset
- A nested dropdown appears showing available versions
- Select the specific version you want to use, or choose
latestfor the most recent
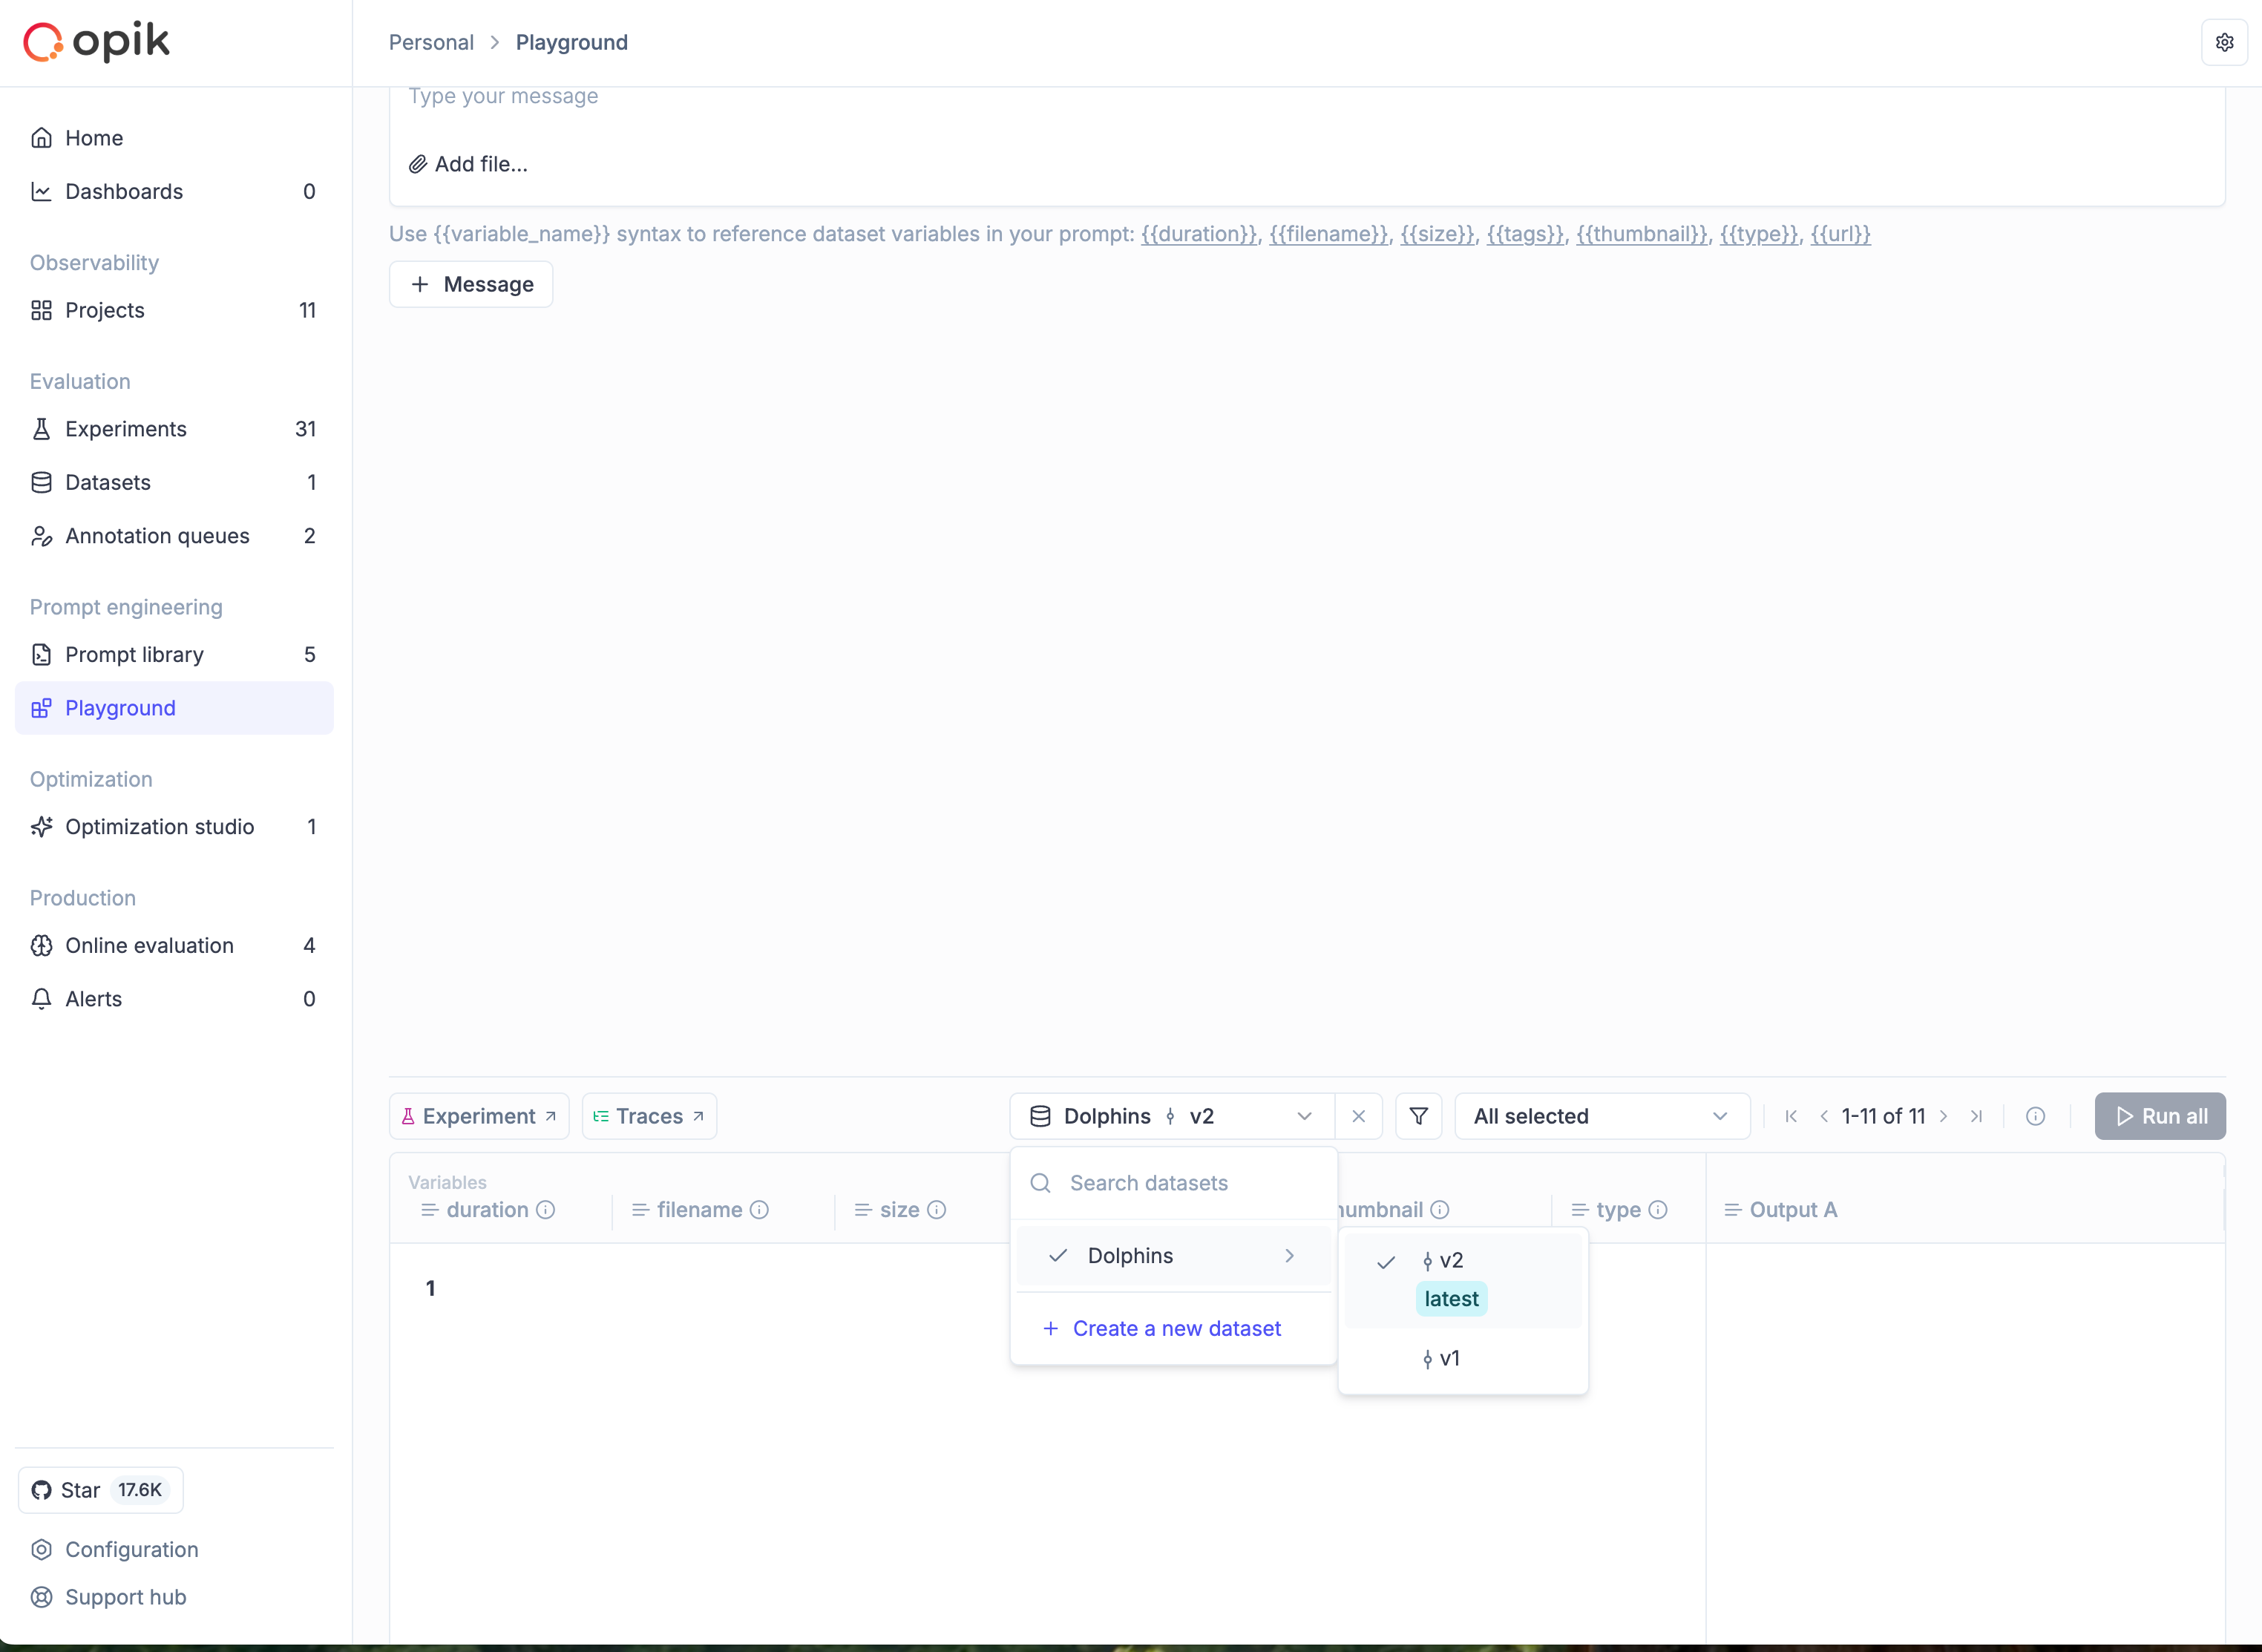
When comparing experiments or running A/B tests, use the same dataset version to isolate the effect of your changes. This ensures differences in results are due to your prompt or model changes, not data variations.
Selecting a specific version in the SDK
When running experiments programmatically, you can specify which dataset version to use by passing a DatasetVersion object to evaluate():
Working with dataset versions programmatically
The SDK provides methods for inspecting and working with dataset versions:
DatasetVersion is a read-only view. You cannot insert, update, or delete items
through a DatasetVersion object. All mutations must be done through the Dataset object.
Expanding a dataset with AI
Dataset expansion allows you to use AI to generate additional synthetic samples based on your existing dataset. This is particularly useful when you have a small dataset and want to create more diverse test cases to improve your evaluation coverage.
The AI analyzes the patterns in your existing data and generates new samples that follow similar structures while introducing variations. This helps you:
- Increase dataset size for more comprehensive evaluation
- Create edge cases and variations you might not have considered
- Improve model robustness by testing against diverse inputs
- Scale your evaluation without manual data creation
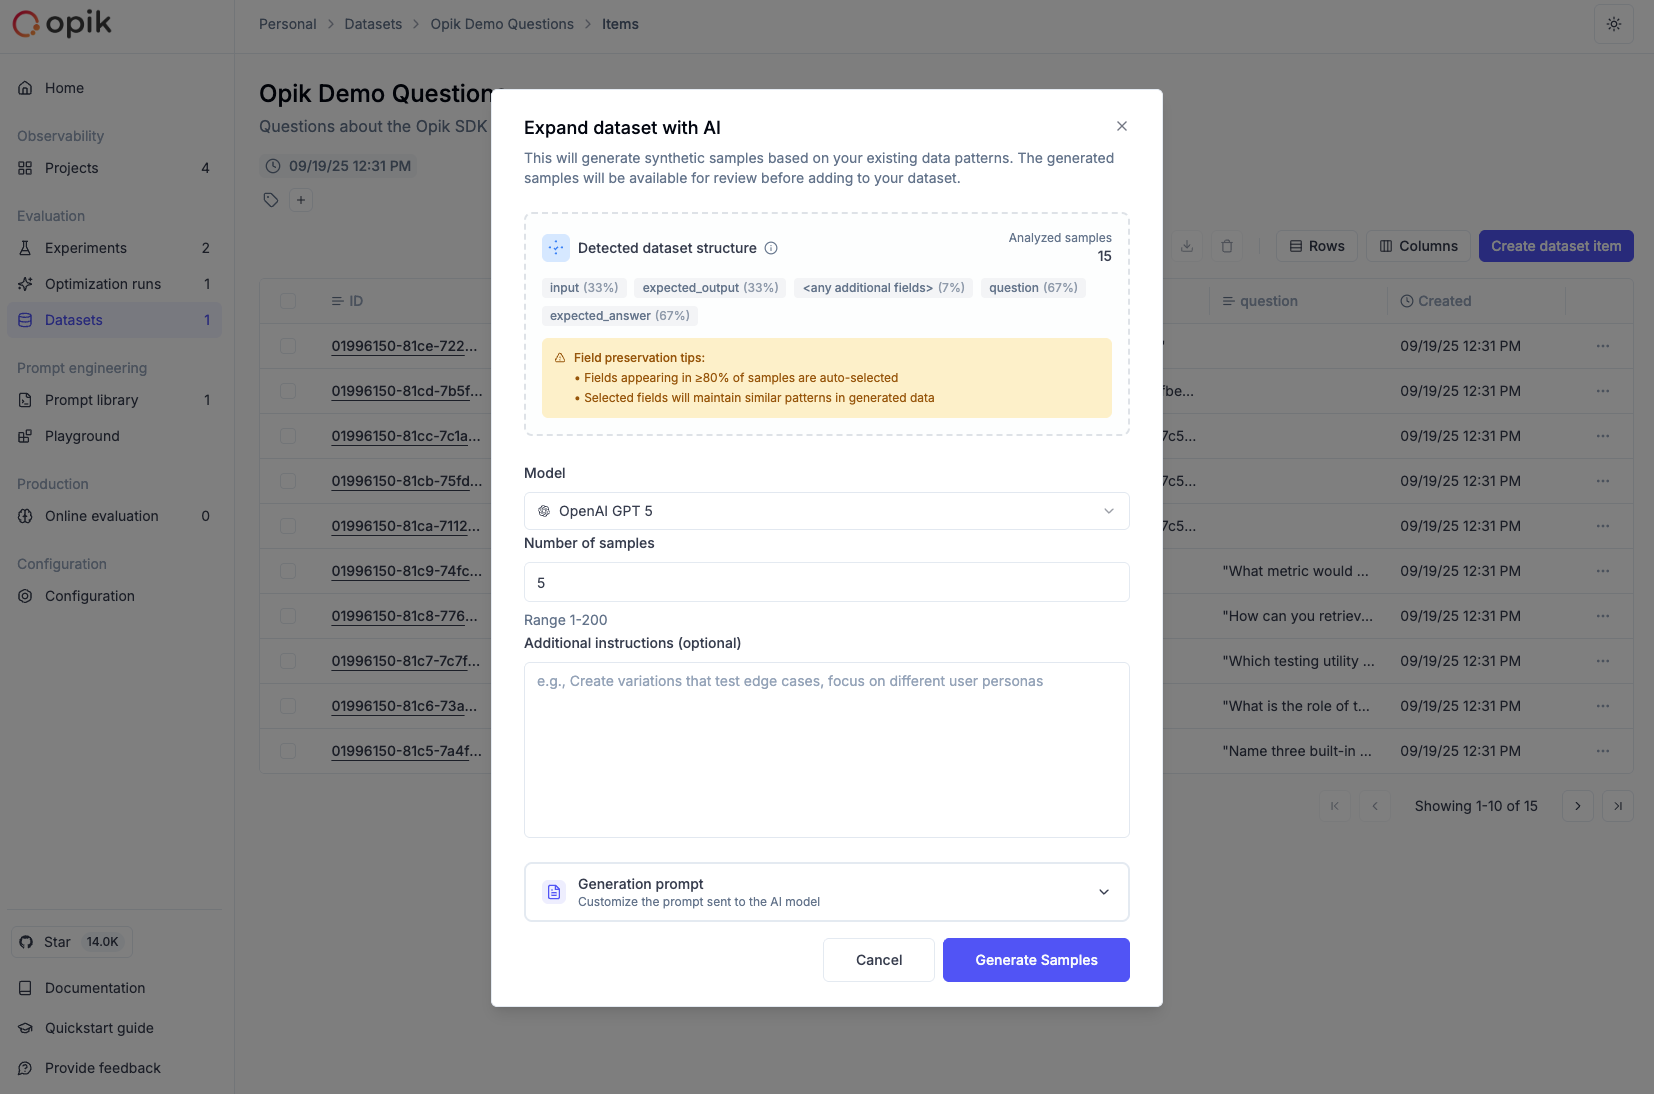
How to expand a dataset
To expand a dataset with AI:
- Navigate to your dataset in the Opik UI (Evaluation > Datasets > [Your Dataset])
- Click the “Expand with AI” button in the dataset view
- Configure the expansion settings:
- Model: Choose the LLM model to use for generation (supports GPT-4, GPT-5, Claude, and other models)
- Sample Count: Specify how many new samples to generate (1-100)
- Preserve Fields: Select which fields from your original data to keep unchanged
- Variation Instructions: Provide specific guidance on how to vary the data (e.g., “Create variations that test edge cases” or “Generate examples with different complexity levels”)
- Custom Prompt: Optionally provide a custom prompt template instead of the auto-generated one
- Start the expansion - The AI will analyze your data and generate new samples
- Review the results - Generated samples are added to your draft. You can review, edit, or remove them before saving to create a new version
Configuration options
Sample Count: Start with a smaller number (10-20) to review the quality before generating larger batches.
Preserve Fields: Use this to maintain consistency in certain fields while allowing variation in others. For example, preserve the category field while varying the input and expected_output.
Variation Instructions: Provide specific guidance such as:
- “Create variations with different difficulty levels”
- “Generate edge cases and error scenarios”
- “Add examples with different input formats”
- “Include multilingual variations”
Best practices
- Start small: Generate 10-20 samples first to evaluate quality before scaling up
- Review generated content: Always review AI-generated samples for accuracy and relevance
- Use variation instructions: Provide clear guidance on the type of variations you want
- Preserve key fields: Use field preservation to maintain important categorizations or metadata
- Iterate and refine: Use the custom prompt option to fine-tune generation for your specific needs
Dataset expansion works best when you have at least 5-10 high-quality examples in your original dataset. The AI uses these examples to understand the patterns and generate similar but varied content.
Managing dataset item tags
Tags are a powerful way to organize, categorize, and filter your dataset items. You can use tags to:
- Categorize test cases by type, difficulty, or domain (e.g.,
edge-case,production,multilingual) - Track data sources where items originated from (e.g.,
user-feedback,synthetic,real-world) - Mark review status during dataset curation (e.g.,
needs-review,validated,archived) - Filter for evaluation to run experiments on specific subsets of your data
- Organize workflows by marking items for different stages or teams
Each dataset item can have multiple tags.
Adding tags to dataset items
Adding tags to individual items
To add tags to a single dataset item:
- Navigate to your dataset in the Opik UI (Evaluation > Datasets > [Your Dataset])
- Click on any dataset item to open the details panel
- In the Tags section, click the ”+” button
- Type the tag name and press Enter
- The tag will be immediately added and saved
You can remove tags by clicking the ”×” icon next to any tag in the details panel.
Adding tags to multiple items (batch operation)
To add the same tag to multiple dataset items at once:
- Navigate to your dataset in the Opik UI
- Select multiple items by clicking the checkboxes next to each item
- Click the “Add tags” button in the toolbar (visible when items are selected)
- Enter the tag name in the dialog that appears
- Click “Add tag” to apply the tag to all selected items
This is particularly useful when you want to categorize a group of related test cases or mark items from the same data source.
Tags are case-sensitive and support alphanumeric characters, hyphens, and underscores. Choose consistent naming conventions for your tags to make filtering easier.
Filtering dataset items by tags
Once you’ve tagged your dataset items, you can filter them to work with specific subsets:
- Navigate to your dataset in the Opik UI
- Click the “Filters” button next to the search bar
- Select “Tags” from the Column dropdown
- Choose “contains” as the operator
- Enter the tag name you want to filter by
- Close the dialog to apply the filter
The dataset items table will update to show only items matching your filter criteria. You can:
- View filtered items to focus on specific categories
- Run experiments on filtered subsets by using the filtered view
- Export filtered data for specific test case groups
- Combine with other filters to create complex queries
The filter is saved in the URL, so you can bookmark or share specific filtered views of your dataset.
Bulk operations
Opik supports bulk operations for efficiently managing large datasets. These operations help you work with many items at once without tedious individual selections.
Select all functionality
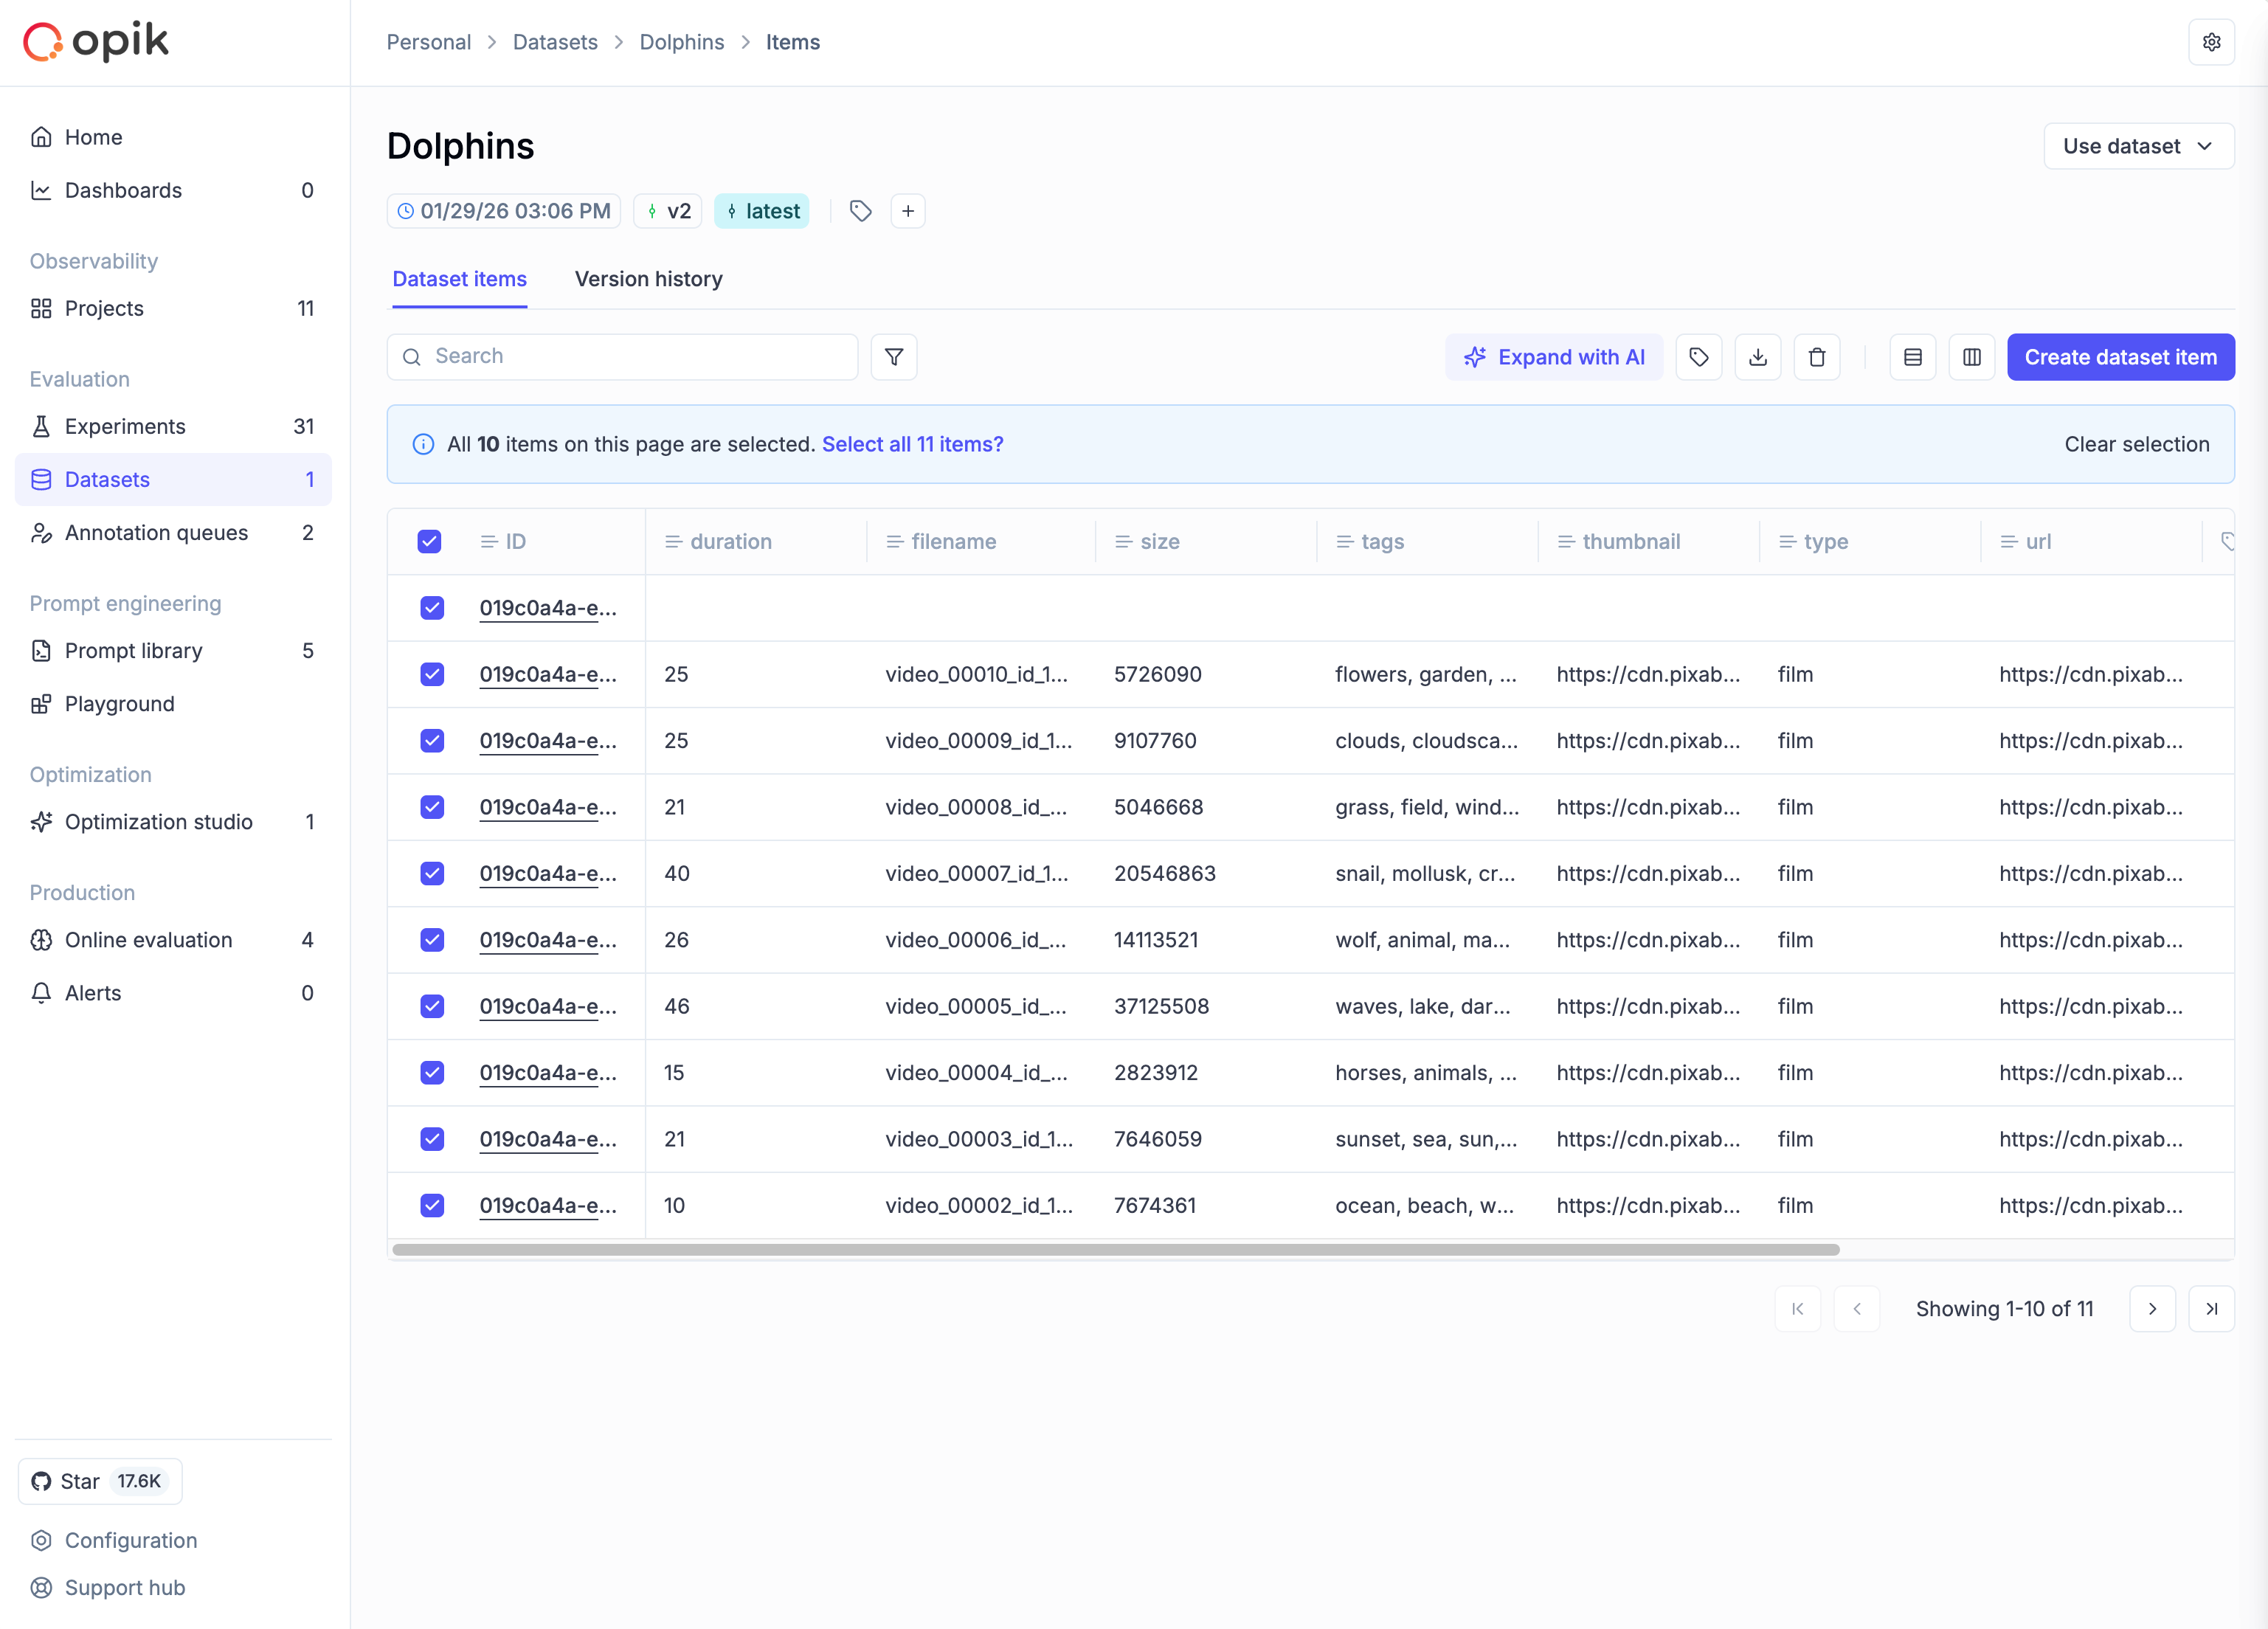
When working with datasets that span multiple pages:
- Select items on the current page using the checkbox in the table header
- A banner appears offering to “Select all items” across all pages
- Click to select all items matching your current filter criteria
This works with filtered views too—if you have a filter applied, “Select all” only selects items matching that filter.
Available bulk operations
Once you have items selected, the toolbar shows available operations:
- Add tags: Apply one or more tags to all selected items
- Delete: Remove selected items (creates a new version with items removed)
- Export: Download selected items as CSV or JSON
Processing indicators
For large bulk operations:
- A loading indicator shows “Your dataset is still processing…”
- The operation runs in the background—you can continue browsing
- A success message appears when processing completes
For very large datasets, bulk operations are processed in batches. The UI remains responsive during processing, and you’ll see progress indicators for long-running operations.