

Data Anonymization
Data anonymization is in preview and available on Opik Enterprise. Contact your Comet account team to enable it for your organization.
Data anonymization masks sensitive values, such as email addresses, phone numbers, or your own customer IDs, when Opik shows trace data to a user. Opik stores traces exactly as they are logged. Each time trace data is read, the Opik server checks the reader’s permissions: users with the Original data view permission see the original values, and all other users see a token such as [EMAIL] instead. Masking happens on the server, so it applies in the Opik UI, the REST API, and the SDKs.
Use it to give analysts, annotators, or external reviewers access to production traces without exposing the personal data inside them.
![Data flow: your application logs a trace, Opik stores the original data, and on read a workspace admin sees the email address while a reviewer without the Original data view permission sees [EMAIL]](https://fdr-prod-docs-files-public.s3.us-east-1.amazonaws.com/opik.docs.buildwithfern.com/66633c23f47970fe61f8c01c05f8f4c88c41681f877f59c3d6094e0283c7044e/img/administration/data_anonymization_flow.svg?X-Amz-Algorithm=AWS4-HMAC-SHA256&X-Amz-Content-Sha256=UNSIGNED-PAYLOAD&X-Amz-Credential=AKIA6KXJSKKNFOCF7G4B%2F20260928%2Fus-east-1%2Fs3%2Faws4_request&X-Amz-Date=20260928T094936Z&X-Amz-Expires=604800&X-Amz-Signature=f584791449bde533f406c11577428293b0168e0dc3c05522708eb7a6428521c9&X-Amz-SignedHeaders=host&x-amz-checksum-mode=ENABLED&x-id=GetObject)
All default workspace roles (Manage, Write, Annotate, and Read) include the Original data view permission. When anonymization is enabled, no data is masked until you assign a custom role that excludes this permission. Organization admins see original data.
Data anonymization vs. SDK anonymizers
Opik has two ways to protect sensitive data. You can use them together.
Use SDK anonymizers for data that must never leave your application, such as passwords or API keys. Use data anonymization when some users must see the original data, for example to debug a customer issue, and other users must not.
What is masked
Your Comet account team configures the masking rules for your deployment: rules for common data types, such as email addresses and phone numbers, and rules for formats that are specific to your organization. For users without the permission, Opik applies the rules to the text it returns, including:
- Trace and span input, output, and metadata, at every level of the JSON.
- Trace and span names, tags, comments, and feedback score reasons.
- Thread messages, dataset items, experiment items, and prompt text.
Some values are never masked:
- IDs, including trace, span, and thread IDs.
- The names of projects, datasets, prompts, and experiments.
- The model and provider of a span.
- The keys of JSON objects. Only values are masked, so do not put sensitive data in key names, for example
{"jane.doe@example.com": "..."}. - Numbers and true/false values. Only text is masked, so log sensitive values such as phone numbers as text, not as numbers.
- Attachments, such as images and files. Do not put sensitive data in attachments if users without the permission can access the workspace.
Set up data anonymization
Ask your Comet account team to enable data anonymization for your organization.
Give the users who should see masked data a custom role that excludes Original data view.
1. Create a custom role
- Click your avatar in the top-right corner and select Admin Dashboard.
- Under Organization, select Roles & permissions, then click Create custom role.
- Enter a Role name, for example
redacted-viewer, and an optional description. - Under Base role, select Read or Annotate.
- Under Customize permissions, expand Opik Traces.
- Clear the Original data view checkbox. The permissions table lists this permission as View unanonymized data. The label changes to Original data view (excluded), and Original data view appears next to Excluded: below the list.
- Click Create role.
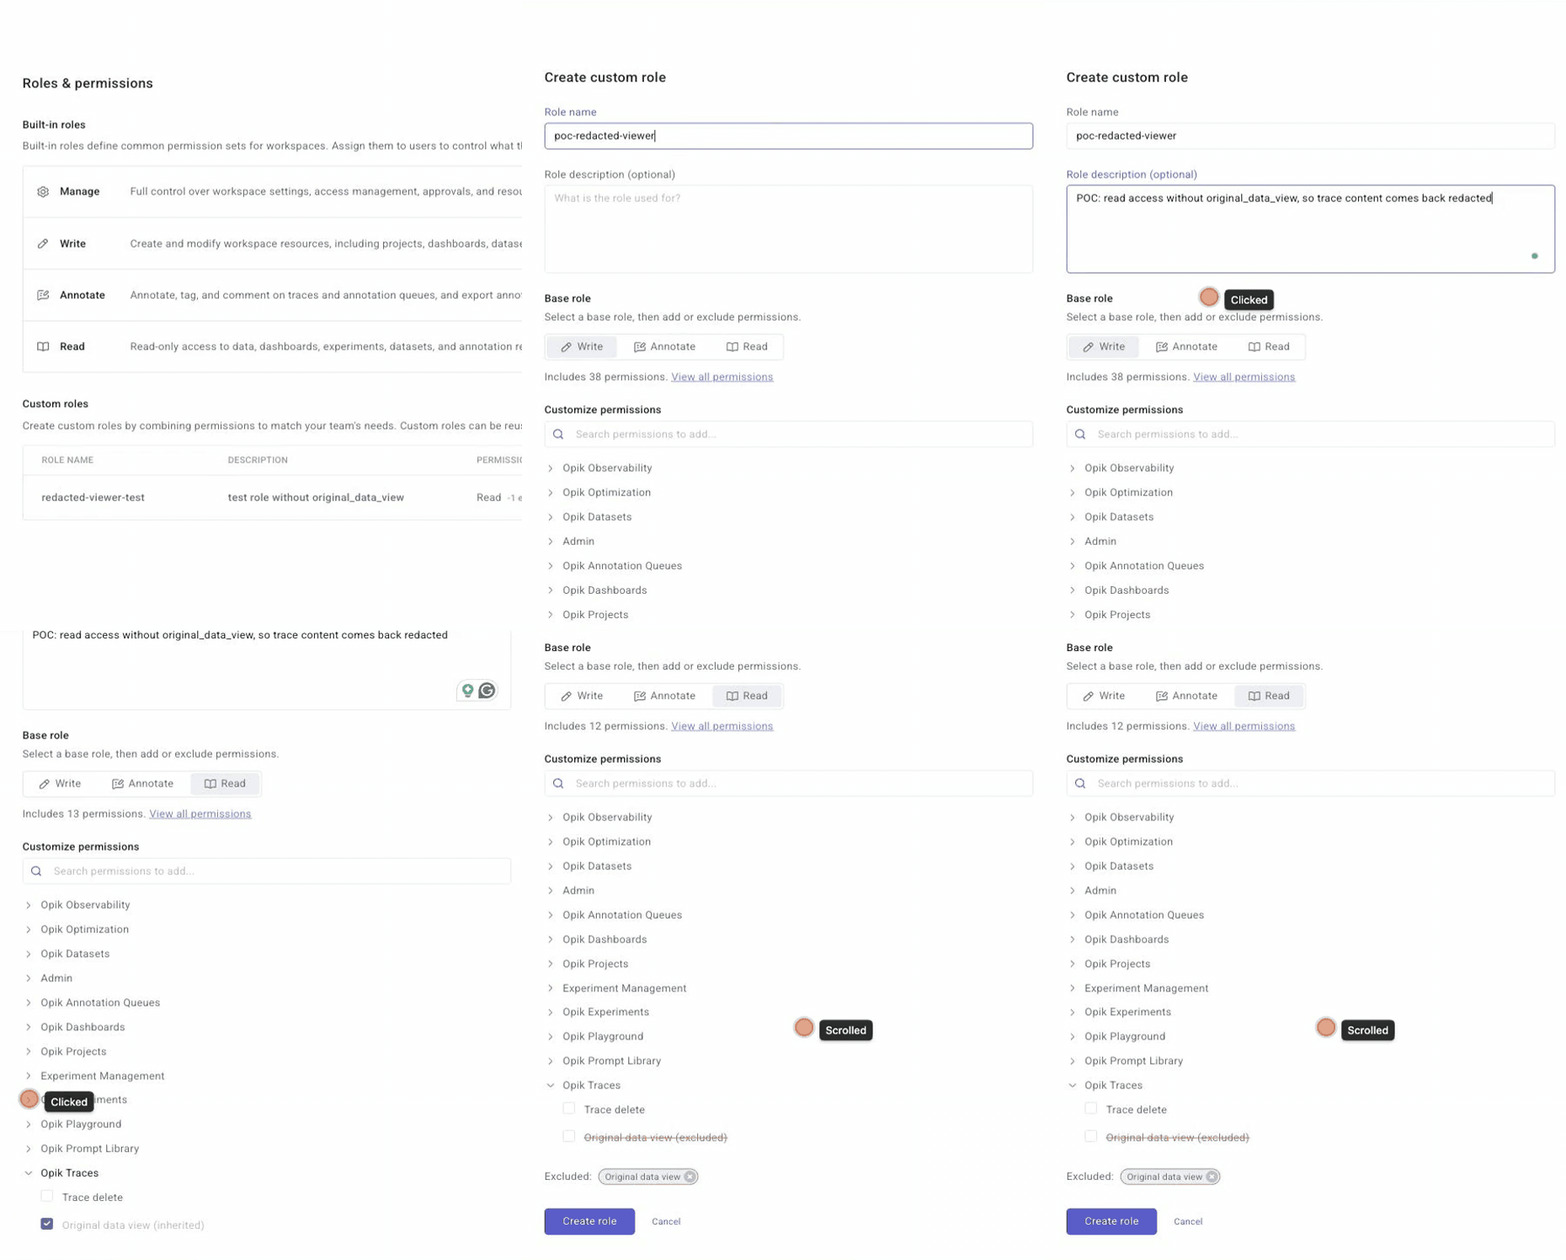
Do not base the role on Write. A user without the permission sees masked values, so if this user edits and saves a prompt, dataset item, or experiment, the masked text replaces the original text.
2. Assign the role to users
You can assign the role from the Admin Dashboard or from the workspace:
- Admin Dashboard: go to Workspaces, click the menu (⋮) of the workspace, and select Manage users. In the Workspace role column, select the custom role for each user. The change is saved right away.
- Workspace: users with the Manage role can go to Configuration > Members and change the Workspace role of each user.
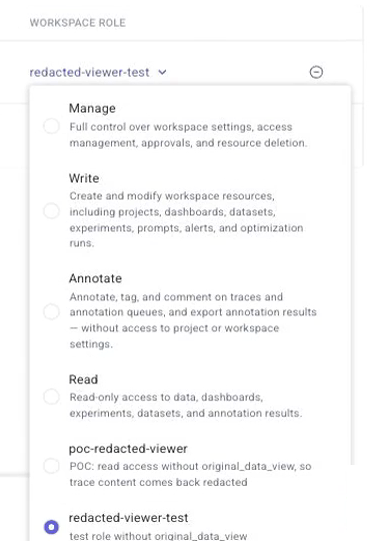
Role changes take effect within a few seconds. The user does not need to log in again.
3. Check the result
Organization admins see original data, so test with a user who is not an organization admin. Ask this user to open a trace that contains data that matches one of your rules, for example an email address. The matched values show as tokens, such as [EMAIL], in the trace input, output, and metadata.
Things to know
- Rules match formats, not meaning. Rules find values by their format, such as the shape of an email address. They do not reliably find names, street addresses, or other free-form personal data.
- Rules apply to all text. A rule can also match values that are not sensitive. For example, a rule for phone numbers can also match order numbers of the same length. When you ask for a custom rule, describe the format of the data as precisely as possible.
Next steps
- Learn how roles and permissions work.
- Manage workspace members and their roles.
- Mask data before it is logged with SDK anonymizers.