

Annotation Queues
Your support leads, lawyers or doctors know when your agent is wrong. An annotation queue gives them a list of traces or threads to label, in a view that shows each item the way they judge it. Their labels land on the traces as feedback scores, ready to align your LLM judges and to build test suites.
Create a queue
Open your project, go to Annotation queues and click Create queue. Give it a name, pick what it holds (traces or threads) and write the instructions annotators read before they start.
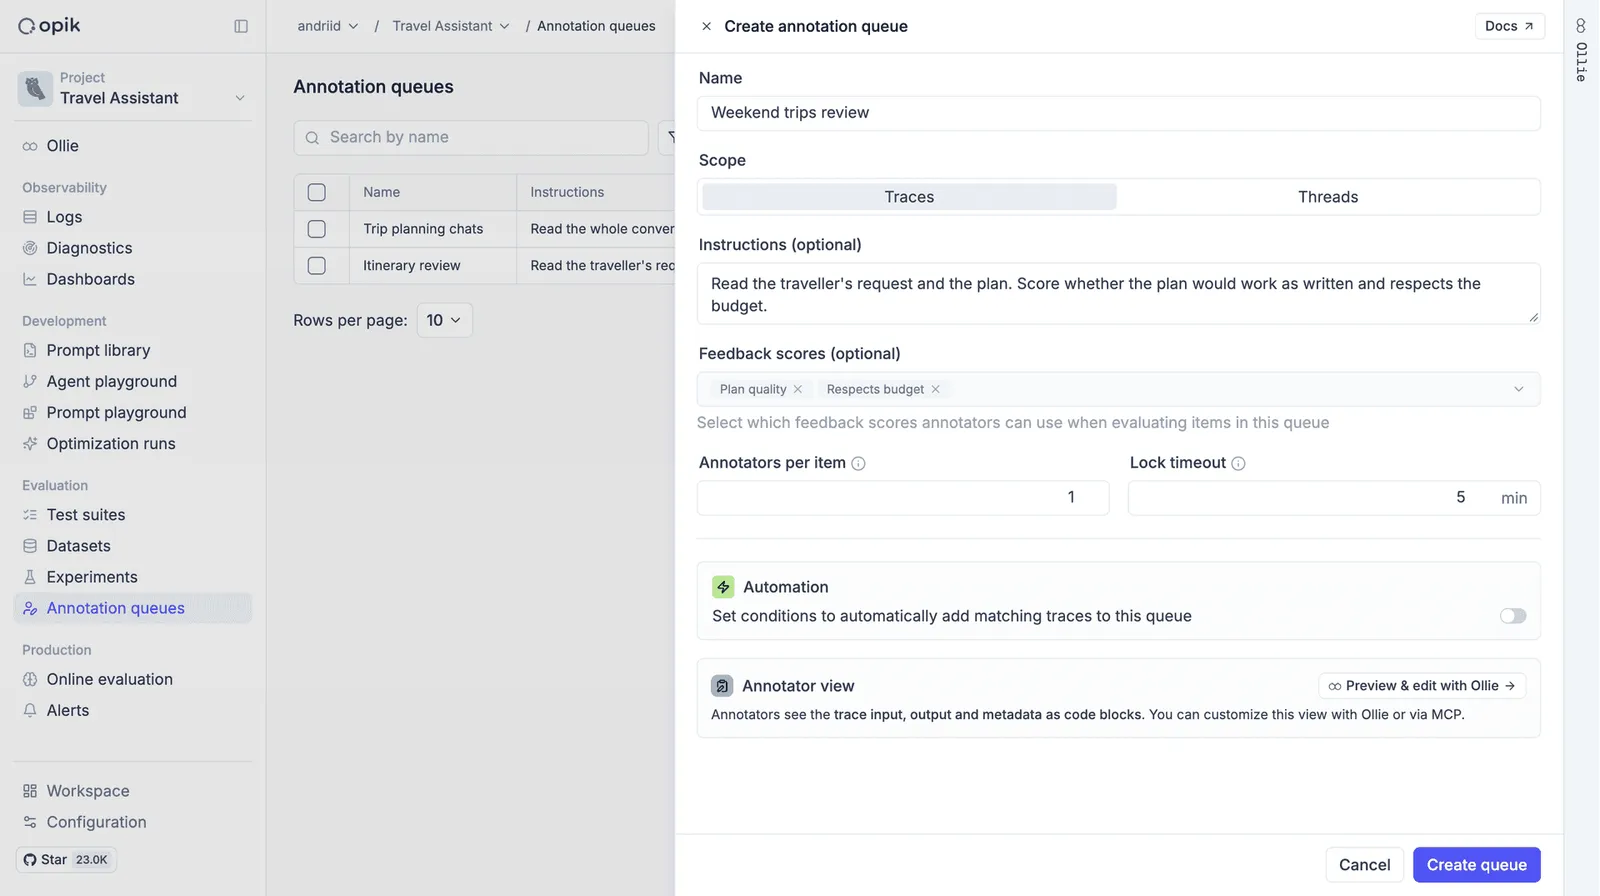
Then set:
- Feedback scores: what annotators fill in for each item. They are workspace-wide feedback definitions, so create them first. Use a category for a decision (Correct, Too generous, Should escalate) and a number for a rating such as reply tone. A few scores with clear descriptions get better labels than a long list.
- Annotators per item: how many people must score an item before it is done. Keep 1 for a fast pass. Use 2 or more when you need agreement between experts, for example to align a judge.
- Lock timeout: how long an annotator’s review slot stays reserved. When it expires, another annotator can take that slot. If the queue requires multiple annotators per item, they can review the same item at once using separate slots. Raise the timeout when items take longer to review.
- Automation: add traces or threads to the queue when their scores match conditions, for example
policy_judge < 0.5. See Add items to the queue.
You can also ask your coding agent to create the queue through the Opik MCP server.
Customize the annotator view
Without a custom view, annotators see a trace’s input, output and metadata as code blocks, or a thread as a chat. That is fine for a quick check, but raw JSON slows reviewers down and hides what matters. A custom annotator view lays out each item around the decision the annotator makes: the email next to the reply, the order next to the policy, the numbers that break a rule.
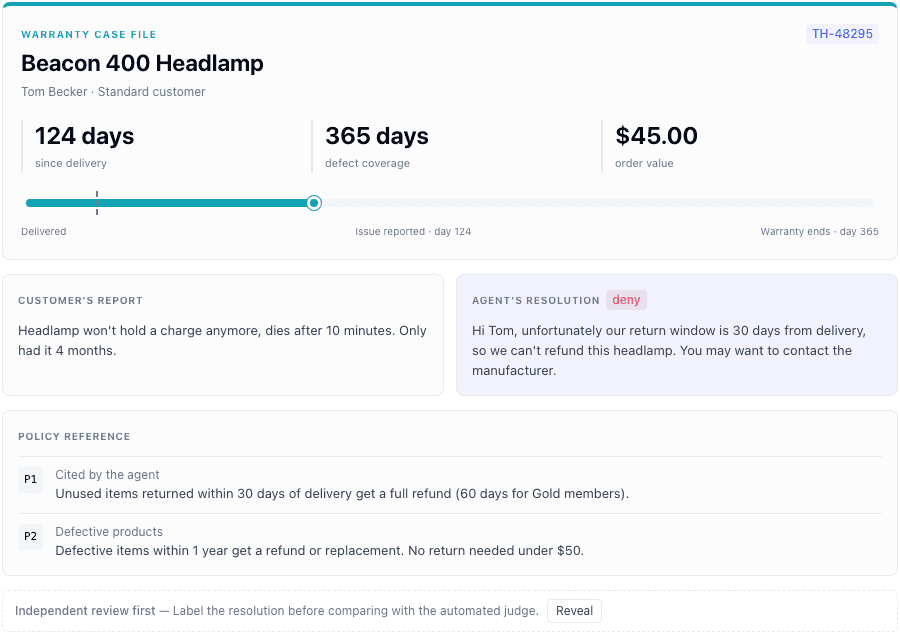
A view is a small HTML page that Opik renders for every item in the queue. Scoring, comments and navigation stay in Opik’s own panel, so a view only changes how the item reads.
With your coding agent
With Ollie
Connect your coding agent to the Opik MCP server (uvx opik mcp configure), then describe what
annotators need to see:
The agent reads real traces from the project to learn their shape, writes the view and saves it on the queue. It answers with a link to the queue and a link to the page your annotators use.
- Trace views can use the trace’s
input,output,metadata,tags,feedback_scores, timing, token usage and cost. Spans are not included. - Thread views get the thread and its traces in order, one per turn.
- Judge scores are in
feedback_scores. Hide them behind a Reveal button so annotators give their own verdict first.
The view runs in a sandbox with no network access or external scripts, images or fonts, and follows Opik’s light and dark themes. If it fails on an item, Opik shows the default view for that item so annotators can keep working.
Add items to the queue
There are two main ways to add traces or threads to an annotation queue: select them from the logs, or set up automation to add them as new feedback scores arrive.
On your project’s Logs page, select the traces or threads you want reviewed and click Add to > Annotation queue. You can also add an individual item while viewing it.
To keep the queue filled as your agent runs, turn on Automation when creating or editing the queue. Set
conditions on feedback scores, such as policy_judge < 0.5, to route low-scoring items to your experts. Opik checks
for matches when new scores arrive, including from online evaluation rules,
and adds items that meet all conditions. Set Cap automatically added items at to limit how much work enters
the queue.
Automation starts with new scores on traces and threads logged by your application. It does not backfill older scores or re-add items that were previously in the queue; add those manually when needed.
You can also add items with the SDK. In the queue’s items table, the Source column shows how each item was added.
Review and score items
Open the queue and click Share to copy the link for your annotators. Annotators must be members of your workspace, so invite them first. Click Annotate to work the queue yourself.
Annotators read the instructions, then go through the items one at a time. For each item they pick the feedback scores, add a reason or a comment, and go to the next one. Items they finish move to Processed, where they can go back and change a score.
Use annotations to improve your agent
Annotator scores are feedback scores on the traces and threads, marked as human. You can filter and sort the logs by them, and chart them on dashboards. Then put them to work:
- Align your LLM judges: compare a judge’s scores to your annotators’ labels and fix the judge where they disagree. See Judge alignment.
- Build test suites: turn the items your annotators flagged into test cases, so the next version of your agent is tested against them. See Building test suites.
Manage queues with the SDK
The Python and TypeScript SDKs create, fill, read and delete queues. Custom annotator views are set through the MCP server or in the UI.
Create a queue
Add traces to a queue
Read queue items
get_items() returns the traces (or threads, for a thread queue) in a queue.
Work with thread queues
Update, list and delete queues
Next steps
- Opik MCP server: connect your coding agent to Opik.
- Judge alignment: use your annotators’ labels to improve your LLM judges.
- Online evaluation rules: score production traces, and feed the low scores into a queue.
- Feedback definitions: set up the scores annotators give.