Change Data Capture: Enabling Event-Driven Architectures
We have changes everywhere. Linkedin, Medium, Github, Substack can be updated everyday.
To be able to have or Digital Twin up to date we need synchronized data.
What is synchronized data?
Synchronized data is data that is consistent and up-to-date across all systems and platforms it resides on or interacts with. It is the result of making sure that any change made in one dataset is immediately reflected in all other datasets that need to share that information.
Change Data Capture(CDC)’s primary purpose is to identify and capture changes made to database data, such as insertions, updates, and deletions.
It then logs these events and sends them to a message queue, like RabbitMQ. This allows other system parts to react to the data changes in real-time by reading from the queue, ensuring that all application parts are up-to-date.
Today, we will learn how to syncronize a data pipeline and a feature pipeline by using CDC pattern.
Note: This Blog Post is the Third Part of a series for the LLM Twin Course. Click here to read the first part!
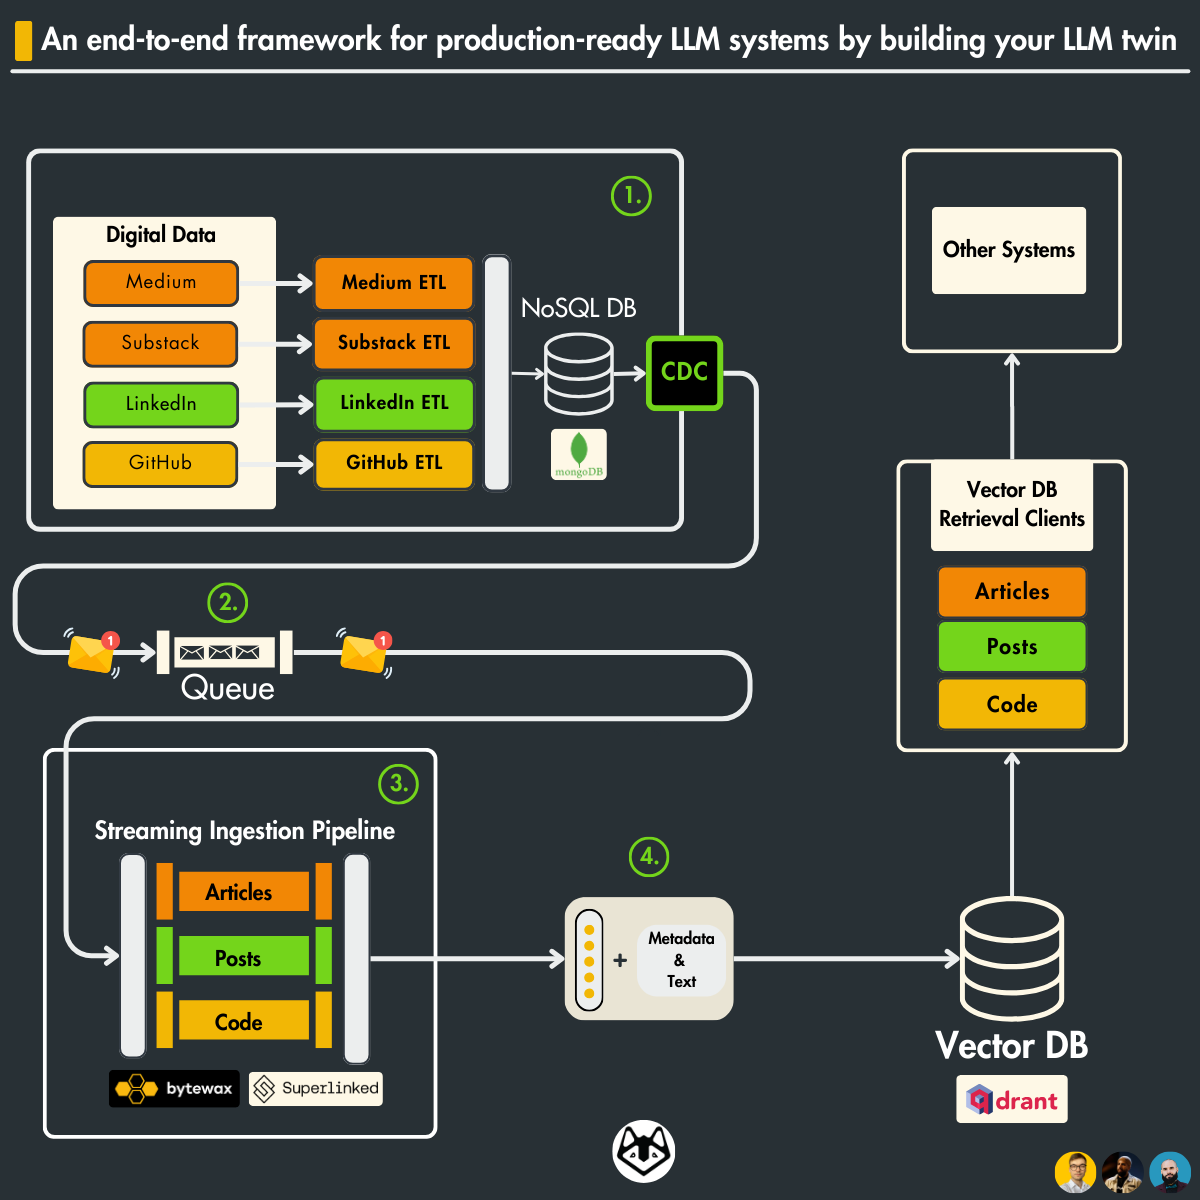
Table of Contents
- CDC pattern — Overview
- CDC pattern —Digital Twin Architecture Use Case
- CDC with MongoDB
- RabbitMQ Message Broker
- Hands-on CDC: Mongo+RabbitMQ
- Test the system -> on local environment
- Test the system -> cloud environment
- Conclusion
🔗 Check out the code on GitHub [1] and support us with a ⭐️
1. CDC pattern-Overview
Change Data Capture, commonly known as CDC, is an efficient way to track changes in a database.
The purpose of CDC is to capture insertions, updates, and deletions applied to a database and to make this change data available in a format easily consumable by downstream applications.
Why do we need CDC pattern?
- Real-time Data Syncing: CDC facilitates near-real-time data integration and syncing.
- Efficient Data Pipelines: It allows incremental data loading, which is more efficient than bulk load operations.
- Minimized System Impact: CDC minimizes the impact on the source system by reducing the need for performance-intensive queries.
- Event-Driven Architectures: It enables event-driven architectures by streaming database events.
What problem does CDC solve?
Change Data Capture (CDC) is particularly adept at solving consistency issues in distributed systems.
Consider a common scenario where an application is required to perform a sequence of actions in response to a trigger — such as a REST call or an event receipt.
These actions usually involve making a change to the database and sending a message through a messaging service like Kafka.
However, there’s an inherent risk: if the application encounters a failure or loses its connection to the messaging service after the database transaction but before the message dispatch, the database will reflect the change, but the corresponding message will never be sent. This discrepancy leads to an inconsistent state within the system.
CDC solve this challenge by decoupling the database update from the messaging.
It works by treating the database as a reliable source of events. Any committed change in the database is automatically captured by the CDC mechanism, which then ensures the corresponding message is sent to the messaging queue.
This separation of concerns provided by CDC means that the database update and the message dispatch are no longer directly dependent on the application’s stability or network reliability.
By employing CDC, we can maintain consistency across distributed components of a system, even in the face of application failures or network issues, thereby solving a critical problem in maintaining the integrity of distributed systems.
Another advantage of using change streams is that they read from this Oplog, not directly from the database.
This method significantly reduces the load on the database, avoiding the common pitfall of throttling database performance with frequent direct queries.
By tapping into the Oplog, CDC can efficiently identify and capture change events (such as insertions, updates, or deletions) without adding undue stress on the database itself. You can learn more about it here [2], [3] and [4]
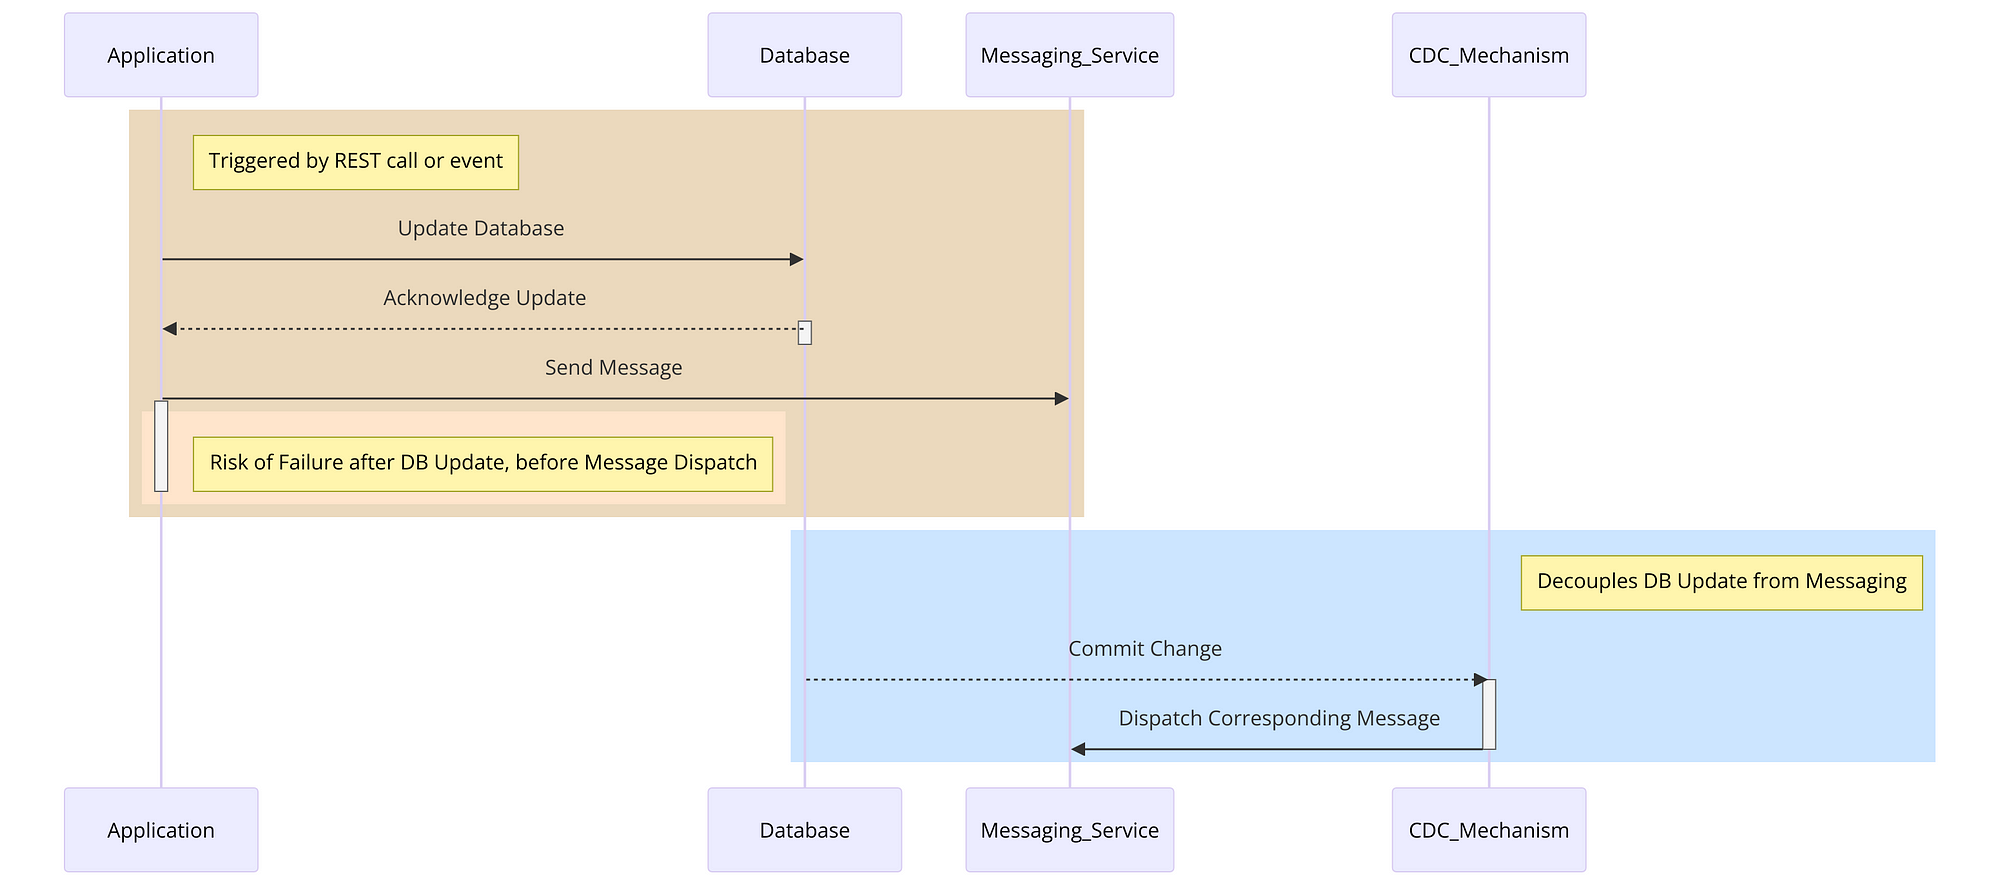
Summary of diagram:
- Application Triggered: The diagram begins with an application that is triggered by a REST call or an event.
- Update Database: The application first updates the database. This is shown as a communication from the ‘Application’ to the ‘Database’.
- Database Acknowledges: The database acknowledges the update back to the application.
- Send Message Attempt: Next, the application tries to send a message through the messaging service (like Kafka). This is where the risk of failure is highlighted — if the application fails after updating the database but before successfully sending the message, it results in inconsistency.
- CDC Mechanism: To resolve this, the CDC mechanism comes into play. It decouples the database update from the messaging.
- Database Commit Triggering CDC: Any committed change in the database is automatically captured by the CDC mechanism.
- CDC Dispatches Message: Finally, the CDC mechanism ensures that the corresponding message is sent to the messaging service. This maintains consistency across the system, even if the application encounters issues after updating the database.
2. CDC pattern — Digital Twin Architecture Use Case
The Digital Twin Architecture is respecting ‘the 3-pipeline architecture’ pattern:
- the feature pipeline
- the training pipeline
- the inference pipeline
But one of the most important component in our architecture is the entrypoint of the system: the data pipeline
To ensure our feature store stays up-to-date with the data pipeline, we need a mechanism that detects changes at the pipeline’s entry point. This way, we can avoid discrepancies like having 100 entries deleted from our RAW Database while the Vector Database lags behind without these updates.
In the Data Collection Pipeline, data from various digital platforms like Medium, Substack, LinkedIn, and GitHub is extracted, transformed, and loaded (ETL) into a NoSQL database. Once this raw data is stored, the CDC pattern comes into play.
The CDC pattern comes into action after data storage, meticulously monitoring and capturing any changes — insertions, updates, or deletions within the NoSQL database.
These changes then trigger events that the CDC system captures and pushes onto a queue, managed by RabbitMQ (message broker).
On the other side of the CDC pattern is the Feature Pipeline, where the data continue to flow.
Here, a streaming ingestion pipeline (Bytewax and Superlinked) takes the queue’s data and processes it in real-time. The processed data includes articles, posts, and code which are then transformed into features — actionable insights or inputs for machine learning models.
The processed data is then loaded into a Vector DB (Qdrant), where it’s organized and indexed for efficient retrieval.
The Vector DB Retrieval Clients serve as the access points for querying and extracting these processed data features, now ready to be used in various applications, including training machine learning models or powering search algorithms.
3. CDC with MongoDB
In the world of data-driven applications, timing is everything.
The swifter a system can respond to data changes, the more agile and user-friendly it becomes. Let’s dive into this concept, especially in the context of MongoDB’s change streams, a feature that fundamentally transforms how applications interact with data.
Immediate Response to Data Changes
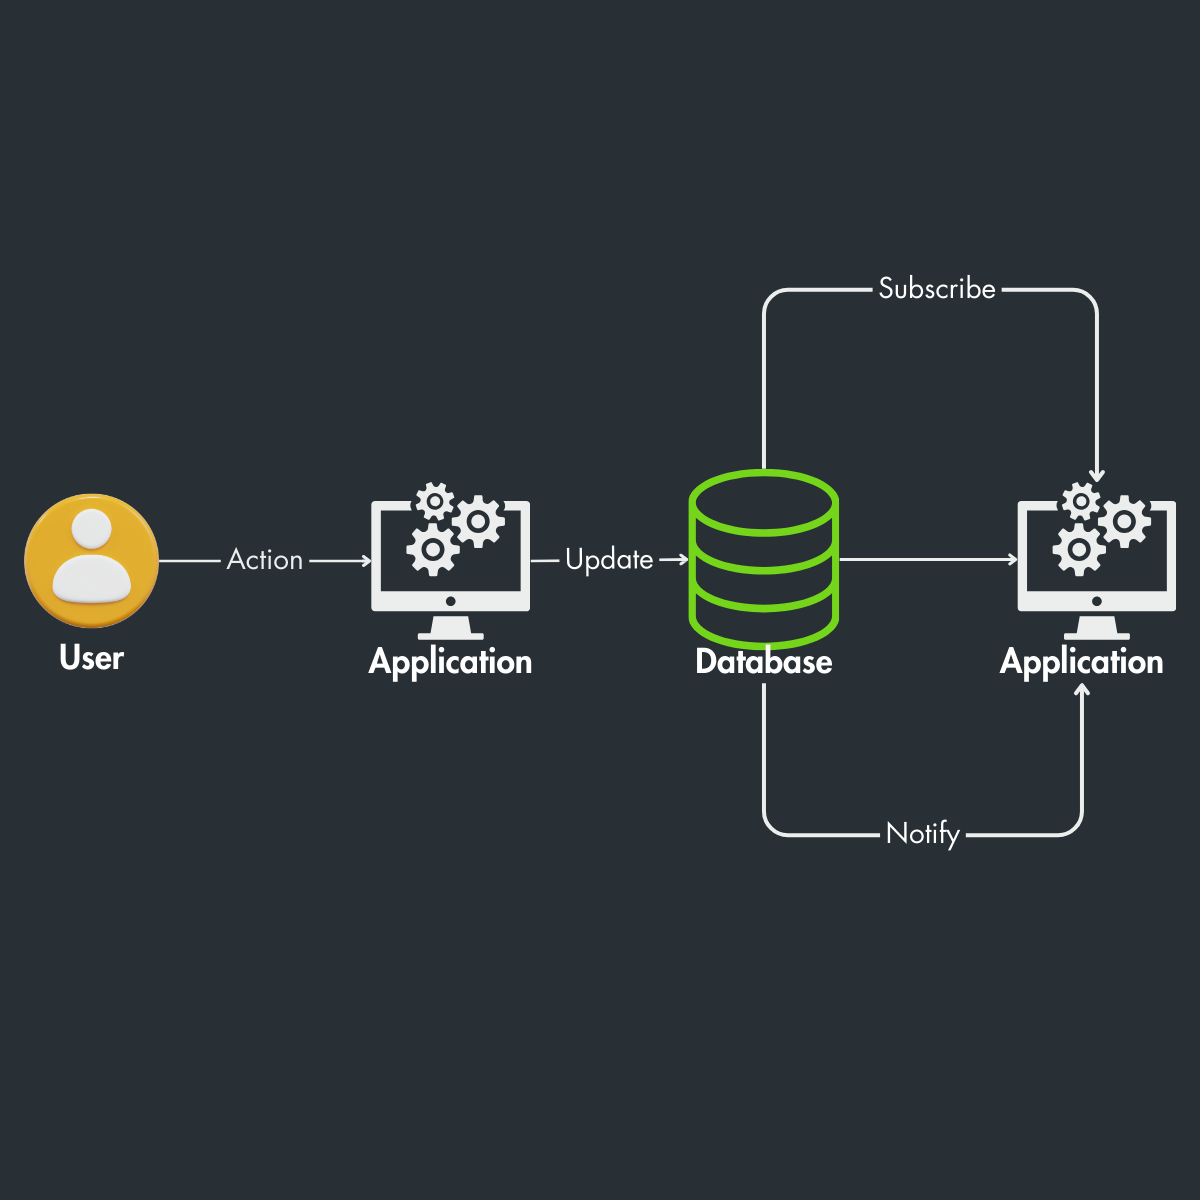
Consider a scenario where LinkedIn posts are regularly updated in our MongoDB database. Each post might undergo changes — perhaps an edit to the content, a new comment, or an update in user engagement metrics.
In a traditional setup, reflecting these updates into our feature store, specifically Qdrant, could involve significant delays and manual intervention.
However, with MongoDB’s change streams, we implement a observer within our database. This feature is detecting changes in real-time. When a LinkedIn post is edited, MongoDB instantly captures this event and relays it to our data pipeline.
Our data pipeline, upon receiving a notification of the change, springs into action. The updated LinkedIn post is then processed — perhaps analyzed for new keywords, sentiments, or user interactions — and updated in Qdrant.
The sweet spot of MongoDB’s change streams is in their ability to streamline this process. They provide a direct line from the occurrence of a change in MongoDB to its reflection in Qdrant, ensuring our feature store is always in sync with the latest data.
This capability is crucial for maintaining an up-to-date and accurate data landscape, which in turn, powers more relevant and dynamic analytics for the LLM twin.
Before change streams, applications that needed to know about the addition of new data in real-time had to continuously poll data or rely on other update mechanisms.
One common, if complex, technique for monitoring changes was tailing MongoDB’s Operation Log (Oplog). The Oplog is part of the replication system of MongoDB and as such already tracks modifications to the database but is not easy to use for business logic.
Change streams are built on top of the Oplog but they provide a native API that improves efficiency and usability.
Note that you cannot open a change stream against a collection in a standalone MongoDB server because the feature relies on the Oplog which is only used on replica sets.
When registering a change stream you need to specify the collection and what types of changes you want to listen to. You can do this by using the $match and a few other aggregation pipeline stages which limit the amount of data you will receive.
4. RabbitMQ Message Broker
RabbitMQ is a reliable and mature messaging and streaming broker, which is easy to deploy on cloud environments, on-premises, and on your local machine. It is currently used by millions worldwide.
Why do we need a message broker?
- Reliability: RabbitMQ guarantees reliable message delivery, ensuring that change events are conveyed to the Feature Pipeline, even in the face of temporary outages.
- Decoupling: This enables loose coupling between services, promoting autonomous operation and mitigating the propagation of failures across the system.
- Load Management: It evenly distributes the data load across multiple consumers, enhancing system efficiency.
- Asynchronous Processing: The system benefits from asynchronous processing, with RabbitMQ queuing change events for processing without delay.
- Scalability: RabbitMQ’s scalability features accommodate growing data volumes by facilitating easy addition of consumers and horizontal scaling.
- Data Integrity: It ensures messages are processed in the order they’re received, which is critical for data integrity.
- Recovery Mechanisms: RabbitMQ offers message acknowledgment and redelivery features, vital for recovery from failures without data loss.
5. Hands-on — CDC: Mongo+RabbitMQ
5.1 Hands-on CDC: Mongo+RabbitMQ
We are building the RabbitMQConnection class, a singleton structure, for establishing and managing connections to the RabbitMQ server. This class is robustly designed to handle connection parameters like username, password, queue name, host, port, and virtual_host, which can be customized or defaulted from settings.
Utilizing the pika Python library, RabbitMQConnection provides methods to connect, check connection status, retrieve channels, and close the connection. This improved approach encapsulates connection management within a singleton instance, ensuring efficient handling of RabbitMQ connections throughout the system lifecycle, from initialization to closure.
class RabbitMQConnection:
    """Singleton class to manage RabbitMQ connection."""

    _instance = None

    def __new__(
        cls, host: str = None, port: int = None, username: str = None, password: str = None, virtual_host: str = "/"
    ):
        if not cls._instance:
            cls._instance = super().__new__(cls)
        return cls._instance

    def __init__(
        self,
        host: str = None,
        port: int = None,
        username: str = None,
        password: str = None,
        virtual_host: str = "/",
        fail_silently: bool = False,
        **kwargs,
    ):
        self.host = host or settings.RABBITMQ_HOST
        self.port = port or settings.RABBITMQ_PORT
        self.username = username or settings.RABBITMQ_DEFAULT_USERNAME
        self.password = password or settings.RABBITMQ_DEFAULT_PASSWORD
        self.virtual_host = virtual_host
        self.fail_silently = fail_silently
        self._connection = None

    def __enter__(self):
        self.connect()
        return self

    def __exit__(self, exc_type, exc_val, exc_tb):
        self.close()

    def connect(self):
        try:
            credentials = pika.PlainCredentials(self.username, self.password)
            self._connection = pika.BlockingConnection(
                pika.ConnectionParameters(
                    host=self.host, port=self.port, virtual_host=self.virtual_host, credentials=credentials
                )
            )
        except pika.exceptions.AMQPConnectionError as e:
            print("Failed to connect to RabbitMQ:", e)
            if not self.fail_silently:
                raise e

    def is_connected(self) -> bool:
        return self._connection is not None and self._connection.is_open

    def get_channel(self):
        if self.is_connected():
            return self._connection.channel()

    def close(self):
        if self.is_connected():
            self._connection.close()
            self._connection = None
            print("Closed RabbitMQ connection")
Publishing to RabbitMQ: The publish_to_rabbitmq function is where the magic happens. It connects to RabbitMQ , ensures that the message delivery is confirmed for reliability, and then publishes the data. The data variable, which is expected to be a JSON string, represents the changes captured by MongoDB’s CDC mechanism.
def publish_to_rabbitmq(queue_name: str, data: str):
    """Publish data to a RabbitMQ queue."""
    try:
        # Create an instance of RabbitMQConnection
        rabbitmq_conn = RabbitMQConnection()

        # Establish connection
        with rabbitmq_conn:
            channel = rabbitmq_conn.get_channel()

            # Ensure the queue exists
            channel.queue_declare(queue=queue_name, durable=True)

            # Delivery confirmation
            channel.confirm_delivery()

            # Send data to the queue
            channel.basic_publish(
                exchange="",
                routing_key=queue_name,
                body=data,
                properties=pika.BasicProperties(
                    delivery_mode=2,  # make message persistent
                ),
            )
            print("Sent data to RabbitMQ:", data)
    except pika.exceptions.UnroutableError:
        print("Message could not be routed")
    except Exception as e:
        print(f"Error publishing to RabbitMQ: {e}")
5.2 CDC Pattern in MongoDB
Setting Up MongoDB Connection: The script begins by establishing a connection to a MongoDB database using MongoDatabaseConnectorclass. This connection targets a specific database named scrabble.
mongo.py

from pymongo import MongoClient
from pymongo.errors import ConnectionFailure

from rag.settings import settings


class MongoDatabaseConnector:

    _instance: MongoClient = None

    def __new__(cls, *args, **kwargs):
        if cls._instance is None:
            try:
                cls._instance = MongoClient(settings.MONGO_DATABASE_HOST)
            except ConnectionFailure as e:
                print(f"Couldn't connect to the database: {str(e)}")
                raise

        print(f"Connection to database with uri: {settings.MONGO_DATABASE_HOST} successful")
        return cls._instance

    def get_database(self):
        return self._instance[settings.MONGO_DATABASE_NAME]

    def close(self):
        if self._instance:
            self._instance.close()
            print("Connected to database has been closed.")


connection = MongoDatabaseConnector()
Monitoring Changes with watch: The core of the CDC pattern in MongoDB is realized through the watch method. Here, the script sets up a change stream to monitor for specific types of changes in the database. In this case, it’s configured to listen for insert operations in any collection within the scrabble database.
changes = db.watch([{'$match': {'operationType': {'$in': ['insert']}}}])
Processing Each Change: As changes occur in the database, the script iterates through each change event. For each event, the script extracts important metadata like the data type (collection name) and the entry ID. It also reformats the document by removing the MongoDB-specific _id and appending the data type and entry ID. This formatting makes the data more usable for downstream processes.
    for change in changes:
        data_type = change['ns']['coll']
        entry_id = change['fullDocument']['_id']
        change['fullDocument'].pop('_id')
        change['fullDocument']['type'] = data_type
        change['fullDocument']['entry_id'] = entry_id
Conversion to JSON and Publishing to RabbitMQ: The transformed document is then converted to a JSON string. This serialized data is ready to be sent to a messaging system, RabbitMQ, in this instance. This is where publish_to_rabbitmq comes into play, sending the JSON data to a specified RabbitMQ queue.
data = json.dumps(change['fullDocument'])
publish_to_rabbitmq(data=data)
5.3 The full system docker-compose
This docker-compose configuration outlines the setup for a system comprising a MongoDB database and a RabbitMQ message broker. The setup is designed to facilitate a development or testing environment using Docker containers. Let’s walk through the key components of this configuration:
This docker-compose configuration outlines the setup for a system comprising a MongoDB database and a RabbitMQ message broker. The setup is designed to facilitate a development or testing environment using Docker containers.
In section 6 we will show you how to start this docker-compose and test the system.
Let’s walk through the key components of this configuration:
MongoDB Service Setup
- Image: Each MongoDB instance uses the
mongo:5image, which is the official MongoDB image at version 5.
2. Container Names: Individually named (mongo1, mongo2, mongo3) for easy identification.
3. Commands: Each instance is started with specific commands:
--replSet "my-replica-set"to set up a replica set named ‘my-replica-set’.--bind_ip_allto bind MongoDB to all IP addresses.--port 3000X(where X is 1, 2, or 3) to define distinct ports for each instance.
Using three replicas in a MongoDB replica set is a common practice primarily for achieving high availability, data redundancy, and fault tolerance. Here’s why having three replicas is beneficial:
- High Availability: In a replica set, one node is the primary node that handles all write operations, while the others are secondary nodes that replicate the data from the primary. If the primary node fails, one of the secondary nodes is automatically elected as the new primary. With three nodes, you ensure that there’s always a secondary node available to take over if the primary fails, minimizing downtime.
- Data Redundancy: Multiple copies of the data are maintained across different nodes. This redundancy safeguards against data loss in case of a hardware failure or corruption on one of the nodes.
4.Volumes: Maps a local directory (e.g., ./data/mongo-1) to the container’s data directory (/data/db). This ensures data persistence across container restarts.
5. Ports: Exposes each MongoDB instance on a unique port on the host machine (30001, 30002, 30003).
6. Healthcheck (only for mongo1): Regularly checks the health of the first MongoDB instance, ensuring the replica set is correctly initiated and operational.
RabbitMQ Service Setup
- Image and Container: Uses RabbitMQ 3 with management plugin based on Alpine Linux. The container is named
scrabble_mq. - Ports: Exposes RabbitMQ on port
5673for message queue communication and15673for management console access. - Volumes: Maps local directories for RabbitMQ data and log storage, ensuring persistence and easy access to logs.
- Restart Policy: Like MongoDB, it’s configured to always restart if it stops.
version: '3.8'

services:
  mongo1:
    image: mongo:5
    container_name: mongo1
    command: ["--replSet", "my-replica-set", "--bind_ip_all", "--port", "30001"]
    volumes:
      - ./data/mongo-1:/data/db
    ports:
      - 30001:30001
    healthcheck:
      test: test $$(echo "rs.initiate({_id:'my-replica-set',members:[{_id:0,host:\"mongo1:30001\"},{_id:1,host:\"mongo2:30002\"},{_id:2,host:\"mongo3:30003\"}]}).ok || rs.status().ok" | mongo --port 30001 --quiet) -eq 1
      interval: 10s
      start_period: 30s

  mongo2:
    image: mongo:5
    container_name: mongo2
    command: ["--replSet", "my-replica-set", "--bind_ip_all", "--port", "30002"]
    volumes:
      - ./data/mongo-2:/data/db
    ports:
      - 30002:30002

  mongo3:
    image: mongo:5
    container_name: mongo3
    command: ["--replSet", "my-replica-set", "--bind_ip_all", "--port", "30003"]
    volumes:
      - ./data/mongo-3:/data/db
    ports:
      - 30003:30003

  mq:
    image: rabbitmq:3-management-alpine
    container_name: scrabble_mq
    ports:
      - "5673:5672"
      - "15673:15672"
    volumes:
      - ~/rabbitmq/data/:/var/lib/rabbitmq/
      - ~/rabbitmq/log/:/var/log/rabbitmq
    restart: always
6. Test the system -> on local environment
In order to test the entire system on your local environment we created a .Makefile where 3 steps are defined:
help:
 @grep -E '^[a-zA-Z0-9 -]+:.*#'  Makefile | sort | while read -r l; do printf "\033[1;32m$$(echo $$l | cut -f 1 -d':')\033[00m:$$(echo $$l | cut -f 2- -d'#')\n"; done

local-start: # Buil and start mongodb and mq.
 docker-compose -f docker-compose.yml up --build -d

local-start-cdc: # Start CDC system
 python cdc.py

local-test-cdc: #Test CDC system by inserting data to mongodb
 python test_cdc.py
1. Build and run docker-compose
- Command:
make local-start - Purpose: This step involves building and starting the MongoDB and RabbitMQ services using Docker Compose.
If everything went well, type docker ps and see if services are up and running:
 docker ps
CONTAINER ID   IMAGE                          COMMAND                  CREATED         STATUS                   PORTS                                                                                                         NAMES
8193d0af74b6   mongo:5                        "docker-entrypoint.s…"   6 minutes ago   Up 6 minutes (healthy)   27017/tcp, 0.0.0.0:30001->30001/tcp                                                                           mongo1
2d82263e5780   mongo:5                        "docker-entrypoint.s…"   6 minutes ago   Up 6 minutes             27017/tcp, 0.0.0.0:30003->30003/tcp                                                                           mongo3
d1cb8d96dba0   rabbitmq:3-management-alpine   "docker-entrypoint.s…"   6 minutes ago   Up 6 minutes             4369/tcp, 5671/tcp, 15671/tcp, 15691-15692/tcp, 25672/tcp, 0.0.0.0:5673->5672/tcp, 0.0.0.0:15673->15672/tcp   scrabble_mq
7a213f0a22a6   mongo:5                        "docker-entrypoint.s…"   6 minutes ago   Up 6 minutes             27017/tcp, 0.0.0.0:30002->30002/tcp                                                                           mongo2
2. Start the CDC ‘watcher’
- Command:
make local-start-cdc - Purpose: This step starts the Change Data Capture (CDC) system, which monitors and captures changes in the MongoDB database.
- Action: Execute
make local-start-cdcin your terminal. It triggers thepython cdc.pyscript, activating the CDC watcher. This watcher will monitor for changes in the database and send them to the message queue.
After you run this command you must see the following logs:
Connection to database with uri: mongodb:/site:30001,localhost:30002,localhost:30003/?replicaSet=my-replica-set successful
Connection to database with uri: mongodb:/site:30001,localhost:30002,localhost:30003/?replicaSet=my-replica-set successful
2024-04-05 04:43:34,661 - INFO - Connected to MongoDB.
3. Insert dummy data into MongoDB
- Command:
make local-test-cdc - Purpose: To test if the CDC system is functioning correctly, you need to insert test data into MongoDB.
- Action: Use
make local-test-cdcto run the commandpython test_cdc.py. This script inserts dummy data into MongoDB, which should trigger the CDC system. Watch for the CDC system to capture these changes and relay them to RabbitMQ, verifying the whole setup is working correctly.
After you run this command, you must observe in the logs that CDC (Change Data Capture) observed that a change was made, and published it to the RabbitMQ .
024-04-05 04:43:51,510 - INFO - Change detected and serialized: {"name": "LLM TWIN", "type": "test", "entry_id": "660f5757b3153bbb219fd901"}
2024-04-05 04:43:51,513 - INFO - Pika version 1.3.2 connecting to ('127.0.0.1', 5673)
2024-04-05 04:43:51,513 - INFO - Socket connected: <socket.socket fd=15, family=2, type=1, proto=6, laddr=('127.0.0.1', 63697), raddr=('127.0.0.1', 5673)>
2024-04-05 04:43:51,514 - INFO - Streaming transport linked up: (<pika.adapters.utils.io_services_utils._AsyncPlaintextTransport object at 0x105c05b80>, _StreamingProtocolShim: <SelectConnection PROTOCOL transport=<pika.adapters.utils.io_services_utils._AsyncPlaintextTransport object at 0x105c05b80> params=<ConnectionParameters host=localhost port=5673 virtual_host=/ ssl=False>>).
2024-04-05 04:43:51,521 - INFO - AMQPConnector - reporting success: <SelectConnection OPEN transport=<pika.adapters.utils.io_services_utils._AsyncPlaintextTransport object at 0x105c05b80> params=<ConnectionParameters host=localhost port=5673 virtual_host=/ ssl=False>>
2024-04-05 04:43:51,521 - INFO - AMQPConnectionWorkflow - reporting success: <SelectConnection OPEN transport=<pika.adapters.utils.io_services_utils._AsyncPlaintextTransport object at 0x105c05b80> params=<ConnectionParameters host=localhost port=5673 virtual_host=/ ssl=False>>
2024-04-05 04:43:51,521 - INFO - Connection workflow succeeded: <SelectConnection OPEN transport=<pika.adapters.utils.io_services_utils._AsyncPlaintextTransport object at 0x105c05b80> params=<ConnectionParameters host=localhost port=5673 virtual_host=/ ssl=False>>
2024-04-05 04:43:51,522 - INFO - Created channel=1
Sent data to RabbitMQ: {"name": "LLM TWIN", "type": "test", "entry_id": "660f5757b3153bbb219fd901"}
2024-04-05 04:43:51,534 - INFO - Closing connection (200): Normal shutdown
2024-04-05 04:43:51,534 - INFO - Closing channel (200): 'Normal shutdown' on <Channel number=1 OPEN conn=<SelectConnection OPEN transport=<pika.adapters.utils.io_services_utils._AsyncPlaintextTransport object at 0x105c05b80> params=<ConnectionParameters host=localhost port=5673 virtual_host=/ ssl=False>>>
2024-04-05 04:43:51,535 - INFO - Received <Channel.CloseOk> on <Channel number=1 CLOSING conn=<SelectConnection OPEN transport=<pika.adapters.utils.io_services_utils._AsyncPlaintextTransport object at 0x105c05b80> params=<ConnectionParameters host=localhost port=5673 virtual_host=/ ssl=False>>>
2024-04-05 04:43:51,535 - INFO - Closing connection (200): 'Normal shutdown'
2024-04-05 04:43:51,536 - INFO - Aborting transport connection: state=1; <socket.socket fd=15, family=2, type=1, proto=6, laddr=('127.0.0.1', 63697), raddr=('127.0.0.1', 5673)>
2024-04-05 04:43:51,536 - INFO - _AsyncTransportBase._initate_abort(): Initiating abrupt asynchronous transport shutdown: state=1; error=None; <socket.socket fd=15, family=2, type=1, proto=6, laddr=('127.0.0.1', 63697), raddr=('127.0.0.1', 5673)>
2024-04-05 04:43:51,536 - INFO - Deactivating transport: state=1; <socket.socket fd=15, family=2, type=1, proto=6, laddr=('127.0.0.1', 63697), raddr=('127.0.0.1', 5673)>
2024-04-05 04:43:51,536 - INFO - AMQP stack terminated, failed to connect, or aborted: opened=True, error-arg=None; pending-error=ConnectionClosedByClient: (200) 'Normal shutdown'
2024-04-05 04:43:51,536 - INFO - Stack terminated due to ConnectionClosedByClient: (200) 'Normal shutdown'
2024-04-05 04:43:51,536 - INFO - Closing transport socket and unlinking: state=3; <socket.socket fd=15, family=2, type=1, proto=6, laddr=('127.0.0.1', 63697), raddr=('127.0.0.1', 5673)>
2024-04-05 04:43:51,536 - INFO - User-initiated close: result=BlockingConnection__OnClosedArgs(connection=<SelectConnection CLOSED transport=None params=<ConnectionParameters host=localhost port=5673 virtual_host=/ ssl=False>>, error=ConnectionClosedByClient: (200) 'Normal shutdown')
Closed RabbitMQ connection
2024-04-05 04:43:51,536 - INFO - Data published to RabbitMQ.
7. Test the system -> cloud environment.
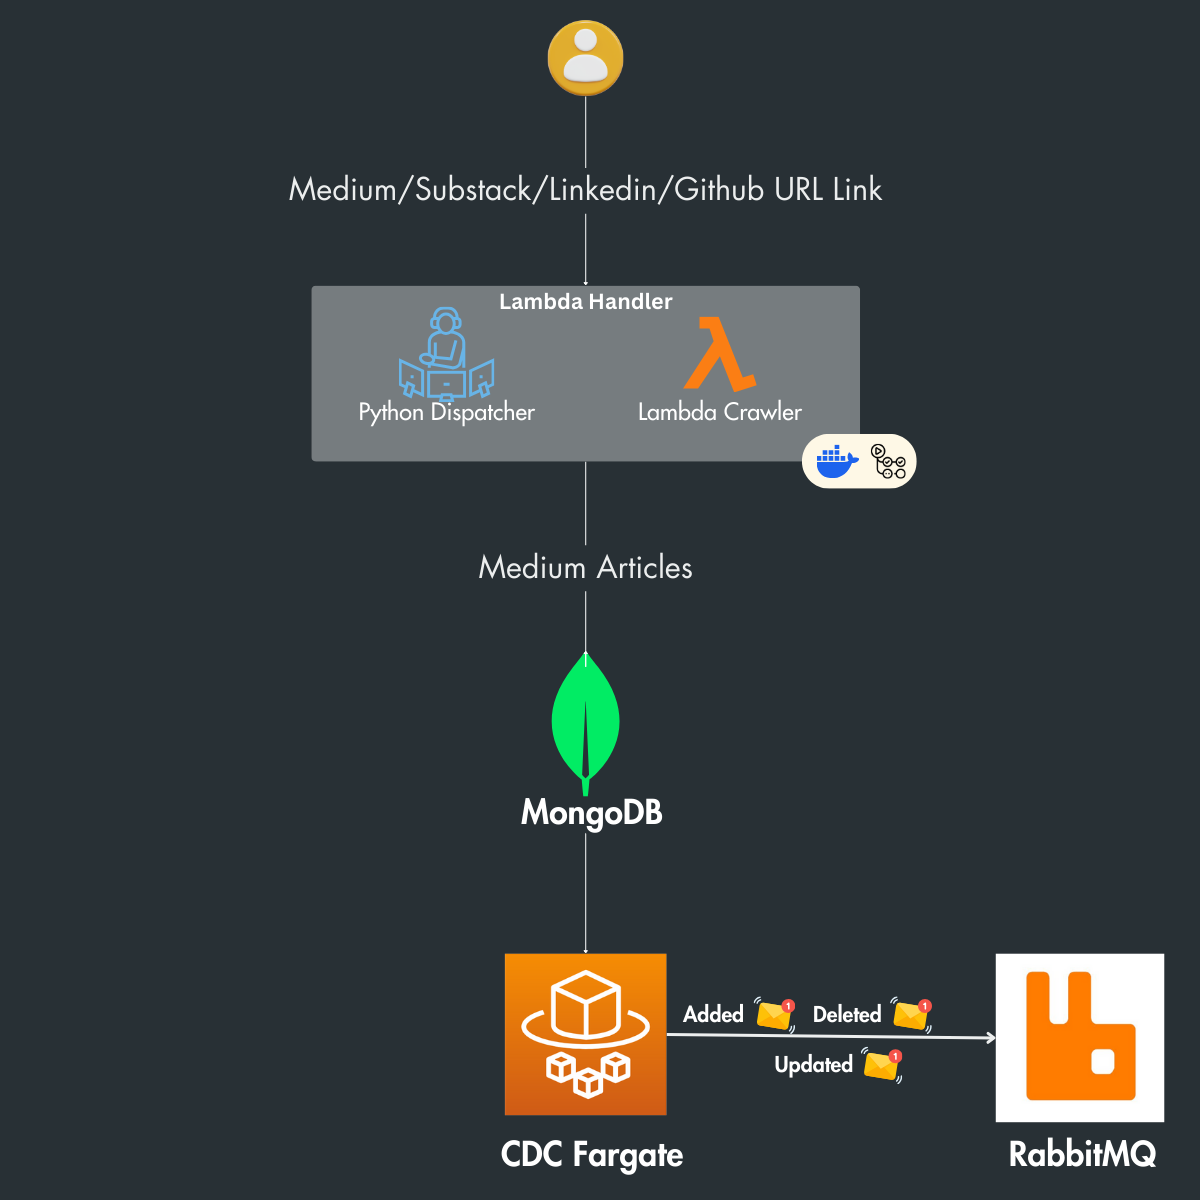
The flow suggests a system where content from various platforms is crawled, processed, and stored in MongoDB. A CDC system running on Fargate captures any changes in the database and publishes messages about these changes to RabbitMQ.
Architecture Overview
- Medium/Substack/Linkedin/Github URL Link: These are the sources of content. The system starts with URLs from these platforms.
- Lambda Handler: This includes a Python Dispatcher and a Lambda Crawler which contains all types of crawlers. The Python Dispatcher is a component that decides which crawler to invoke based on the URL, while the Lambda Crawler is responsible for extracting the content from the provided URLs.
- MongoDB: A NoSQL database used to store the crawled content.
- CDC Fargate: This is a Change Data Capture (CDC) process running on AWS Fargate, which is a serverless compute engine for containers. CDC is used to capture and monitor changes in the database (like new articles added, or existing articles updated or deleted).
- RabbitMQ: This is a message-broker software that receives messages about the changes from the CDC process and likely forwards these messages to other components in the system for further processing or notifying subscribers of the changes.
Cloud Deployment with GitHub Actions and AWS
In this final phase, we’ve established a streamlined deployment process using GitHub Actions. This setup automates the build and deployment of our entire system into AWS.
It’s a hands-off, efficient approach ensuring that every push to our .github folder triggers the necessary actions to maintain your system in the cloud.
In our GitHub repository it will be a .Readme file in which we will explain everything you need to setup your credentials and run everything.
You can delve into the specifics of our infrastructure-as-code (IaC) practices, particularly our use of Pulumi, in the ops folder within our GitHub repository.
This is a real-world example of modern DevOps practices, offering a peek into industry-standard methods for deploying and managing cloud infrastructure.
Conclusion
This is the 3rd article of the LLM Twin: Building Your Production-Ready AI Replica free course.
In this lesson, we presented Change Data Capture (CDC) as a key component for synchronizing data across various platforms, crucial for maintaining real-time data consistency in event-driven systems:
- Integration with MongoDB and RabbitMQ: The lesson demonstrates how CDC, combined with MongoDB for data management and RabbitMQ for message brokering, creates a robust framework for real-time data processing.
- Role of CDC in LLM Twin Architecture: It emphasizes CDC’s importance in the construction of an LLM Twin, ensuring data remains synchronized across the system, from data collection to feature extraction.
- Practical Application and Implementation: Detailed instructions are provided on setting up and testing CDC in both local and cloud environments, offering hands-on experience in implementing these technologies.
In Lesson 4, we will dive deeper into the Streaming ingestion pipeline and explain why it’s a crucial component in any machine learning project, where data is involved.
🔗 Check out the code on GitHub [1] and support us with a ⭐️
Have you enjoyed this article? Then…
↓↓↓
Join other engineers in the 𝗗𝗲𝗰𝗼𝗱𝗶𝗻𝗴 𝗠𝗟 𝗡𝗲𝘄𝘀𝗹𝗲𝘁𝘁𝗲𝗿 for battle-tested content on production-grade ML. 𝗘𝘃𝗲𝗿𝘆 𝘄𝗲𝗲𝗸:
References
[1] Your LLM Twin Course — GitHub Repository (2024), Decoding ML GitHub Organization
[2] Change Streams, MongoDB Documentation
[3]Shantanu Bansal, Demystifying MongoDB Oplog: A Comprehensive Guide with Oplog Entry Examples, 2023, Medium
[4] How Do Change Streams Work in MongoDB?, MongoDB Documentation
Related Articles