
Text classification is an interesting application of natural language processing. It is a supervised learning methodology that predicts if a piece of text belongs to one category or the other. As a machine learning engineer, you start with a labeled data set that has vast amounts of text that have already been categorized. These algorithms can perform sentiment analysis, create spam filters, and other applications.
This tutorial will teach you how to train your binary text classifiers using Keras. You will use the IMDB dataset that has 50K+ movie reviews that are classified as positive or negative. The main goal of this tutorial is to equip you with the skills of using R and R Studio to build the classifier while using Comet ML’s platform to monitor your experiments.
Pre-requisites
To follow along with this tutorial, you need to prepare your development environment as follows:
· Make sure you have R installed from the Official Website
· After installing R, install R Studio, the preferred IDE for creating R projects.
· Visit Comet ML’s platform to sign up for an account
Getting Started
Let’s install some dependencies that you need to build your classifier. You will install all these dependencies by using R Studio. Open R Studio and in the console, type in the following commands to install the dependencies needed.
First, install Comet’s R package which will be used to log metrics to your Comet
install.packages(“cometr”)
Next, you will need to install the Keras package for R by running the following command in the console. Keras provides a simple API to build neural networks and uses Tensorflow as the backend.
install.packages(“keras”)
install_keras()
Now we have our development environment setup. Let’s move on to loading the datasets.
Data Loading
The IMDB dataset is already preloaded with Keras, making it easy to load it. Create a new R Script and call it train.R. This file will hold all your source code for this project. Add the code below to download the IMDB dataset that has 50K+ reviews for movies from the IMDB website.
library(keras)
library(cometr)
imdb <- dataset_imdb(num_words = 10000)
train_data <- imdb$train$x
train_labels <- imdb$train$y
test_data <- imdb$test$x
test_labels <- imdb$test$y
The data is partially preprocessed. This means that the sequence of words representing reviews has already been converted to a sequence of integers. Each integer stands for a unique word in a dictionary.
However, you will still need to convert the sequence of numbers to vectors. In order to do this, you will write a simple function that vectorizes your lists. This function will use the one-hot encoding methodology. The one-hot encoding converts your lists of integers to an N-dimensional vector where N is the count of unique words in the data. The term being represented will have a value of 1 while the rest are represented by 0. You can choose to explore other vectorization functions like TF-IDF that are a bit more memory efficient.
vectorize_seq <- function(sequences, dimension = 10000) {
  results <- matrix(0, nrow = length(sequences), ncol = dimension)
  for (i in 1:length(sequences))
    results[i, sequences[[i]]] <- 1
  results
}
Make sure you convert the training and testing datasets using the function created above.
x_train <- vectorize_seq(train_data)
x_test <- vectorize_seq(test_data)

y_train <- as.numeric(train_labels)
y_test <- as.numeric(test_labels)
Training Neural Network
Let’s use a simple architecture to build the network. A stack of fully connected layers with relu activation functions can solve our binary classifications problem. However, some design decisions need to be made
· How many layers will your network have?
· How many hidden units do you need for each layer?
For this tutorial, let’s keep it simple and have the architecture as shown below.
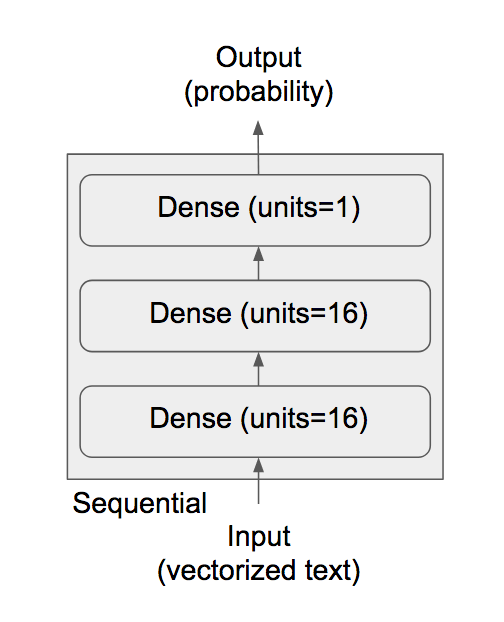
It is also important to note that you will need a sigmoid function that will be used to calculate the output probabilities (0 for negative or 1 for positive). Keras provides a simple API and you can create your model as shown in the code block below.
model <- keras_model_sequential() %>%
  layer_dense(units = 16, activation = "relu", input_shape = c(10000)) %>%
  layer_dense(units = 16, activation = "relu") %>%
  layer_dense(units = 1, activation = "sigmoid")
Loss Function & Optimizers
This section demonstrates how to add loss functions and optimizers to your neural network. Because the output of the network is a probability, you can use a binary cross-entropy loss function. You will use a learning rate of 0.01 for your optimizer. Add the following code block to your R script.
learning_rate <- 0.001
model %>% compile(
  optimizer = optimizer_rmsprop(lr=learning_rate),
  loss = "binary_crossentropy",
  metrics = c("accuracy")
)
Monitoring
Before you start training, you’ll need to integrate Comet ML’s R package by adding the following code block. Make sure you have your API key from your Comet ML’s account then create a ~/.comet.yml. Follow the official documentation for additional help with getting started with R.
COMET_WORKSPACE: my-comet-user-name
COMET_PROJECT_NAME: nlpkeras
COMET_API_KEY: my-comet-api-key
Next, create an experiment as shown below in your R script.
exp <- create_experiment(
  keep_active = TRUE,
  log_output = TRUE,
  log_error = FALSE,
  log_code = TRUE,
  log_system_details = TRUE,
  log_git_info = TRUE
)
Next, you need to specify the number of epochs you want to train the network and log it using Comet ML.
epochs <- 20
exp$log_parameter("epochs", epochs)
exp$log_parameter("learning_rate", learning_rate)
Training
Now, train the model using the training datasets created above. Also, make sure you add the model evaluation using the validation sets created above.
history <- model %>% fit(
  partial_x_train,
  partial_y_train,
  epochs = epochs,
  batch_size = 512,
  validation_data = list(x_val, y_val)
)
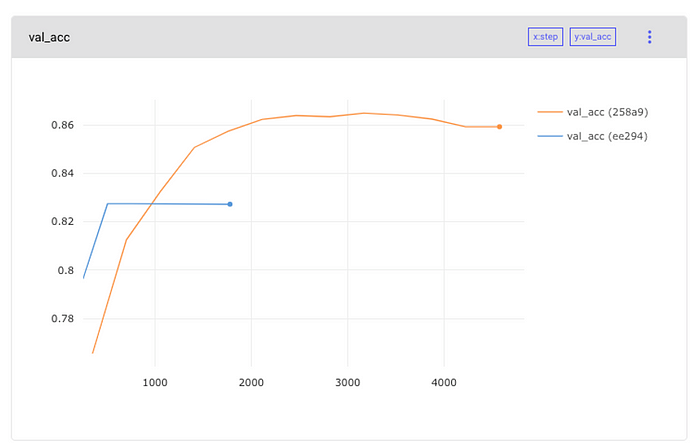
The fit method returns a history object that has a plot function that you can use to visualize the training and validation metrics by epoch.
plot(history)
Make sure you log the training loss and accuracy metrics to Comet ML.
results <- model %>% evaluate(x_test, y_test)
exp$log_metric("val_loss", results$loss)
exp$log_metric("val_acc", results$acc)
Here’s an example of visualization from Comet ML’s platform showcasing the model’s accuracy.
Conclusion
In this article we used Keras with R to build a neural network that can classify text into two categories. In addition, we logged some metrics like loss, accuracy, and epochs to Comet ML’s platform. This tutorial was just a simple introduction to how to use R to build NLP models while monitoring your experiments using Comet ML. Kindly visit Comet ML’s Official Documentationto gain more insights on how to monitor your R projects.
