
Introduction
Sentiment analysis is a natural language processing technique which identifies and extracts subjective information from source materials using computational linguistics and text analysis. It is employed to ascertain a speaker’s or writer’s feelings, attitudes, and opinions with regard to a particular subject or general contextual polarity of a work. Applications for sentiment analysis include market research, customer service, and social media monitoring. Among other things, companies use it to get insight from their customers on social media and know what is being said about their products.
Spark NLP is a natural language processing library built on Apache Spark. It is used to carry out precise annotation for machine learning pipelines that can scale quickly in a distributed environment.
We will build a pipeline for performing sentiment analysis on text data using the Spark NLP library and use Comet to monitor the metrics of our model. Comet is an online platform that allows you to track and monitor logs experiments and we are using Comet in this tutorial to track the metrics of our model.
But first, let’s understand how sentiment analysis works.
Sentiment Analysis
One common approach to sentiment analysis is using supervised machine learning techniques to classify text into various sentiment categories, such as positive, negative, or neutral. This is often done by training a classifier on a labeled dataset of text, where each piece of text has been manually annotated with a sentiment label. Once the classifier is trained, it can be used to classify new text into the appropriate sentiment category.
Another approach is to use lexicon-based methods, which involve looking up words or phrases in a pre-defined lexicon to determine the sentiment. This can be done by using a lexicon of positive and negative words and counting the number of positive and negative words in the text. The sentiment of the text is then determined based on the ratio of positive to negative words.
How does the team at Uber manage to keep their data organized and their team united? Comet’s experiment tracking. Learn more from Uber’s Olcay Cirit.
pip install spark-nlp==4.2.6
pip install comet_ml
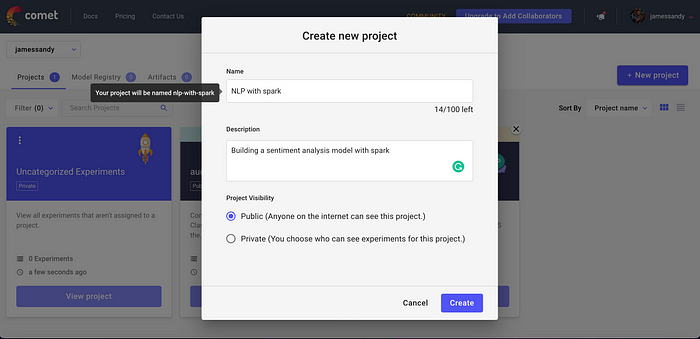
If you don’t already have a Comet account, you can create one here. Once your account is set up, you can manually create a project from the UI, or, as you’ll see in this tutorial, we can create our project with a simple experiment parameter.
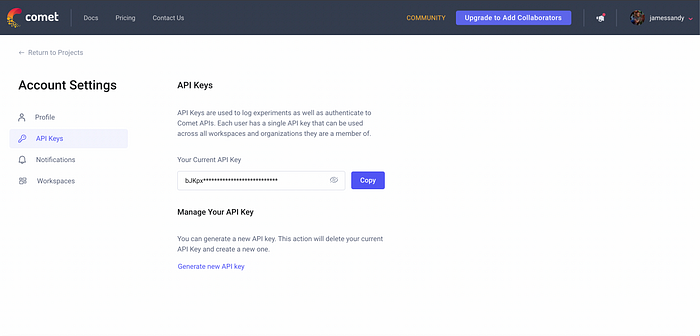
After creating an account, navigate to the top right of the Comet website and click on your avatar. Then select Account Settings and finally pick the API keys tab and generate an API key.
Now let’s import our libraries:
# Import Spark NLP
import sparknlp
from sparknlp.base import *
from sparknlp.annotator import *
from sparknlp.pretrained import PretrainedPipeline


from pyspark.ml import Pipeline
from pyspark.sql import SparkSession
import pyspark.sql.functions as F

spark = sparknlp.start()

# Import comet
import comet_ml
from sparknlp.logging.comet import CometLogger
Note that Comet integrates with Spark automatically. Next, we instantiate our experiment object:
experiment = comet_ml.Experiment("YOUR-API-KEY")
Now we’ll give our project a name using the project_name parameter:
comet_ml.login(project_name='test-sparknlp ')
Next, we start Spark, set the logger, and set an output log path:
spark = sparknlp.start()
logger = CometLogger()
OUTPUT_LOG_PATH = "./run"
Building the pipeline
We have five stages in our pipeline:
- The first stage is the
DocumentAssembler, which creates a column from the text that is imputed. This allows us to easily use the text when we want to train the model.
# Create a document assembler
document = DocumentAssembler() \
    .setInputCol("text") \
    .setOutputCol("document")
2. The second stage is the Tokenizer, which tokenizes the text from the document column into separate words in the output as token. We don’t know what the input text will look like, so we’ll have to format it to fit our guidelines by slicing sentences into words that our model can easily digest.
# Create a tokenizer
token = Tokenizer() \
    .setInputCols(["document"]) \
    .setOutputCol("token")
3. The third step is the Normalizer, which removes the punctuation from the token column, makes the text lowercase, and then saves the output column as normal.
# Create a normalizer
normalizer = Normalizer() \
    .setInputCols(["token"]) \
    .setOutputCol("normal")
4. The fourth step is instantiating the ViveknSentimentModel. Here we’re using a pre-trained model to classify the sentiment of the text as positive, negative, or neutral by taking the document and normal columns as input and setting its output column to result_sentiment. Now we’re ready to actually train the model on our dataset.
# Load a pretrained sentiment analysis model
vivekn = ViveknSentimentModel.pretrained() \
    .setInputCols(["document", "normal"]) \
    .setOutputCol("result_sentiment")
5. The fifth stage takes the output of the previous stage, result_sentimentand sets the final output column as final_sentiment. The aim is just to generate a final sentiment output for the user and save it as finisher.
# Create a finisher
finisher = Finisher() \
    .setInputCols(["result_sentiment"]) \
    .setOutputCols("final_sentiment")

logger.monitor(logdir=OUTPUT_LOG_PATH, model=vivekn)

# Create a pipeline with all the stages
pipeline = Pipeline().setStages([document, token, normalizer, vivekn, finisher])
After creating the pipeline, let’s fit in a small dataset of two sentences and get the sentiment of each of them displayed.
# Create the data as a Spark dataframe
data = spark.createDataFrame([
["I recommend this movie"],
["Dont waste your time!!!"]
]).toDF("text")
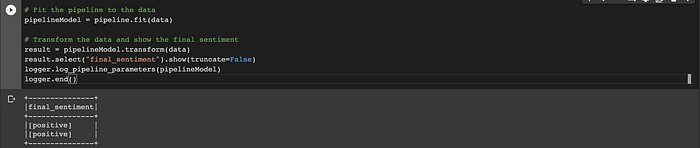
# Fit the pipeline to the data
pipelineModel = pipeline.fit(data)
# Transform the data and show the final sentiment
result = pipelineModel.transform(data)
result.select("final_sentiment").show(truncate=False)
logger.log_pipeline_parameters(pipelineModel)
logger.end()
Now you can see the sentiment of the text that you passed it. You can display the evaluation metrics directly in your interactive notebook using the code below, or head over to the Comet UI to check out the results more in-depth.
Conclusion
This is how to build a sentiment analysis pipeline with SparkNLP, while also using Comet to track your project metrics. You can check out the code on this Colab notebook to easily get started. There are many other cool ways to use Comet and you can check them out and try more examples from their documentation.
