If you are a natural language processing researcher or have an interest in this field, you have surely come across SpaCy or you are very close to it!
SpaCy, a free, open source natural language processing library developed in Python, is very popular for use in real products. This advanced library, which is frequently used in applications that process and understand large volumes of text, is now integrated with Comet ML, a very useful experiment monitoring tool!
Now let’s train a multi-label text classifier using SpaCy-v3 on the Huggingface — dair-ai/emotion dataset and track the model trainings and record the results with Comet ML!
Emotion Recognition Dataset Overview
The dataset to be used in the application described in the blog post was created for an emotion classification task. For detailed information on the dataset of Twitter messages written in English, which includes six basic emotions: anger, fear, joy, love, sadness and surprise, please review this article.
🔹Please click to access the Emotion dataset via Hugging Face Datasets!
🔹Please click to download the Emotion dataset directly!
🔹Please click to access Papers with Code Public Leaderboard!
🔸Data fields are:
text: a string feature.label: a classification label, with possible values including sadness (0), joy (1), love (2), anger (3), fear (4), surprise (5)
🔸An example within the dataset looks like this:
{
  "text": "im feeling quite sad and sorry for myself but ill snap out of it soon",
  "label": 0
}
🔸A total of 20,000 samples in the dataset are divided into training, validation, and test sets:
- training set: 16,000
- validation set: 2,000
- test set: 2,000
Step 1 : Setup
The first step is to install the necessary libraries, including SpaCy, which we will use for basic language processing tasks, Comet ML, which we will use to log the model trainings and results, and HuggingFace’s datasets library for accessing the dataset.
!pip install "spacy >= 3.0.6"
!pip install "comet_ml>=3.31.19"
!pip install datasets
Step 2: Comet Environment Variables
To configure Comet, you can set your credentials via environment variables as follows:
%env COMET_API_KEY=<Your Comet API Key>
%env COMET_PROJECT_NAME=<Your Comet Project Name>
Step 3: Loading Dataset Using Huggingface Datasets
“Datasets” is a library that allows loading datasets that can be used for audio processing, image processing, natural language processing tasks, and more, with a single line of code.
Let’s load the ‘Emotions’ dataset using this library and create a smaller subset of the dataset’s training, validation and test sets as follows.
small_train_dataset = ds["train"].shuffle(seed=34).take(5000)
small_val_dataset = ds["validation"].shuffle(seed=34).take(1000)
small_test_dataset = ds["test"].shuffle(seed=34).take(1000)
Let’s assign all the labels in the dataset as an array to a variable called “categories.”
categories = small_train_dataset.features["label"].names
Let’s define our labels in dictionary format as “tag name” and “tag id” to be used when defining in SpaCy data format.
labels_ = {}
for index, key in enumerate(categories):
  labels_[key] = index
Step 4: Convert to spaCy Data Format and Save to Disk
We need to convert the text and tags to clean SpaCy Doc Objects.
def convert_spacy_dataset(dataset, target_file: str, labels):
    nlp = spacy.blank("en")
    db = DocBin()

    for item in tqdm(dataset):
        doc = nlp.make_doc(item["text"])
        doc.cats = {label: 0 for label in labels}
        doc.cats[labels[item["label"]]] = 1

        db.add(doc)

    db.to_disk(target_file)
    return db
Let’s convert the train, validation, and test datasets to the SpaCy Doc object type and save it to disk with the name we gave it.
convert_spacy_dataset(small_test_dataset, "test_data.spacy", categories)
convert_spacy_dataset(small_val_dataset, "validation_data.spacy", categories)
convert_spacy_dataset(small_train_dataset, "train_data.spacy", categories)
Sometimes simple solutions offer the best results. We made minor hardware optimizations for a huge increase in throughput. Check out the project here.
Step 5: Create the Configuration File
The training in SpaCy v3 needs a config file to set up your model and all the hyperparameters. Let’s use SpaCy’s built-in tools to create a configuration. You can create a configuration with the following command:
python -m spacy init config --lang en --pipeline textcat_multilabel comet_config.cfg
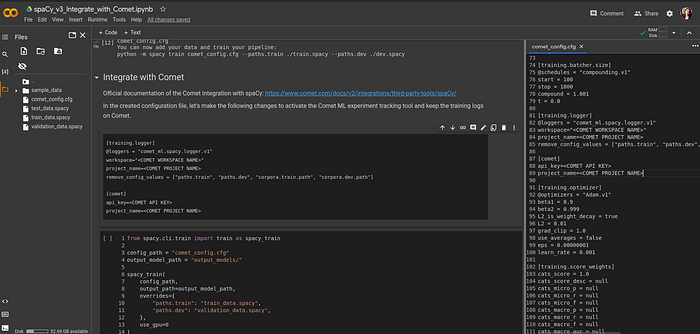
Step 6: Integration with Comet
Let’s make the following changes in the created configuration file to activate the Comet ML experiment tracking tool and keep the training logs in Comet ML.
For detailed information on the integration of SpaCy with Comet ML, you can review the official documentation.
[training.logger]
@loggers = "comet_ml.spacy.logger.v1"
workspace="<COMET WORKSPACE NAME>"
project_name=<COMET PROJECT NAME>
remove_config_values = ["paths.train", "paths.dev", "corpora.train.path", "corpora.dev.path"]
[comet]
api_key=<COMET API KEY> project_name=<COMET PROJECT NAME>
Step 7: Model Training and Evaluation
If you have completed the previous 6 steps, you are now ready to train a model!
By giving the config file and training dataset we prepared to the “spacy_train” function, we can start the training as follows:
from spacy.cli.train import train as spacy_train

config_path = "comet_config.cfg"
output_model_path = "output_models/"

spacy_train(
    config_path,
    output_path=output_model_path,
    overrides={
        "paths.train": "train_data.spacy",
        "paths.dev": "validation_data.spacy",
    },
    use_gpu=0
)
During the training period, you can see the training logs instantly under the workspace project on Comet.
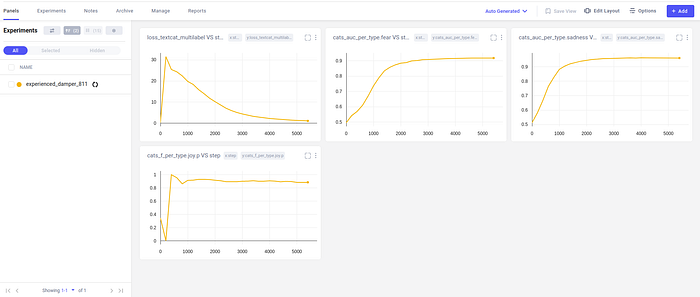
You can also see the training outputs in the notebook.

When the experiment is complete, two models are created in the output_models folder:
🔸model-best: model with highest score during training iteration
🔸model-last: model trained in last training iteration
Evaluation of the model performance with the test dataset that did not participate in the training can be done as follows:
python -m spacy evaluate output_models/model-best/ test_data.spacy
Performance results in the test set of the model:
================================== Results ==================================

TOK                   100.00
TEXTCAT (macro AUC)   94.46
SPEED                 281793

=========================== Textcat F (per label) ===========================

               P       R       F
sadness    91.42   75.80   82.88
joy        90.88   83.53   87.05
love       76.00   44.71   56.30
anger      93.83   58.91   72.38
fear       94.94   61.48   74.63
surprise   80.00   21.62   34.04

======================== Textcat ROC AUC (per label) ========================

           ROC AUC
sadness       0.96
joy           0.96
love          0.94
anger         0.96
fear          0.94
surprise      0.91
Step 8: Using the Trained Model
We can quickly use our trained classifier model to get predictions about the sentiment of different texts.
Let’s load our best trained SpaCy model from disk and then easily get the sensitivity analysis model result for all sample sentences with the SpaCy Pipeline. Finally, let’s filter the scores above the 0.5 threshold value among the multiple classes of the model and print the results.
#We load our spaCy model from disk
trained_nlp = spacy.load("output_models/model-best/")

texts = ['im feeling pretty anxious',
        'i don t feel particularly agitated',
        'i find myself in the odd position of feeling supportive of',
        'i feel so cold a href http irish',
        'im feeling very peaceful about our wedding again now after having'
        ]

category_scores = [doc.cats for doc in trained_nlp.pipe(texts)]

thresh = 0.5
for d in category_scores:
  print(dict((k, v) for k, v in d.items() if v >= thresh))
{'fear': 0.6161302924156189}
{'anger': 0.7113955020904541}
{'love': 0.5419280529022217}
{'anger': 0.8137673139572144}
{'joy': 0.6693308353424072}
To access all the code in this emotion classification application example, please review the Colab Notebook!
Today, data science researchers use many machine learning frameworks and third-party tools in their work. Comet integrates with the most commonly used platforms and tools, and its modular and customizable design allows researchers to maintain flexibility to allow their machine learning platform to adapt to future changes and needs.
Please visit the official Comet documentation page to review other platforms and tools that Comet integrates with!
Visit here for my blog post about the Pythae and Comet integration with the “Reconstructing MNIST images” dataset!
