Transfer learning involves using a pre-trained model to solve a deep-learning problem. If your problem is not necessarily unique, it is better to create a model that has already been trained on a given task.
Comet extensively integrates with multiple libraries, including the most common ones for deep learning, such as TensorFlow, Keras, and Pytorch.
These integrations are well-supported and allow extensive types of workflows, including those that require transfer learning. This article will dive deep into how you can make great observations and visualizations with Comet. I will also indicate how easy it is to integrate Comet with previous projects, as it takes a few lines of code here and there to get things running.
Now, for this task, you will need a few things:
- A Comet account. Sign up here.
- A Python 3.9+ install.
- The following libraries: Comet, ScikitLearn, Pandas, and Keras.
- A fierce learning spirit.
Let’s dive into the tiny project now.
Project Overview
In our tiny project, I will use one of my favorite datasets. The beauty of this dataset is that it has just the right amount of difficulty to ensure that you learn numerous concepts in a deep learning problem. We are going to be using data from Kaggle’s famous Cats-and-Dogs problem.
The objective here is not to gain perfection or even high accuracy, as this is purely a learning exercise; hence, there are a few tradeoffs that I will highlight here.
We are going to build a simple, bare-bones model and train it only on a very small sample of the data we downloaded. The data will only be trained for a few epochs. From this, we can ascertain that there will be poor accuracy. It could be better with proper interventions, though.
Since that is established, let’s code.
Dataset Preparation
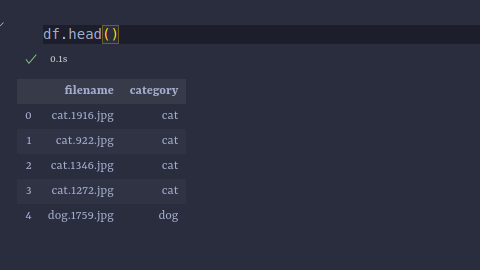
We first store the information in the dataset in a Pandas DataFrame. The DataFrame will contain two columns: one for the file names and the other for each image’s class.
import pandas as pd
import os

train_dir = r"./src/train_data"

#path to training data
filenames = os.listdir(train_dir)

#separating cats from dogs
categories = []
for f_name in filenames:
    category = f_name.split('.')[0]
    if category == 'cat':
        categories.append(0)
    else:
        categories.append(1)

df = pd.DataFrame({
        'filename': filenames,
        'category': categories,
})

#replacing booleans with names
df["category"] = df["category"].replace({0:'cat', 1:'dog'})

#storing info in csv files
df.to_csv("new_training_info.csv", index=False)
After doing this, the table will look as follows:
Parameter Definition
We need to define a few parameters. One set will go into the model, while the other will be fed into the DataLoaders.
The parameters belonging to the model will be logged into Comet, allowing the training process to be monitored and properly visualized.
Our parameters will appear as below:
img_height = 224
img_width = 224
img_channels = 3
img_size = (img_height, img_width)
train_dir = r"./src/train_data"
batch_size = 32
The image fed into the model we will use will be 224 x 224 x 3 pixels, so all the images must be transformed into these sizes. The model will take batches of 32 images for training from the “train_data” directory.
Initializing Comet and Data Generators
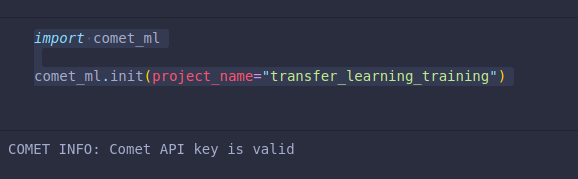
Import the Comet library and initialize it by giving the project a name. This project will appear on your Comet home page. Most importantly, you will be requested to add an API key, which you can easily find on your account’s “Settings” page.
import comet_ml

comet_ml.login(project_name="transfer_learning_training")
After pasting your API key, you will get the image below.
The next step is to allow Comet to monitor our parameters. These parameters will be logged.
from comet_ml import Experiment

#initializing comet experiment
experiment = Experiment()

parameters = {
    "batch_size":batch_size,
    "epochs": 5,
    "optimizer": "adam",
    "loss": "binary_crossentropy",
}
#Logging Parameters
experiment.log_parameters(parameters)
We can now create data generators for our training and validation data fed into the models. Here, we will perform the necessary transformations on the images.
from sklearn.model_selection import train_test_split
from keras.preprocessing.image import ImageDataGenerator


#Importing dataframe
df = pd.read_csv("new_training_info.csv")

#performing training and validation splits
train_df, validation_df = train_test_split(df,test_size=0.2, random_state=42)

#preparing data generators
train_datagen = ImageDataGenerator(rotation_range=15,
                                   rescale=1./255,
                                   shear_range=0.1,
                                   zoom_range=0.2,
                                   horizontal_flip=True,
                                   width_shift_range=0.1,
                                   height_shift_range=0.1)


train_gen = train_datagen.flow_from_dataframe(train_df,
                                              train_dir, x_col='filename', y_col='category',
                                              target_size=img_size,
                                              class_mode='binary',
                                              batch_size=batch_size)

validation_datagen = ImageDataGenerator(rescale=1./255)


validation_gen = validation_datagen.flow_from_dataframe(train_df,
                                              train_dir, x_col='filename', y_col='category',
                                              target_size=img_size,
                                              class_mode='binary',
                                              batch_size=batch_size)
Now that that part is complete, we can use transfer learning using a pre-trained model.
Transfer Learning
We are going to use a ResNet50 as the base model, and we will add a few layers on top of it.
#model creation and training
from keras.applications.resnet import ResNet50
from keras.layers import Dense, Flatten
from keras.models import Sequential
from keras.callbacks import EarlyStopping

#initialize sequential model
model = Sequential()

#base model
base = ResNet50(weights= 'imagenet',
                 include_top=False,
                 input_shape=(img_height, img_width, img_channels),
                 classes=2
                 )

for layer in base.layers:
    layer.trainable = False

#Adding layers to the model
model.add(base)
model.add(Flatten())
model.add(Dense(512, activation='relu'))
model.add(Dense(1, activation='sigmoid'))

#EarlyStopping callback
callback = EarlyStopping(monitor='loss',
                         patience=0)
Above, we define our ResNet50 model and highlight the number of classes we train (only 2). We also specify the shape of the image that we want.
We will now compile the model and train it. Training will be recorded as a live event on your “Project page” in Comet. It will be indicated as complete once we run the “experiment.end()” function provided by Comet.
Let’s first see the structure of our model:
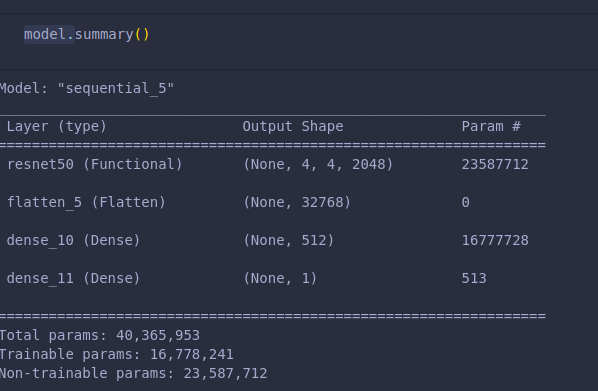
The model can then be compiled using the parameters we initially logged to Comet.
model.compile(loss=parameters["loss"],
              optimizer=parameters["optimizer"],
              metrics=["accuracy"])
We will do the same when training the model.
#removing validation_steps and steps_per_epoch
model.fit_generator(train_gen,
                    validation_data = validation_gen,
                    epochs=parameters["epochs"],
                    callbacks=[callback])

Training occurs for five epochs, and now we can open our Comet “Project” page and check whether all the information we want has been logged and visualized.

We can see that our visualizations have been made. The loss and accuracy charts for the training and validation sets are available.
To end the run, one should add the line below:
experiment.end()
Till we meet again!!
