AI Providers
AI Providers let you connect LLMs for use in the Playground and Online Evaluation.
Using AI Providers
Once configured, providers appear in two places:
- Playground — Test prompts interactively with different models.
- Online Evaluation — Run LLM-as-a-judge scoring on your traces.
Adding a Provider
- Click the Add configuration button in the top-right corner

- In the Provider Configuration dialog that appears:
- Select a provider from the dropdown menu
- Enter your API key for that provider
- Click Save to store the configuration
Supported Providers
Opik supports integration with various AI providers, including:
- OpenAI
- Anthropic
- OpenRouter
- Gemini
- VertexAI
- Azure OpenAI
- Amazon Bedrock
- Ollama (local or self-hosted, OpenAI-compatible)
- vLLM / any other OpenAI API-compliant provider
If you would like us to support additional LLM providers, please let us know by opening an issue on GitHub.
Provider-Specific Setup
Below are instructions for obtaining API keys and other required information for each supported provider:
OpenAI
- Create or log in to your OpenAI account
- Navigate to the API keys page
- Click “Create new secret key”
- Copy your API key (it will only be shown once)
- In Opik, select “OpenAI” as the provider and paste your key
Anthropic
- Sign up for or log in to Anthropic’s platform
- Navigate to the API Keys page
- Click “Create Key” and select the appropriate access level
- Copy your API key (it will only be shown once)
- In Opik, select “Anthropic” as the provider and paste your key
OpenRouter
- Create or log in to your OpenRouter account
- Navigate to the API Keys page
- Create a new API key
- Copy your API key
- In Opik, select “OpenRouter” as the provider and paste your key
Gemini
- Signup or login to Google AI Studio
- Go to the API keys page\
- Create a new API key for one your existing Google Cloud project
- Copy your API key (it will only be shown once)
- In Opik, select “Gemini” as the provider and paste your key
Azure OpenAI
Azure OpenAI provides enterprise-grade access to OpenAI models through Microsoft Azure. To use Azure OpenAI with Opik:
-
Get your Azure OpenAI endpoint URL
- Go to portal.azure.com
- Navigate to your Azure OpenAI resource
- Copy your endpoint URL (it looks like
https://your-company.openai.azure.com)
-
Construct the complete API URL
- Add
/openai/v1to the end of your endpoint URL - Your complete URL should look like:
https://your-company.openai.azure.com/openai/v1
- Add
-
Configure in Opik
- In Opik, go to Workspace Settings > AI Providers
- Click “Add Configuration”
- Select “vLLM / Custom provider” from the dropdown
- Enter your complete URL in the URL field:
https://your-company.openai.azure.com/openai/v1 - Add your Azure OpenAI API key in the API Key field
- In the Models section, list the models you have deployed in Azure (e.g.,
gpt-4o) - Click Save to store the configuration
Once saved, you can use your Azure OpenAI models directly from Online Scores and the Playground.
Vertex AI
Option A: Setup via gcloud CLI
- Create a Custom IAM Role
- Create a Service Account
- Assign the Role to the Service Account
- Generate the Service Account Key File
The file
opik-key.jsoncontains your credentials. Open it in a text editor and copy the entire contents.
Option B: Setup via Google Cloud Console (UI)
Step 1: Create the Custom Role
- Go to IAM > Roles
- Click Create Role
- Fill in the form:
- Title:
Opik - ID:
opik - Description:
Custom IAM role for Opik - Stage:
Alpha
- Click Add Permissions, then search for and add:
aiplatform.endpoints.predictresourcemanager.projects.get
- Click Create
Step 2: Create the Service Account
- Go to IAM > Service Accounts
- Click Create Service Account
- Fill in:
- Service account name:
Opik Service Account - ID:
opik-sa - Description:
Service account for Opik role
- Click Done
Step 3: Assign the Role to the Service Account
- Go to IAM
- Find the service account
opik-sa@<my-project>.iam.gserviceaccount.com - Click the edit icon
- Click Add Another Role > Select your custom role: Opik
- Click Save
Step 4: Create and Download the Key
- Go to Service Accounts
- Click on the
opik-saaccount - Open the Keys tab
- Click Add Key > Create new key
- Choose JSON, click Create, and download the file
Open the downloaded JSON file, and copy its entire content to be used in the next step.
Final Step: Connect Opik to Vertex AI
- In Opik, go to Workspace Settings > AI Providers
- Click “Add Configuration”
- Set:
- Provider:
Vertex AI - Location: Your model region (e.g.,
us-central1) - Vertex AI API Key: Paste the full contents of the
opik-key.jsonfile here
- Click Add configuration
Amazon Bedrock
Amazon Bedrock provides access to foundation models from leading AI companies like AI21 Labs, Anthropic, Cohere, Meta, Mistral AI, Stability AI, and Amazon through AWS. Opik connects to Bedrock using the OpenAI Chat Completions API. Only models that support this API format will work with the Opik Playground. Check the supported models documentation to verify compatibility before configuring.
Prerequisites
Before configuring Bedrock in Opik, ensure you have:
- An active AWS account with Bedrock access
- Model access enabled for the models you want to use (see AWS documentation)
- An API key or credentials configured for Bedrock access
You can request access to models in the AWS Bedrock console. Not all models are available in all regions — check the model availability documentation to verify availability in your chosen region.
Configuring Bedrock in Opik
- In Opik, go to Workspace Settings > AI Providers
- Click “Add Configuration”
- Select “Bedrock” from the provider dropdown
- Fill in the configuration:
- Provider name: A unique identifier for this provider instance (e.g., “Bedrock us-east-1”)
- URL: Your Bedrock endpoint URL (see format below)
- API Key: Your AWS Bedrock API key (see AWS documentation for setup instructions)
- Models list: Comma-separated list of models you want to use (e.g.,
us.anthropic.claude-3-5-sonnet-20241022-v2:0,us.meta.llama3-2-3b-instruct-v1:0) - Custom headers (optional): Add any additional HTTP headers required by your configuration
- Click Add configuration to save
Bedrock URL Format by Region
Bedrock endpoints follow this pattern: https://bedrock-runtime.<region>.amazonaws.com/openai/v1
Examples by Region:
- US East 1:
https://bedrock-runtime.us-east-1.amazonaws.com/openai/v1 - US West 2:
https://bedrock-runtime.us-west-2.amazonaws.com/openai/v1 - Europe West 1 (Ireland):
https://bedrock-runtime.eu-west-1.amazonaws.com/openai/v1 - Europe Central 1 (Frankfurt):
https://bedrock-runtime.eu-central-1.amazonaws.com/openai/v1 - Asia Pacific (Tokyo):
https://bedrock-runtime.ap-northeast-1.amazonaws.com/openai/v1 - Asia Pacific (Singapore):
https://bedrock-runtime.ap-southeast-1.amazonaws.com/openai/v1
Multiple Bedrock Instances
You can configure multiple Bedrock providers for different AWS regions or accounts. Each instance appears separately in the provider dropdown, making it easy to switch between configurations in the Playground and Online Evaluation.
Ollama
Opik connects to Ollama using the OpenAI-compatible API, so you can use Ollama models for all LLM operations.
URL must end with /v1. The base URL you enter in Opik must end with /v1 (e.g., http://localhost:11434/v1). Opik uses this to call the OpenAI-compatible chat completions endpoint on your Ollama instance.
Self-hosted deployments: The Ollama provider is enabled by default. To disable it, set the environment variable TOGGLE_OLLAMA_PROVIDER_ENABLED=false on the Opik backend service.
Configuring Ollama in Opik
- In Opik, go to Workspace Settings > AI Providers
- Click “Add configuration”
- Select “Ollama” from the provider dropdown
- Fill in:
- Provider name: A name for this instance (e.g., “Ollama local”)
- URL: Base URL of your Ollama instance, ending with
/v1(e.g.,http://localhost:11434/v1) - API Key (optional): Leave blank unless your Ollama instance requires authentication
- Use “Test connection” to verify Opik can reach the instance, then “Discover models” to load the model list
- Click Save to store the configuration
You can configure multiple Ollama instances with different provider names and URLs.
vLLM / Custom Provider
Use this option to add any other OpenAI API-compliant provider such as vLLM, etc. You can configure multiple custom providers, each with their own unique name, URL, and models.
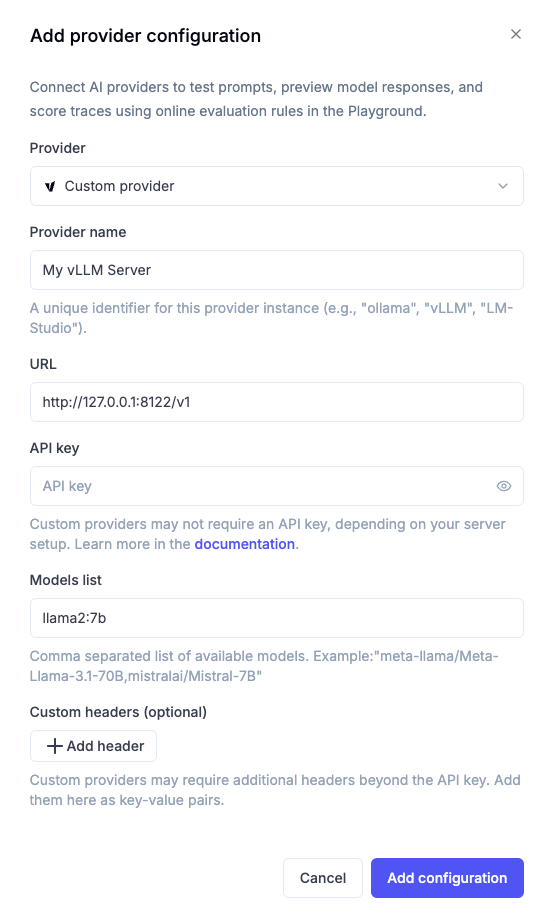
Configuration Steps
- Provider Name: Enter a unique name to identify this custom provider (e.g., “vLLM Production”, “Ollama Local”, “Azure OpenAI Dev”)
- URL: Enter your server URL, for example:
http://host.docker.internal:8000/v1 - API Key (optional): If your model access requires authentication, enter the API key. Otherwise, leave this field blank.
- Models: List all models available on your server. You’ll be able to select one of them for use later.
- Custom Headers (optional): Add any additional HTTP headers required by your custom endpoint as key-value pairs.
If you’re running Opik locally, you would need to use http://host.docker.internal:<PORT>/v1 for Mac and Windows or http://172.17.0.1:<PORT>/v1 for Linux, and not http://localhost.
Custom Headers
Some custom providers may require additional HTTP headers beyond the API key for authentication or routing purposes. You can configure these headers using the “Custom headers” section:
- Click ”+ Add header” to add a new header
- Enter the header name (e.g.,
X-Custom-Auth,X-Request-ID) - Enter the header value
- Add multiple headers as needed
- Use the trash icon to remove headers
Common use cases for custom headers:
- Custom authentication: Additional authentication tokens or headers required by your infrastructure
- Request routing: Headers for routing requests to specific model versions or deployments
- Metadata tracking: Custom headers for tracking or logging purposes
- Enterprise features: Headers required for enterprise proxy configurations
Custom headers are sent with every request to your custom provider endpoint. Ensure header values are kept secure and not exposed in logs or error messages.
Managing Multiple Custom Providers
Once you’ve configured multiple custom providers, you can:
- Edit any custom provider by selecting it from the provider dropdown in the configuration dialog
- Delete custom providers that are no longer needed
- Switch between different custom providers in the Playground and Automation Rules
Each custom provider appears as a separate option in the provider dropdown, making it easy to work with multiple self-hosted or custom LLM deployments.
API Key Security
API keys are encrypted and stored securely. Only the name and provider type are visible after configuration.
Troubleshooting
- Authentication Errors: Ensure your API key is valid and hasn’t expired
- Access Denied: Check that your API key has the required permissions for the models you’re trying to use
- Rate Limiting: Adjust your request frequency or contact your provider to increase limits