Introduction
Hyperparameters are among the most important aspects of any given model in Data Science and Machine Learning applications. The right combination of hyperparameters is essential when one desires to come up with a great model.
A pertinent problem that plagues engineers and coders is the fact that it is difficult to get a perfect set of hyperparameters that will give the most accurate results. This problem has a fix though. If you have a set of hyperparameters with a range of values, then you could use an algorithm that attempts multiple combinations of hyperparameters and rates the performance using evaluation metrics.
For this reason, multiple popular platforms and algorithms have arisen depending on the level of complexity of a problem. The variety allows someone to leverage the type of hyperparameter tuning algorithm that would computationally fit the problem at hand.
Optuna vs Comet
Optuna resonates strongly with the data science and machine learning community and it is often used to look for the best hyperparameters for gradient boosting models like xgboost.
Someone with experience using Optuna might find it a little difficult to use Comet for the same objective if they have never tried using it before. Comet provides a user interface that allows someone to easily track many experiments performed for a given training session, but also provides a built-in hyperparameter optimizer.
I will now get to the technical details of hyperparameter tuning and experiment tracking on comet ml by making parallels with Optuna for simple migration.
Requirements
There are a few requirements that you’d need before you begin:
- A Comet ML account
- An installation of Jupyter Notebook or a Google Colab account
- Python 3.9.X +
- XGBoost, Numpy, Pandas, Comet_ml and Scikit-learn libraries installed
- Motivation to learn
Workflow Overview
A typical Optuna workflow involves a few standard steps. You would have to first implement a normal ML workflow to train our gradient boosting model, e.g. XGBoost:
- Import necessary libraries.
- Define training and testing datasets.
- Define a function to be optimized that will be used to train on different hyperparameters.
For someone familiar with Optuna, only the third step will be different and that’s where we will begin:
import optuna
from xgboost import XGBClassifier
from optuna.integration import XGBoostPruningCallback

def objective(trial):
   #Hyperparameters with ranges from minimum value to maximum value
   parameter_grid = {

        "n_estimators": trial.suggest_categorical("n_estimators", [10000]),
        "learning_rate": trial.suggest_float("learning_rate", 0.01, 0.3),
        "max_leaves": trial.suggest_int("max_leaves", 20, 3000, step=20),
        "max_depth": trial.suggest_int("max_depth", 3, 12),
        "max_bin": trial.suggest_int("max_bin", 200, 300),
        "lambda": trial.suggest_int("lambda", 0, 100, step=5),
        "alpha": trial.suggest_int("alpha", 0, 100, step=5),
        "gamma": trial.suggest_float("gamma", 0, 15),
    }
#feeding the hyperparameters into the model
model = XGBClassifier(objective="binary:logistic", **parameter_grid)

#Fitting
model.fit(X_train,
          y_train,
          eval_set=[X_test, y_test],
          early_stopping_rounds=100,
          callbacks = XGBoostPruningCallback(trial, "validation_0-logloss"))
#Predict
y_preds = model.predict(X_test)

#Creating study
study = optuna.create_study(direction="minimize", study_name="Xgboost")

#Optimizing the study
study.optimize(objective, n_trials = 20)

#Printing the best hyperparameters
for key, value in study.best_params.items():
    print(f"\t\t{key}: {value}")
The above code snippet assumes that you already have your train and test datasets. Additionally, it gives a generalized view of the process that one undergoes when training with Optuna.
Now that we have seen a basic Optuna workflow, we can implement this in Comet ML. We will also see how we can take these results and use them in our gradient-boosting algorithm.
Comet ML Implementation
The Comet ML Python library and Comet account are necessary to interact with the Comet API.
The first cell will include Comet ML’s library call and an init method that would initialize the project:
import comet_ml
#Similar to the initialization of a study in Optuna
comet_ml.login(project_name="xgboost")
Running this will then ask you for an API key that you will copy from the user settings as highlighted in the docs.
After ensuring that your API key has been input and it accepts it as valid, the next step would be to make a similar workflow to your Optuna:
- Place the optimization algorithm, the hyperparameters, the metric and objective in a dict and use the dict as an argument in Comet’s optimizer.
- Proceed with a normal training workflow and call the hyperparameters as arguments in the classifier.
- Perform an experiment run that will graph the outcome in multiple experiments in Comet.
The three steps will be accompanied by code below with comparisons on how it is done in Optuna.
Struggling to track and reproduce complex experiment parameters? Artifacts are just one of the many tools in the Comet toolbox to help ease model management. Read our PetCam scenario to learn more.
Step 1: Dictionary for Optimizer
The code will look as follows:
from comet_ml import Optimizer

#Dict that contains optimization algorithm, hyperparameters,metric and objective
config = {
    #algorithm for optimization
    "algorithm": "bayes",
    #parameters
    "parameters":{
        "learning_rate": {"type":"float","min":0, "max":1},
        "max_leaves": {"type":"integer", "min": 20, "max":3000},
        "max_depth": {"type":"integer", "min": 3, "max": 12},
        "max_bin": {"type":"integer", "min": 200, "max": 300},
        "lambda": {"type":"integer", "min": 0, "max": 100},
        "alpha": {"type":"integer", "min":0, "max":100},
        "gamma":{"type":"float", "min":0, "max":15}
    },
    #What shall be optimized
    "spec":{
        "metric": "loss",
        "objective": "minimize"
    },
    "trials": 1,
}
#Will be used to feed information in the workflow
Opt_algo = Optimizer(config)
Step 2: Normal Workflow with Comet ML integration
Here we will split the train data and the test data. The most important thing will be the training function that introduces the hyperparameters that we want to perform multiple experiments on.
The code will be as follows:
from xgboost import XGBClassifier
import pandas as pd
import numpy as np
from sklearn.model_selection import train_test_split

#training dataset
train_df = pd.read_csv("input file path in here")

#Performing splits
X_train,  X_val, y_train, y_val = train_test_split(X_train, y_train, test_size=0.2, random_state = 1)

#training function
def train_model(experiment):
    model = XGBClassifier(objective="binary:logistic",
                           learning_rate = experiment.get_parameter("learning_rate"),
                           max_leaves = experiment.get_parameter("max_leaves"),
                           max_depth = experiment.get_parameter("max_depth"),
                           max_bin = experiment.get_parameter("max_bin"),
                           reg_lambda = experiment.get_parameter("lambda"),
                           alpha = experiment.get_parameter("alpha"),
                           gamma = experiment.get_parameter("gamma"))
    model.fit(
            X_train,
            y_train,
            eval_set=[(X_val, y_val)],
            early_stopping_rounds = 100,
            )
    y_pred = model.predict(X_val)
In the above code, I would like to highlight the syntax in the XGBClassifier hyperparameters. It is not automatically obvious that the hyperparameters we used in the config dictionary correspond with those in XGBoost. Hence we need to map them with the get_parameter() method. This is very similar to how Optuna uses trial.suggest_int() without the difficulty of having to suggest types for those who may struggle with them.
Once we finish training then we can use this on a test set to predict its performance.
Step 3: Training Function with Comet ML page interaction
An added benefit of using Comet is the interface that allows one to easily track the experiments they have performed and the types of hyperparameters that would produce a given set of results.
We will then call the model and put in a for loop and let it train multiple times.
for experiment in opt.get_experiments():
    #Training
    train_model(experiment)
    #Ending the experiment
    experiment.end()
After running the above code, a project will be initialized on Comet ML’s homepage with the name you initialized with and will run multiple experiments in a short span of time. By pressing stop on the cell, one can stop further experiments from running.
As seen below:
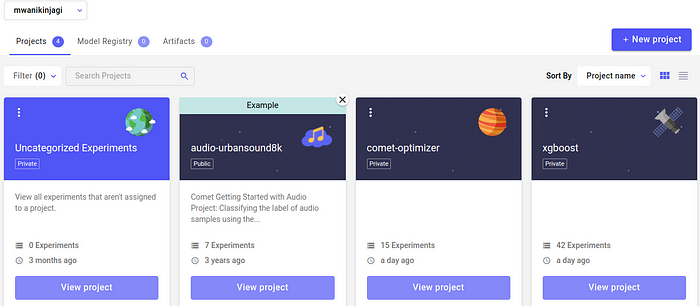
On the right, our XGBoost project is ready and it contains the 42 experiments I ran. Clicking “View Project” takes you to the next page where the experiments are.

The above graph shows us the hyperparameters that led to a given loss function. As the objective was to minimize the function, we can interact with the graph and click on the lowest possible value of the loss function and extract the hyperparameters.
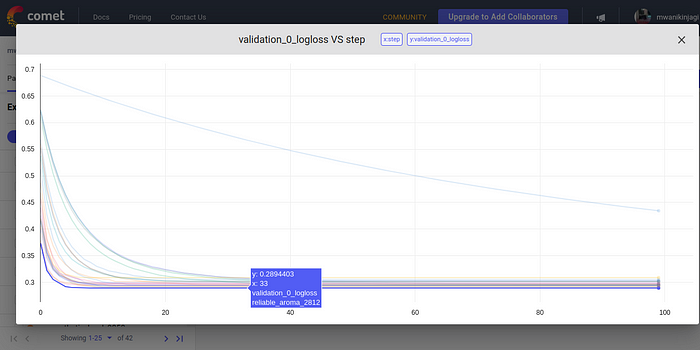
The experiment with the lowest possible value is named “reliable_aroma_2012” and when we click it, we can see all the details that we seek.
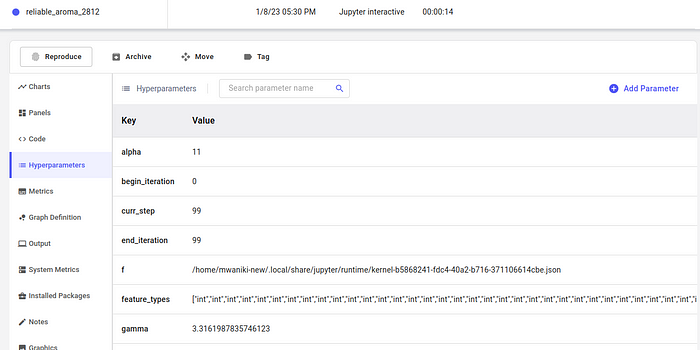
And on this page, we can collect the hyperparameters that we desire and feed them into our algorithm for the performance we seek.
Conclusion
The code above was an introduction to all parties that desire to migrate from Optuna to Comet ML for the many potential benefits that it holds. The workflow is similar when it comes to code optimization and the tweaks made will easily transition one used to Optuna to fully using Comet ML.
