Machine learning practitioners can now use PyTorch Lightning with Comet to speed up research cycles and build better models, faster.
Machine learning practitioners can now use PyTorch Lightning, a popular deep learning framework that organizes PyTorch code to decouple the research code from the engineering code and automate it, with Comet. Comet is a leading meta machine learning experimentation platform that allows machine learning researchers and practitioners to visualize, compare and share all of their experiment data.
Pytorch Lightning
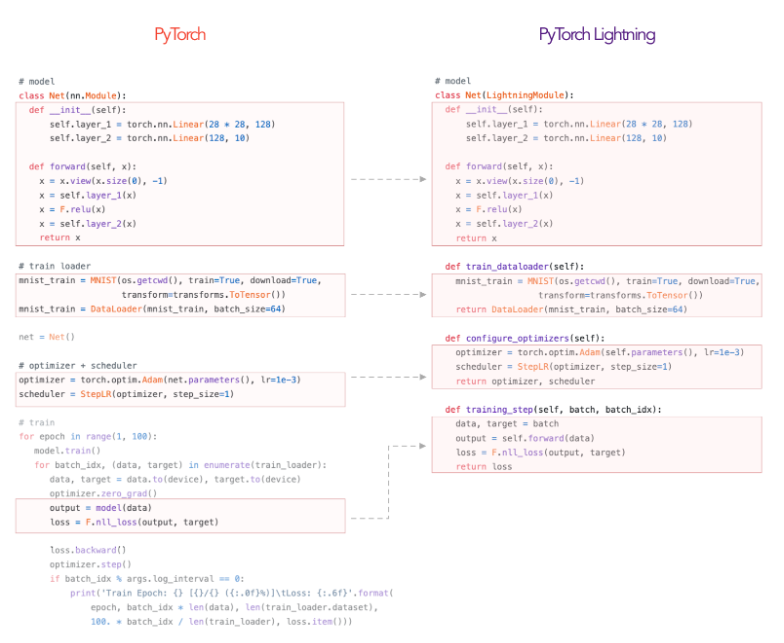
Lightning helps organize PyTorch code and decouple the science code from the engineering code. It’s more of a style-guide than a framework. By organizing PyTorch code under a LightningModule, Lightning makes things like TPU, multi-GPU and 16-bit precision training (40+ other features) trivial.
Here’s an example of PyTorch code organized in the Lightning format:
Comet
Comet is a powerful meta machine learning experimentation platform allowing users to automatically track their metrics, hyperparameters, dependencies, GPU utilization, datasets, models, debugging samples, and more, enabling much faster research cycles, and more transparent and collaborative data science.

Comet provides best-in-class feature richness and flexibility—including a built-in hyperparameter optimization service, interactive confusion matrices, full code tracking and reproducibility features, and a wide range of on-premise installation options.
To learn how to get started with PyTorch Lightning and Comet, follow along below as we go through a simple code example using the two tools. If you’d prefer to be more hands on, continue this demo in this Google Colab notebook instead.
Install and Load Dependencies
Be sure you’ve pip installed the comet-ml and PyTorch-lightning libraries.
pip install pytorch-lightning
pip install comet-ml
Next, in your script or notebook, import Comet’s Experiment class and the CometLogger and Trainer classes from PyTorch Lightning.
from comet_ml import Experiment
from pytorch_lightning.loggers import CometLogger
from pytorch_lightning import Trainer
Create CometLogger
Once you’ve imported your dependencies, initialize a CometLogger. You’ll need to pass in your Comet API Key, which you can easily access once you’ve signed up for Comet with Github or your email address here. Projects and Workspaces are optional but help you organize which experiments belong to which modeling projects you’re working on.
comet_logger = CometLogger(
    api_key="YOUR COMET API KEY",
    workspace="YOUR COMET WORKSPACE", # Optional
    project_name="YOUR COMET PROJECT" # Optional
    # rest_api_key=os.environ["COMET_REST_KEY"], # Optional
    # experiment_name="default" # Optional
)
Set up PyTorch Lightning Template
It’s time to define a PyTorch Lightning Model, which will define your architecture, forward and step functions, as well as your data loaders.
class MNISTModel(pl.LightningModule):
    def __init__(self):
        super(MNISTModel, self).__init__()
        # not the best model...
        self.l1 = torch.nn.Linear(28 * 28, 10)
    def forward(self, x):
        return torch.relu(self.l1(x.view(x.size(0), -1)))
    def training_step(self, batch, batch_nb):
        # REQUIRED
        x, y = batch
        y_hat = self.forward(x)
        loss = F.cross_entropy(y_hat, y)
        tensorboard_logs = {'train_loss': loss}
        return {'loss': loss, 'log': tensorboard_logs}
  ...
    def train_dataloader(self):
        return DataLoader(MNIST(os.getcwd(), train=True, download=True, transform=transforms.ToTensor()), batch_size=32)  ...
Once you’ve defined your Model class, create an instance for training.
mnist_model = MNISTModel()Create a trainer and pass in your CometLogger instance you created earlier.
trainer = Trainer(logger=CometLogger)That’s it! You’re ready to start training your model. Simply call .fit() on your trainer, passing in the mnist_model you created earlier.
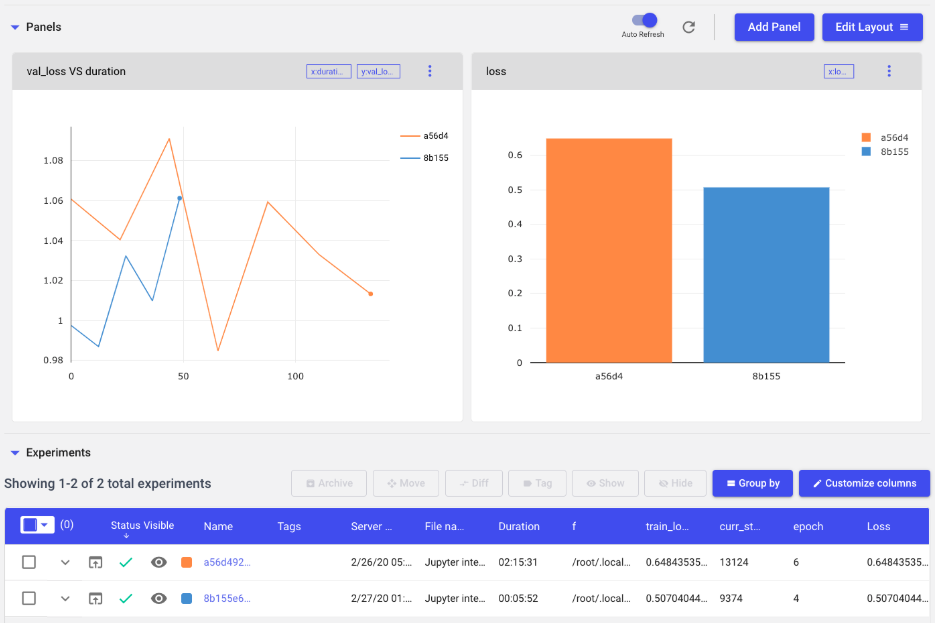
trainer.fit(mnist_model)Visualize Logs
Head to the Comet UI in the browser to visualize your training — metrics, parameters, code, system metrics, and more — in real time.
Inspect Dataset Samples
Comet has dedicated modules for almost every type of data you may be modeling with. Using the Comet Graphics module, easily log and inspect dataset samples right in the UI.
for _ in range(10):
    value = random.randint(0, len(images))
    tmp = images[value]
    img = tmp.numpy()[0]
    comet_logger.experiment.log_image(img, name="label :{}".format(labels[value]))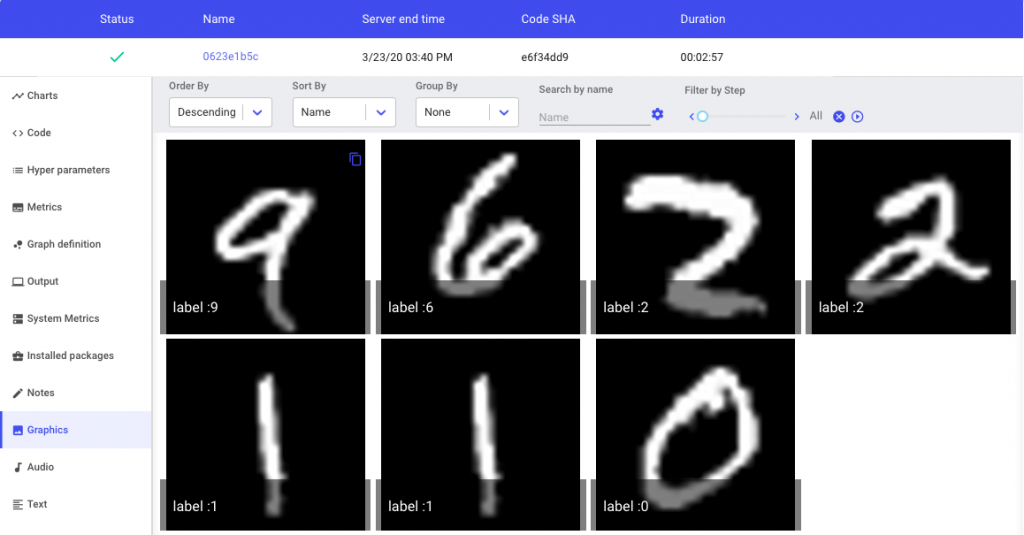
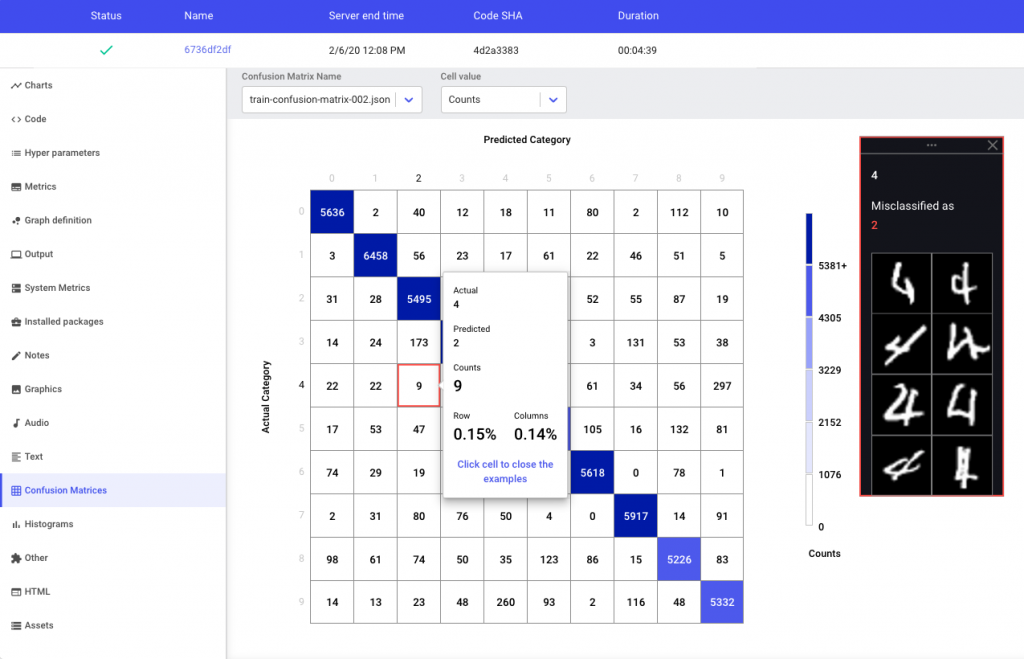
Generate Interactive Confusion Matrices for Model Debugging
Comet also allows you to create interactive confusion matrices in the UI, allowing you to visualize predictions and debug your model efficiently. (See the Google Colab notebook for the code used to generate these confusion matrices.)
Store your Trained Model to the Comet Model Registry
Once you’ve trained a model you’d like to save for future use (training in the future, taking into production, etc.), use the Comet Model Registry to do just that. Once you’ve saved your model, simply call experiment.log_model() to store your model in Comet’s Model Registry.
torch.save(mnist_model.state_dict(), 'my_model')
comet_logger.experiment.log_model('model_0', './my_model')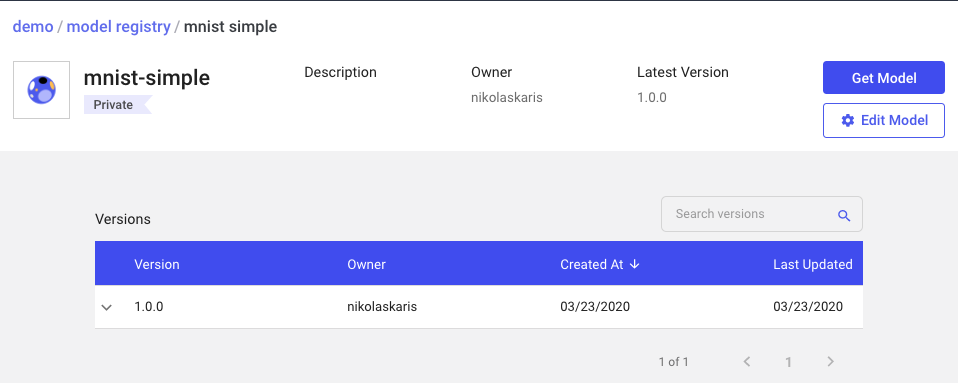
For more information on PyTorch Lightning and the CometLogger, consult the docs here. For more information on Comet’s experiment management capabilities, check out Comet’s docs here.
This post was written with the help of Will Falcon, creator of PyTorch Lightning.