In this project guide, we will dive into object detection by creating a custom object detection model and monitoring its accuracy metrics and hyperparameters in five simple steps!
It doesn’t even matter if your machine sucks, let’s go!
Dataset
We will use this dataset from Google Drive to train the model in this project. The dataset contains two folders: train and test, which both contain subfolders, images, and labels. As the name implies here, the images folder includes the training and validation images, while the labels have theannotation for the respective images. We will be uploading this file to our Google Colab soon. Get ready!
Coding Environment
We will be using Google Colab as our coding environment for this project.
Ensure to turn your Runtime to GPU when using Google Colab.
Step 1: Clone the YoloV7 repository from GitHub
We need to clone the YoloV7 folder from the official GitHub repository:
! git clone https://github.com/WongKinYiu/yolov7.git
Code Output
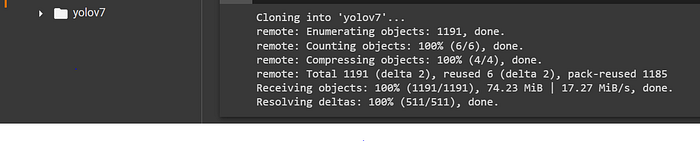
From the code output above, it can be seen that we can create a folder “yolov7,” which contains all the subfolders, scripts, configuration files, and many more required to run object detection.
Step 2: Install All The Dependencies Needed to Run Your Object Detection
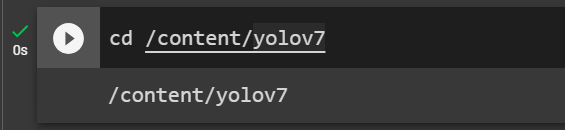
We must install the dependencies provided in the requirement.txt file inside the yolov7 folder. But first, you need to ensure that you are inside the yolov7 folder before running the requirement.txt file. To do this, run the command below:
cd /content/yolov7
This will return the output below:
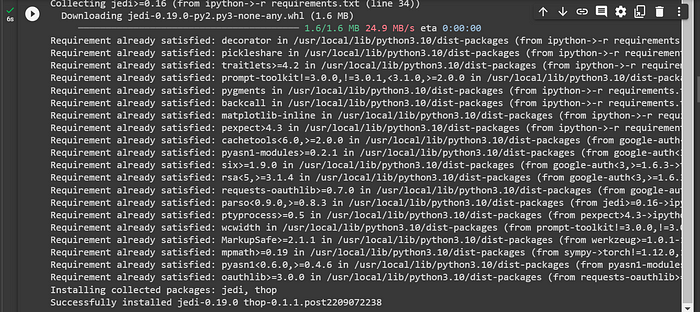
Now run the requirements.txt files:
pip install -r requirements.txt
Code Output
Step 3: Prepare and Upload Your Data
Now proceed inside the yolov7 folder and locate the data folder. Open it and create two folders, test and train. Create subfolders, images, and labels inside each of the two folders.
The figure below shows the newly created folders.

Bravo! Now, go and download the dataset we will be using for this project into your local machine.
The idea is that the folder structure and all its contents must be uploaded into its corresponding folder in Google Colab. This means that for every image in the test folder on your local machine, you select all and drag and drop them inside the images folder of the test folder in Google Colab. You also do this for the labels. When you are done with the test folder, repeat the same for the train folders; select all, drag, and drop all the images and labels in the train folder in your local machine into the images and labels folders in the train folder here in Google Colab.
To confirm you uploaded the files correctly and successfully, run the code below:
import os
test_images = "/content/yolov7/data/test/images"
test_labels = "/content/yolov7/data/test/labels"
train_images = "/content/yolov7/data/train/images"
train_labels = "/content/yolov7/data/train/labels"

print("Number of images and labels inside the test folder:", len(os.listdir(test_images)) + len(os.listdir(test_labels)))
print("Number of images and labels inside the train folder:", len(os.listdir(train_images)) + len(os.listdir(train_labels)))
Code Output:

From the code output above, the number of training images alongside their corresponding labels is 72, while that of the validation is 32.
Step 4: Set Up Your Configuration Scripts
Here is where it might get tricky. But sit tight; it is as simple as ABC!
Edit the coco.yaml file
Inside your yolov7 > data folder, there is a file named coco.yaml file. Open it and incorporate the following edits:
- Remove the first five lines and the “test” variable, leaving four variables in the coco.yaml file: “train,” “val,” “nc,” “names.“
Now, for each of these variables, we must pass their respective values:
- train: This accepts the path to your train folder in your Google Colab. Now go ahead and replace it with the right path: /content/yolov7/data/train
- val: This accepts the path to your test folder in your Google Colab. Now go ahead and replace it with the right path: /content/yolov7/data/test
- nc: This accepts the number of classes in your training data. Therefore, replace 80 with 1.
- names: This agrees with the name of the label. In this case, remove all the labels in the file and input only “messi.”
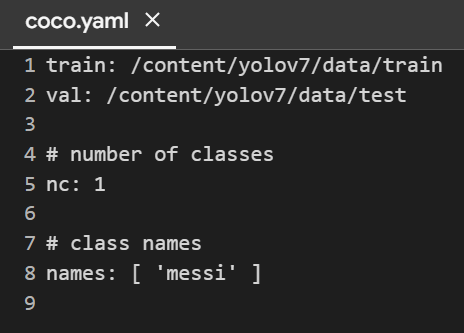
Your coco.yaml file will look like this:
train: /content/yolov7/data/train
val: /content/yolov7/data/test

# number of classes
nc: 1

# class names
names: [ 'messi' ]
Now save and close your coco.yaml file.
Edit the yolov7.yaml file
Now locate the yolov7.yaml file inside the yolov7 > cfg > training/ folder. When opened, replace 80 in line 2 with 1. This represents training for one class and not 80 classes.
Now, let’s move on to the last step. We are close to the end of the project!
Step 5: Monitor and Train Your Model Using Comet
Now, head over to Comet and register a new account if you are not an existing user. Here, you can generate an API key for all your projects. You will need the API key for this part of the project.
At this point, we need to modify the training script to monitor the object detection model before running the script.
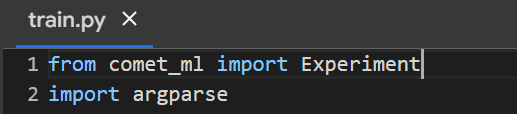
Edit the train.py Script
The train.py script is found directly inside the yolov7 parent folder. Open and incorporate the following edits:
- Add to the first line of the script:
from comet_ml import Experiment
This would be like this:
- Secondly, go to line 43 and insert this line of code:
experiment = Experiment(api_key="9HibPMbc18_THIS IS MY PERSONAL API KEY", project_name="Testing yolo on Comet")
This would look like this:

Explanation
This code initializes a new experiment on the Comet platform to visualize and track our model’s learning experiments, using my API key (kindly create an account and get yours) and associating it with the project named “Monitor my model.”
Download a Pretrained YoloV7 Model
Proceed to download a pre-trained YoloV7 model here. Ensure you drag and drop this downloaded model, “yolov7.pt”, inside the yolov7 folder in Google Colab. We will use this model for training on our custom dataset soon.
Install Comet
Now, we install the Comet library by running the code below:
pip install comet_ml
Train Your Model!
Now, it’s time to train the object detection model. Run the script below to begin training:
! python train.py --workers 1 --device 0 --batch-size 16 --epochs 5 --img 640 640 --data data/coco.yaml --hyp data/hyp.scratch.custom.yaml --cfg cfg/training/yolov7.yaml --name my_model --weights /content/yolov7/yolov7.pt
Code Explanation
-workers 1: This flag specifies the number of data-loading workers for loading training data. In this case, it sets the number of workers to 1.-device 0: This flag sets the device (GPU) index to 0. It indicates that the training will be performed on the GPU with index 0.-batch-size 16: This flag sets the batch size for training data. It sets the batch size to 16, meaning the training algorithm will process 16 samples simultaneously.-epochs 5: This flag determines the number of training epochs, i.e., the number of times the algorithm will iterate over the entire training dataset during training. It sets the number of epochs to 5.-img 640 640: This flag specifies the input image size for the training process. It sets the image size to 640×640 pixels.-data data/coco.yaml: This flag points to a YAML file containing configuration data for the dataset. It tells the training script to use the dataset configuration specified in the “coco.yaml” file in the “data” folder.-hyp data/hyp.scratch.custom.yaml: This flag points to a YAML file containing hyperparameters for training. It tells the training script to use the hyperparameters specified in the “hyp.scratch.custom.yaml” file in the “data” folder.-cfg cfg/training/yolov7.yaml: This flag points to a YAML file containing the model configuration for training. It tells the training script to use the model configuration specified in the “yolov7.yaml” file in the “cfg/training” folder.-name my_model: This flag sets the name of the experiment or model being trained. In this case, the experiment or model is named “my_model.”-weights /content/yolov7/yolov7.pt: This flag points to the initial weights file for the training. It tells the training script to use the “yolov7.pt” file located in the “/content/yolov7” folder as the initial weights for training.
Track your model
Once the training starts, you will see the output shown in the figure below, which provides a link to your model’s training.

You can see this training experiment using this link.
Once the training is done, you will get an output telling you where to locate the model you just trained. Now, you can download and save the model. This is shown below:

As shown in the figure above, the custom object detection model named best.pt has been thoroughly trained on the data and is ready for use. It is in the folder runs/train/my_model2/weights/, found in the YoloV7 folder.
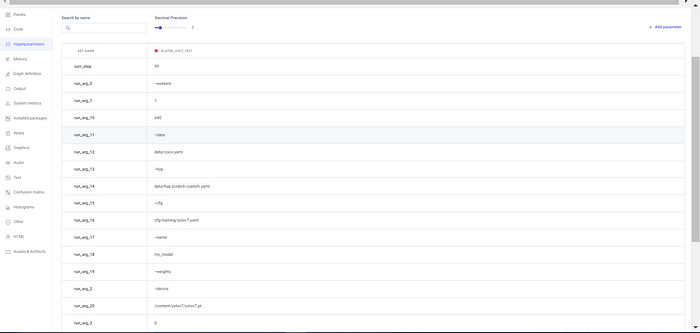
Below are some snippets from Comet:
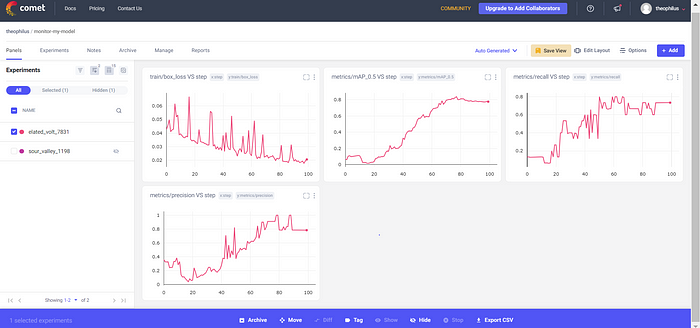
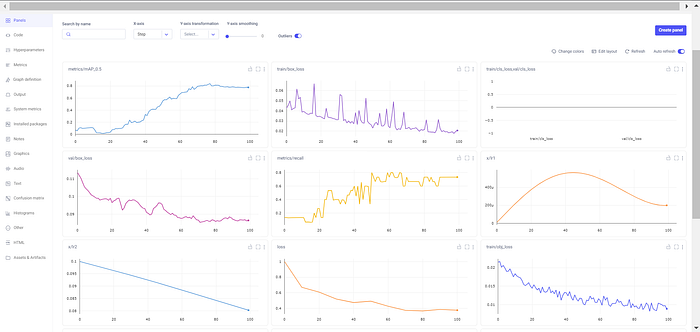
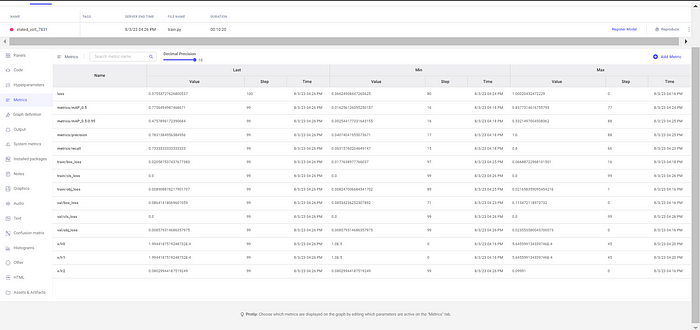
Summary
So far, so good; we built a custom object detection model using a YoloV7 pre-trained model, and we tracked our model using Comet.
These are the steps we took to achieve our objective:
- Step 1: Clone the YoloV7 repository from GitHub
- Step 2: Install all the dependencies needed to run your object detection
- Step 3: Prepare and upload your data
- Step 4: Set up your configuration scripts by modifying the coco.yaml and yolov7.yaml files.
- Step 5: Monitor and train your model using Comet
