Turn every AI agent change into a measured experiment you compare before and after to detect regressions and measure performance.

The scariest AI failures are the silent ones.
You ship a change to your agent on a branch — a new feature, a prompt fix, a quick refactor. No errors. No complaints. Everything looks fine. But does it still work, or did you quietly break something that worked yesterday?
As Alejandro Aboy puts it: “the fact that they’re not complaining doesn’t mean there’s no issue going on.” A quiet user is not a happy user. Usually, it’s the opposite.
The more Alejandro and I talked about AI evals and EDD, the more his struggles sounded like mine. A story from builders to builder.
- You can break what already worked. Change a prompt, refactor a tool, and an old feature quietly regresses. Alejandro lived it: cleaning noisy instructions out of his agent’s system prompt made it start fabricating IDs it used to get right. You only catch that by running the same tests before and after the change, and comparing.
- The feature is brand new, so you have nothing to test it on. No dataset, no historical traces, no ground truth. Yet you still need to know whether it works, and how well. So how do you generate realistic test data fast, then feed it to evaluators that turn it into hard performance numbers?
This is the case study that gives you a plan of attack for both: Evaluation-Driven Development (EDD)
How to prove a new feature works, and didn’t regress, before you merge. It comes from a recent conversation with Alejandro Aboy, a senior data and AI engineer at Workpath who owns the entire data stack, built the Workpath AI Companion, and writes The Pipe and The Line Substack.
And we won’t keep it abstract. Every example comes from one real product: Workpath, a strategy-execution SaaS that keeps large companies’ OKRs and initiatives aligned. (OKRs — Objectives and Key Results — are the goal-setting framework teams use to name what they want to achieve and the measurable results that prove they’re getting there.) Its AI-native feature is the Workpath AI Companion: an agent that scans a company’s strategy and OKR data end-to-end to keep enterprise teams aligned. It’s the exact system Alejandro runs EDD on every day.
So when we say developing a new feature, picture shipping a change to that Companion and proving, before you merge, that it works and didn’t regress.
The Develop-a-Feature Workflow
Imagine. You start working on a new feature, branch, and develop the change. But before you merge, you have to answer 2 questions:
- What’s the performance of my new feature?
- Did my change introduce any regressions into the existing codebase?
Only when both look good you accept the pull request. EDD helps you answer those 2 questions.
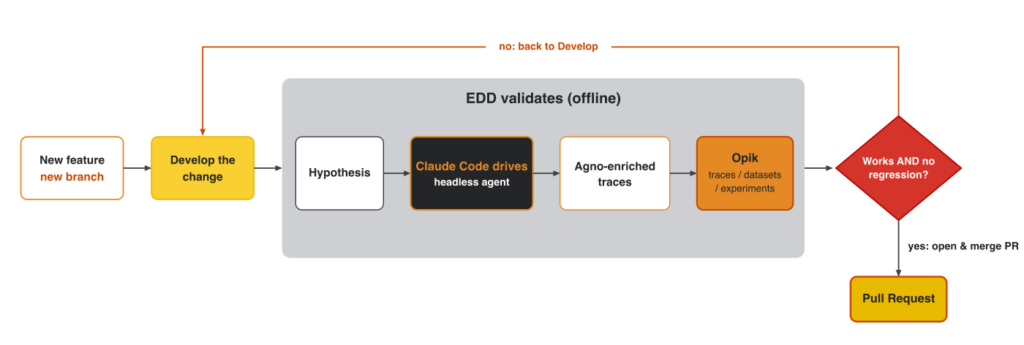
Every feature is hypothesis-first. As Alejandro frames it, “I have a hypothesis… and everything should lie around that.” Every change starts as a stated hypothesis on a branch.
Based on that hypothesis, EDD runs a simulation and scores the results to answer the 2 questions.
Every feature ends in a PR, backed by an experiment, with clear traces and metrics. Framing the eval results as an experiment allows you to compare current results to previous ones, detecting regressions or tracking improvements.
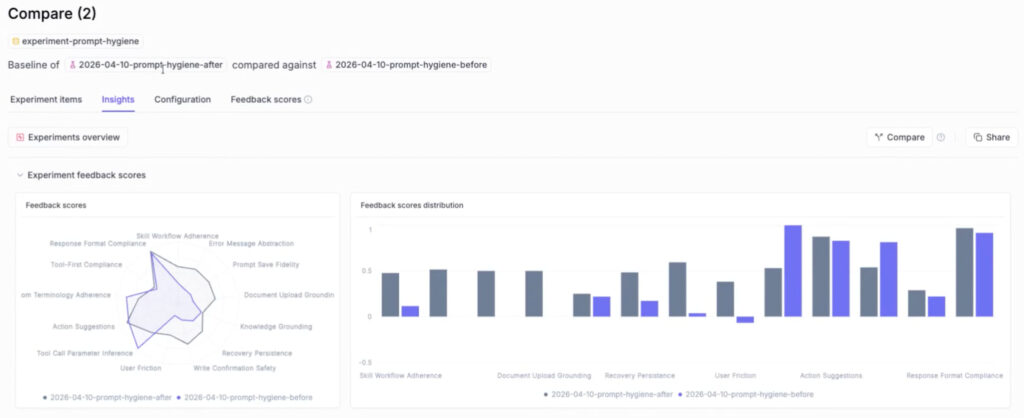
This is how you can compare two experiments in Opik:
What about the process that happens between starting a new feature and its experiment?
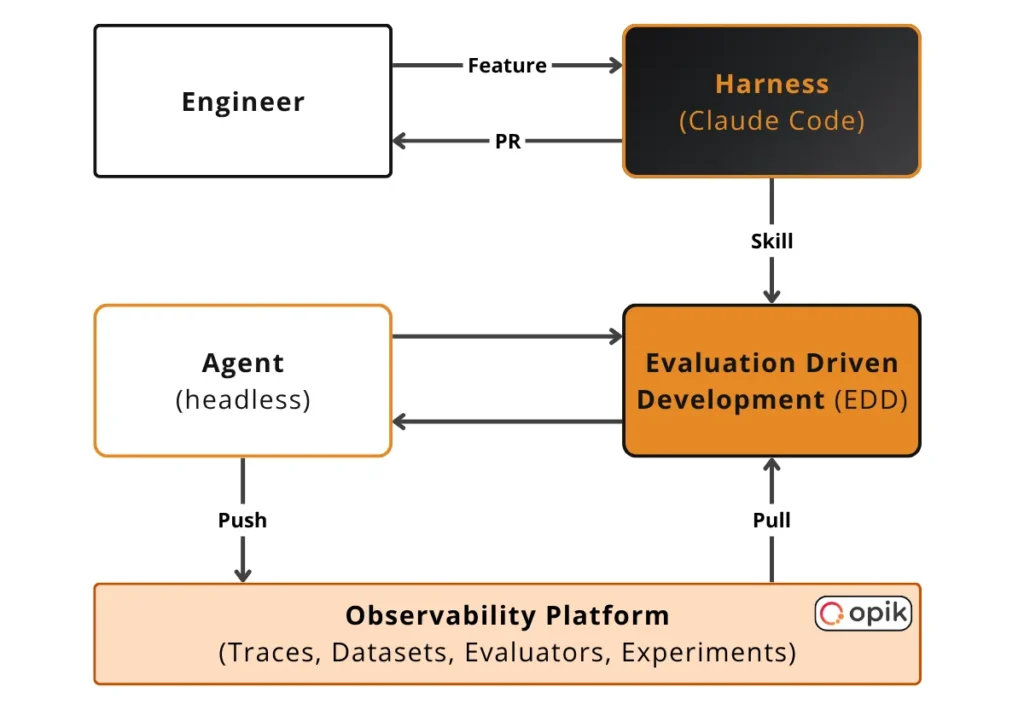
From an architectural perspective, we have:
- The AI application, which can be an AI agent, workflow or a simple chatbot. In Alejandro’s case, it’s an AI agent built with Agno. More precisely, it’s the Workpath AI Companion he is building. But due to data privacy reasons, during the demo, he could share only a mock of the data.
- A headless evaluation harness, powered by Claude Code.
- An AI observability and evaluation platform responsible for capturing traces, managing eval datasets and evaluators, running experiments and comparing results. Alejandro is using Opik. The tool is open-source, but for ease of use, you can also try out their managed platform for free here for 25k spans/month.
Now… how do we generate data for these experiments? How do we get the traces? How do we populate the evaluation harness with the right context? We will see how all of that falls into place, where everything starts with two modes.
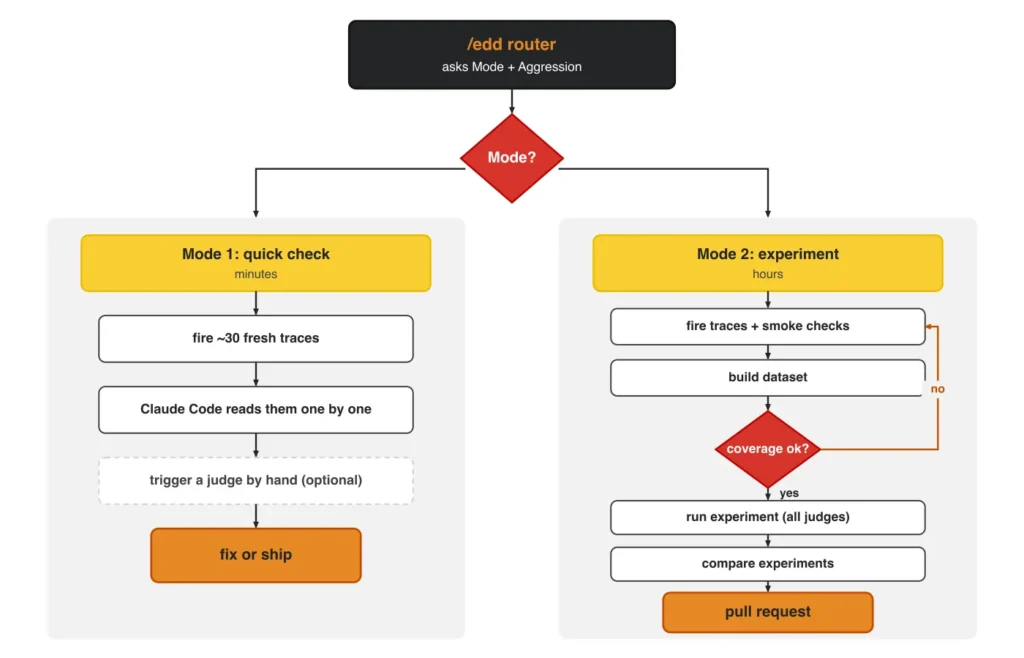
Two Modes: Manual Quick Check vs. Automated Experiments
The two modes are modeled by the /edd skill, which has two inputs: Mode and Aggression.
Mode 1 is a quick, manual check. You fire around 30 fresh traces, let Claude Code read them back from Opik one by one, and trigger a judge by hand only if you want a score. As Alejandro describes it, “it won’t trigger automatic evaluations; you trigger them manually.” No dataset, no experiment, ephemeral, minutes. His favorite for a small change: his Substack Author Agent kept over-asking for the publication URL on every new trace. A tiny, targeted fix, exactly what Mode 1 is for.
Mode 2 automates the judgment. When you touch a lot or ship new functionality, you turn the traces into a dataset and run an experiment, both Opik objects, where the judges score every item automatically and produce an experiment you can compare across runs. This is the only way to catch a subtle regression, because you compare 2 experiments.
Both modes start from a hypothesis on a branch, emit fresh simulated traces, and can use the same evaluators. The mode only changes whether the evaluation is done by hand or automatically.
The Aggression setting controls how adversarial the simulated traces get, from happy-path up to fully adversarial. As you turn up the knob, simulated traces get more aggressive, finding harder and harder corner cases to break the agent.
The secret sauce of Alejandro’s EDD approach is in how he uses Claude Code to simulate fresh traces.
Scope the Change and Simulate Its Traces
Remember. Our goal is to simulate relevant traces to test the performance of our feature. To do that, we use Claude Code to read the agent’s source code, especially the code around the new feature. After, we retrieve old traces (stored in Opik) that are relevant to our current code.
Based on these two signals, we generate ~30 traces targeting the new feature’s functionality.
The traces need to be high signal and as diverse as possible. The goal is to find holes within our system and fix them, not to validate what currently works.
To achieve that, the traces are generated based on 2 dimensions:
- Regression evals (what worked still works) vs. capability evals (can do it on new things
- Happy path (easy: testing the core logic) vs. adversarial (hard: finding edge cases, such as missing data, faulty tool descriptions or guardrails)
During generation, we can configure these parameters. For example, if we go full adversarial, the probability of finding errors increases. Which isn’t necessarily a good thing, as you don’t want to overoptimize in advance either. You want to make the system as good as possible on the hot path. You don’t want to waste time on scenarios that might never happen. That’s why anchoring your trace generation to existing traces is an essential step for properly understanding the user’s behavior and which components to target when generating the traces.
⚠️ Important! Even if we simulate the data, we still want REAL traces and outputs to evaluate on.
This is what we have to do. The pipeline starts from the data, not from invented inputs. Claude Code analyzes the current traces to learn what inputs are worth generating, so we simulate only the inputs, NOT the outputs or internal state.
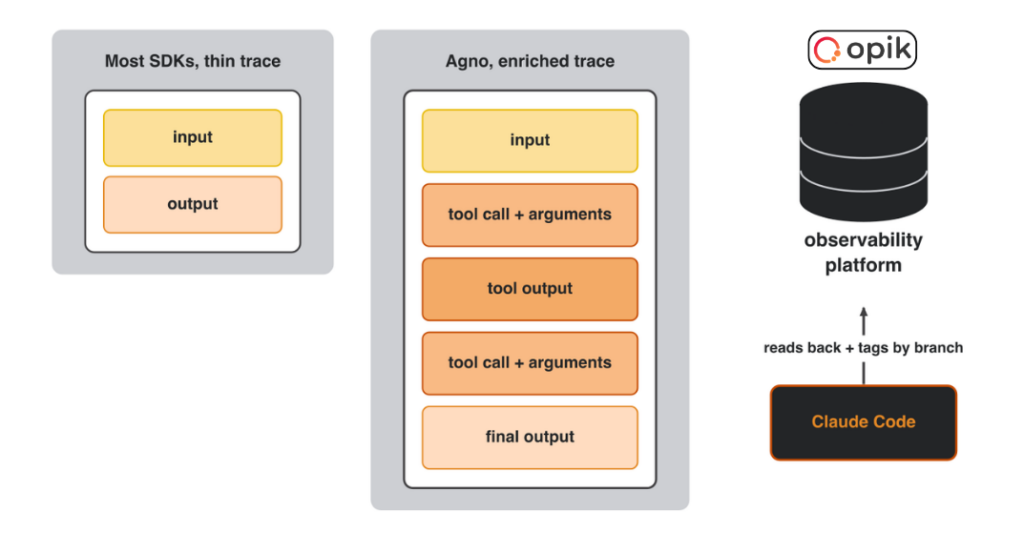
That’s the whole point. Synthesize the outputs too and you hit Alejandro’s problem: “every time I try synthetic datasets, I was losing everything the agent was doing beyond the response.” Grade the final answer alone and a wrong tool call stays invisible.
To get there, we send each simulated input to a headless copy of the agent, which runs for real: selecting tools, calling the staging backend, handling whatever comes back. As it runs, Agno records the full tool-call history and outputs into its OpenTelemetry trace, and the agent emits it to Opik.
Using this strategy, we simulate the inputs, run the agent, and record the trace with real values produced by the agent.
A simulated trace is only as trustworthy as the state the agent was in when it ran, and recreating that state is the hardest part.
Context Population: Mocking Production State
The hardest part of agentic evals is getting the agent into the right state, so it passes or fails for reasons that actually relate to your hypothesis. A trace generated from the wrong state is a useless trace.
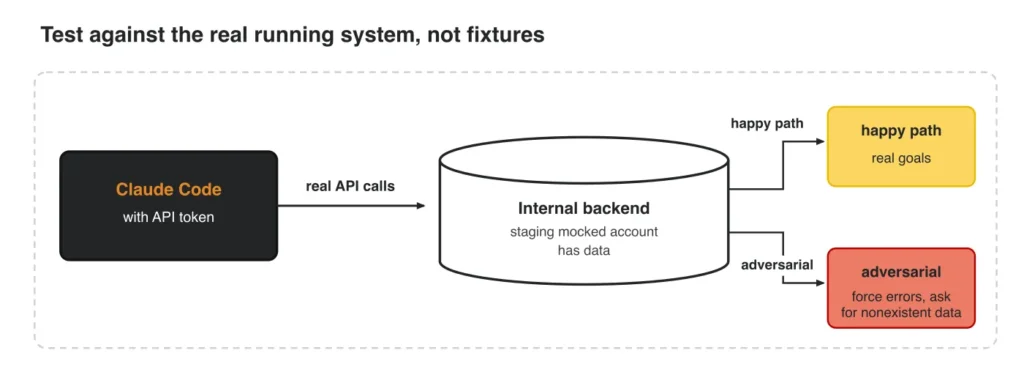
In Alejandro’s use case, roughly 90% of the agent’s tools are API calls, so Claude Code gets a token and hits the real internal backend through a staging mocked account that already holds data. For the happy path, it pulls real goals, OKRs, and teams. To go adversarial, it forces errors and asks for data that doesn’t exist.
The reusable trick is where the context gets injected. Before the agent boots, Claude Code calls the API and injects the user’s context into dedicated system-prompt sections. So the agent greets you with “Hi Paul, want to check goals from the coding AI team?” It runs “as if for real.”
Alejandro is explicit that this is not pytest-style fixtures, but “the prompt is the only thing the LLM sees.” A faithful prompt-level state is a faithful enough production proxy. You mock at the system-prompt layer and stop worrying about reproducing the whole backend.
So instead of using the standard way of using fixtures to populate the backend, you can bypass everything and directly inject the context into the system prompt. From the LLM’s perspective, it’s the same thing.
The last step is to transform the traces into an evals dataset.
On-Demand Datasets
You want two types of eval datasets:
- A persistent, hand-built evaluation set that tests the core business logic. Useful for catching regressions.
- An on-demand, synthetic dataset used to evaluate the feature you are working on.
We are interested here in the second option.
Via the /edd skill Claude Code assembles an Opik dataset, on the fly, from the branch-tagged simulated traces. The dataset is tagged so a later run can filter straight to it, then kept or thrown away.
Before committing to a big sample, Alejandro fires a couple of runs as smoke checks, “to catch anything awful” before spending tokens. Then he checks that the dataset’s coverage is good enough to be worth running an experiment against. Small, cheap, and it saves the expensive mistake.
Because the dataset is cheap to regenerate and scoped to one change, it’s disposable. Optionally, you might promote a couple of high signal traces into the persistent regression set.
A dataset is only useful once you’ve decided what metrics to use — aka the judges.
Define the Judge
You want to support 2 evaluator types.
Code metrics score the structural things deterministically, server-side, free, no LLM, like whether it called the tool or whether the format is right. Always try to evaluate a given metric via code metrics if possible.
LLM judges score the subjective things, like completeness, accuracy, and ranking quality.
Both evaluators are designed as binary classifiers: verified, or not. The urge to introduce 1-5 likert scales is huge. But the thing is that it’s incredibly difficult to get it right. What’s the difference between 2 and 3 or 4 and 5? Even when using multiple human annotators, the labels are inconsistent. With binary labels, the decision is clear: it’s correct or not. Which makes it incredibly easy for the LLM to get it right.
To get some nuance, on top of the binary labels, you want to add a critique that explains in 2-3 sentences why the output is correct or not.
The judge model is deliberately a different model than the agent, so the two don’t share blind spots and the judge can’t rubber-stamp its own family’s mistakes.
But here is the trick! The evaluators are static, carefully defined and calibrated up front from the codebase. The loop regenerates traces and datasets, not the metrics. When implementing LLM judges, it’s extremely important to align them with the domain expert. Once they are working well, you can use them for inference, which we are doing here on the dynamic datasets.
The judges are configured within Opik, using their API to call the model to score each sample from the dataset.
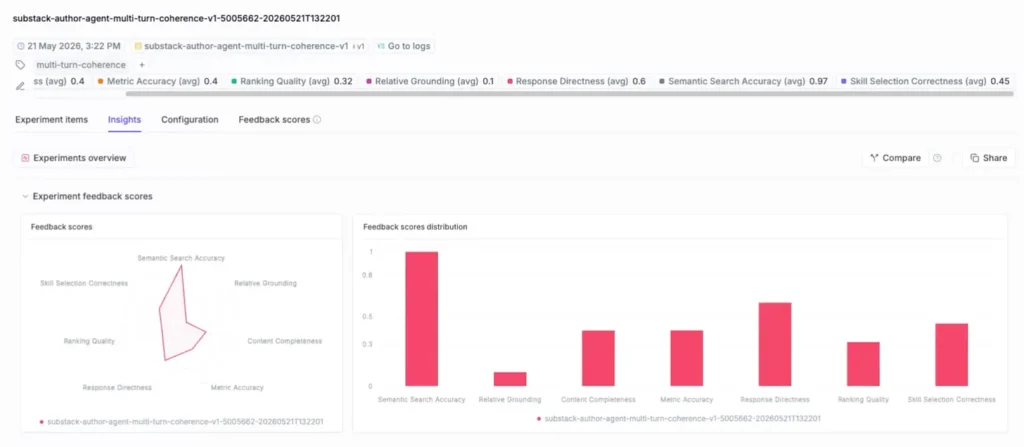
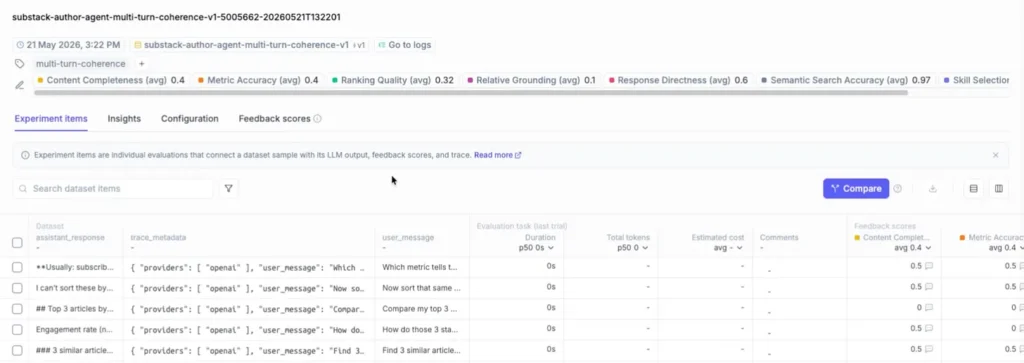
In the image below, you can see the evaluators Alejandro configured for each experiment:
- Content Completeness
- Metric Accuracy
- Ranking Quality
- Relative Grounding
- Response Directness
- Semantic Search Accuracy
- Skill Selection
With the dataset built and the judges defined, you run the experiment. And you run it twice.
Run and Compare Experiments
The experiment runs in Opik, scoring the dataset against all the judges to produce a score distribution.
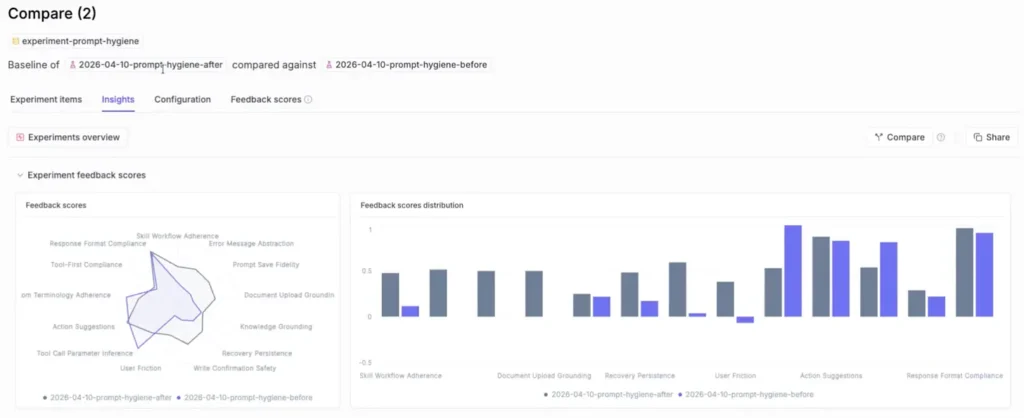
In a feature Alejandro was working on, he cleaned all the noisy instructions out of his agent’s system prompt, “hygiene before” vs. “hygiene after,” and ran 2 experiments over the same scope in Opik’s comparison view.

The after had regressed on one judge: tool-call parameter inference. The agent should remember which ID to pass to a tool, but the cleanup made it “get lost and fabricate IDs.” EDD caught his own change before it shipped.
Comparison matters because failure hides where a single trace can’t show it. Trace-level evals are usually fine, but problems surface across 5, 10, or 20-message conversations. Around the 10th message, the model slides into a “context rot zone”: a request that earlier earned a cooperative “let’s work with this” now gets “what do you mean by that?”
A user asks the agent to “scan 50 teams, get me all the OKRs.” It pushes back and offers to go progressively, returning 17 copy-pasteable tables. But by trace 21 of a 20-message conversation, you’re at 200k total tokens, paying heavily without caching.
These are the kinds of errors proper evals protect you from! Not only performance, but also latency and cost issues that can blow up your infrastructure overnight.
Don’t Run Online Evals
Everything so far ran offline, on a branch, before the merge. The expensive default everyone reaches for instead is always-on online evals. That’s the trap.
Alejandro made the same mistake.
He thought running online evaluations on all the traces was essential for production. Until the bill! It was on credits, not cash, but it would have been around $2k a month just from triggering a few evaluations: “the bill just pops in — in one second you have thousands of dollars in debt.”
So you recalibrate. What’s the actual risk of evaluating whether the agent leaked an ID to the user? Low. So you sample or look for a pattern, run the heavy judges offline, and cap spend first: “consume an amount you know you can afford.”
The good news? The whole /edd skill and headless harness implemented by Alejandro via Opik is now an installable open-source Claude Code plugin. You can also create a free account on Opik with 25k spans/month to try out this EDD strategy on your own project.
🎥 Watch the full conversation between Alejandro Aboy and me
Final Thoughts
You’re already driving one AI process with another. Would you hand the whole thing over to an agent that reads the traces, understands the agent’s mistakes, gets the signal from the evaluators and writes the code changes itself?
— Paul
Alejandro would want exactly that, on one condition. He’s tried prompt-only optimizers and doesn’t trust them, because they change the prompt but never test the agent’s full harness. Until then, the human stays in the loop, and every change earns its pull request.
Opik has been shipping exactly that: Test Suites, Agent Configuration and Playground. Where does your hand-rolled loop go from here?
— Paul
Because they tackle the prompt-only-optimization gap, Alejandro is bullish on adopting them — he expects they’ll close the whole agentic loop: analyze the code & failures → generate inputs → call the agent → build a dataset → evaluate each sample → fix the code → repeat, all in one place.
Try out Alejandro’s EDD code on GitHub, while leveraging Opik’s free tier as the observability platform.
