In the previous article, we demonstrated the benefits and ease with which someone could integrate memory mapping into their workflow. A simple overview is that memory mapping allows an individual to occupy a small amount of memory rather than loading an entire array or object.
Numpy offers multiple solutions for any given problem, and we explored memory mapping using the “mmap_mode” argument presented in Numpy’s “load().” The difference is that now we will look at Numpy’s other solution.
When there may be a need for further capacity to manipulate values and leverage more tools when doing memory mapping, the go-to solution would be Numpy’s “memmap().”
Let’s get to it.
A Brief Intro
One of the first realizations you encounter with memmap is that it will not be as straightforward as you may have assumed. The documentation provides an intricate web of warnings on how to use it, and you quickly learn why.
For instance, a simple documentation scan mentions that you “must specify shape” as the array will be provided as a 1-dimensional array by default. One way we can do this is by taking the binary with information of an “X_train” array in the previous article.
import numpy as np

X_train = np.load("X_train.npy", mmap_mode='r')

print(X_train.shape)

Attempting the same thing using memmap will yield a dramatically different result that aligns with the warning aired in the documentation.
X_train = np.memmap("X_train.npy", mode = 'r')

The value above is truly a 1-dimensional array with many elements, as indicated by a lack of values trailing the comma.
But can we fix this and load the values appropriately? What points are vital and need consideration when using memmap? We can now answer these questions by paying attention to the tiny details a person could easily miss.
Binary Formats and Arguments
In the example above, I attempted to use a binary in NumPy format. Even after trying the appropriate method of loading the binary, I still could not get the proper elements out of it.
By visual inspection, we see many floats when we use the “load” method, but that doesn’t happen when using “memmap.”
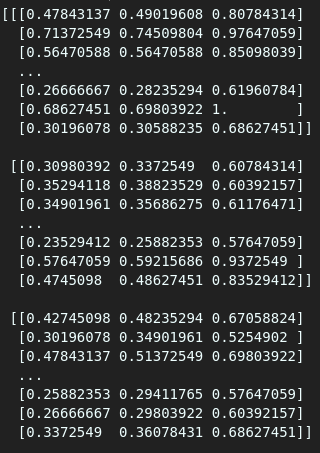
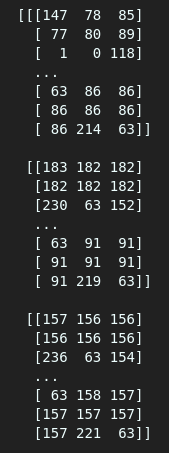
As seen above, one gives an array of floats while the other offers an array of integers. We will still get different values even if we try assigning a float type in memmap using the data type argument(dtype=).
One of the reasons we are running into these issues is because of the binary file format we use. We are using Numpy binaries and expecting that they will work perfectly, yet “memmap()” requires us to use different formats, such as the Raw Binary Format (RBF).
We can convert the Numpy array we loaded earlier into a Raw Binary Format and attempt memory mapping the array.
import numpy as np
#remember we loaded X_train using "load()" previously
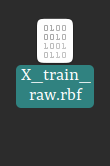
X_train.tofile("X_train_raw.rbf")
The binary file created above is smaller than the original Numpy binary by a few hundred megabytes. Will it mean a smaller memory occupation? We will investigate later.
Now, we can attempt memory mapping with the lessons we acquired:
- Pay attention to shape.
- Specify data type.
- Mode — Whether it is read-only(r), read and write(r+) etc.
Memory Mapping
We are going to name the variable that will store the memory-mapped array “X_train_mapped.”
#Using memmap to memory map the binary

X_train_mapped = np.memmap("X_train_raw.rbf",
                            shape=(4002, 120, 120, 3),
                            mode = 'r',
                            dtype = 'float64')

#printing the first element of the stored array
print(X_train_mapped[0])
Now that all arguments are theoretically in the appropriate form, we can run the code and see if the first element is what we desire.

Now, it is identical to the information we had initially stored. The data looks precisely as it was meant to because we have used the correct binary format, the appropriate shape, and, most importantly, the correct data type.
Since it works, we can now explore the question of memory.
Memory Usage
Is there any inherent advantage when using this particular method? In the previous article, we highlighted that a 1.4 GB file only occupied 184 bytes after being memory-mapped.
In this article, we created and stored a raw binary from that same file. It occupies 805.4 MB. Now, we can check how much space it will take on the memory using the “sys” library.
import sys

#getting the amount of memory occupied by X_train_mapped
print(f'X_train_mapped memory occupied: {sys.getsizeof(X_train_mapped)} bytes')

Well, we can see no change in the amount of memory occupied. It is still 184 bytes, which is still impressive, to say the least.
I believe that we now have a comprehensive understanding of both “load()” and “memmap()” for the tasks we need to use them for. A simple overview of what we did would be as follows for those who want to use memmap():
- Store arrays in Raw Binary Format.
- Ensure you know the array’s shape to write in the “shape” argument.
- Specify the mode you desire to load the array in.
- Make sure that the datatype argument has the correct datatype.
Conclusion
This is the end of the two-part series on memory mapping, where I have given a comprehensive beginner tutorial on the best method for a deep learning dive. These methods are not limited to deep learning as we have acquired an understanding of binaries and how they could be used to store information.
Adios! Til we meet again in the next tutorial. Code away.
