
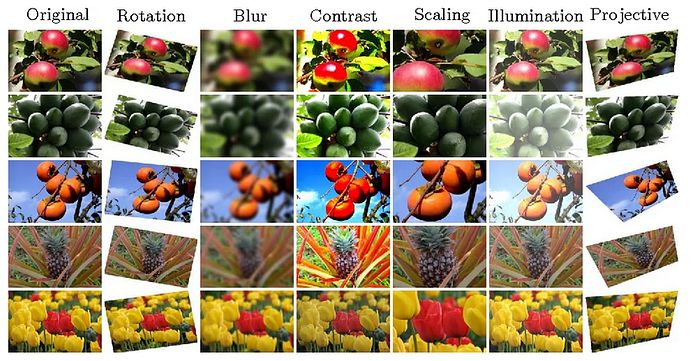
Data augmentation is the process of transforming training data to introduce randomness. This strategy is common for computer vision tasks. In this scenario, the training data in question are images. For example, you can scale, rotate, mirror, and/or crop your images during training.
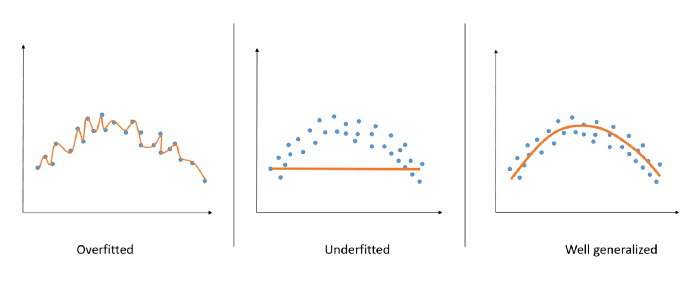
Image augmentation has two key benefits: One, it helps your neural network generalize well by increasing the diversity of learning examples, allowing your model to make reliable predictions on new, never seen before input data. This prevents your model from being either excessively adjusted to training data (over-fitted), or not capable of capturing pattern in data at all (under-fitted).
Second, it boosts the performance and outcomes of your trained models by forming new and different examples to train datasets. If the dataset is rich and sufficient, the model performs better and more accurately.
In this tutorial, you are going to learn how to perform data augmentation using PyTorch. It is a great library that allows you to train neural networks.
Centralizing knowledge means being able to reproduce, extrapolate, and tailor experiments. Learn how large scale companies like Uber share internal knowledge.
To make the development experience smooth for you, let’s use Google Colabto create a notebook. In order to create a code cell in your notebook, click +Code. Create a code cell to install the required PyTorch dependencies.
%pip install -q torch==1.4.0 torchvision==0.5.0.
Add another code cell to import the libraries that are required in this tutorial.
import shutil
from pathlib import Path
from urllib.request import urlretrieve
import PIL
import torch
import torch.utils.data as data
from torchvision import datasets, transforms
import urllib.request
import os
Variable Definitions
Create another code cell that will host the variable definitions for your script. Here, you will have to define the link for the flower dataset, paths, image, and batch sizes.
DATASET_LINK = ‘https://storage.googleapis.com/download.tensorflow.org/example_images/flower_photos.tgz'
WORKING_DIR_PATH = Path(‘.’)
FLOWERS_PATH = WORKING_DIR_PATH / ‘flower_photos’
IMAGE_SIZE = 64
BATCH_SIZE = 128
Data Collection
Use the data set link created above to download the flower images in your Google Colab instance. Create a new code cell and add the code below.
def download_and_unpack_file(link, filename, unpack=True):
    if (WORKING_DIR_PATH / filename).exists():
        return
    archname = link.split(‘/’)[-1]
    urllib.request.urlretrieve(link, archname)urllib.request.urlcleanup()
    shutil.unpack_archive(archname, WORKING_DIR_PATH)
    os.remove(archname)
download_and_unpack_file(DATASET_LINK, ‘flower_photos.tgz’, unpack=False)
Image Augmentation
In computer vision tasks, there are classic image processing activities for augmentation of images: Vertical and horizontal flipping, padding, zooming. random rotating, adding noise, random erasing, cropping, re-scaling, color modification, changing contrast, gray scaling and translation (image is moved along X, Y direction). All these operations and many more are well defined in PyTorch’s documentation. Using the compose interface, you can stack a number of these operations to form your pipeline. The choice of operations you want to include in your augmentation pipeline depends on the level of variation you want to achieve with your training images.
PyTorch also supports automatic augmentation, a common Data Augmentation technique that can improve the accuracy of image classification models.
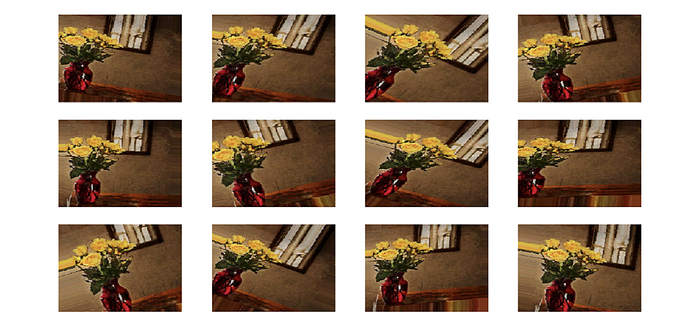
In this section, you are going to compose transformation pipelines using PyTorch. For this tutorial, let’s keep it simple and create the following pipeline in a new code cell:
- Resize the image to a specified dimension
- Flip the image horizontally
- Introduce color filters to the image
- Affine the image
- Convert the image to a tensor
transform= transforms.Compose([
    transforms.Resize(IMAGE_SIZE),
    transforms.RandomHorizontalFlip(),
    transforms.ColorJitter(brightness=0.5, contrast=0.5, saturation=0.2, hue=0.1),
    transforms.RandomAffine(3, scale=(0.95, 1.05)),
    transforms.ToTensor()
])
Load Data
PyTorch provides developers an intuitive interface to load images located in a folder. Afterward, you will create training and validation datasets you need to use later on.
The random split function needs the sum of the training and validation datasets to be equal to the total number of images in the dataset, otherwise the function will throw an error.
data_dir = ‘./flower_photos’
dataset = datasets.ImageFolder( data_dir , transform=transform)
train_set, val_set = data.random_split(dataset, [3000, 670])
trainloader = data.DataLoader(train_set, batch_size=BATCH_SIZE)
testloader = data.DataLoader(val_set, batch_size=BATCH_SIZE)
Conclusion
PyTorch library simplifies image augmentation by providing a way to compose transformation pipelines. They work with PyTorch datasets that you use when creating your neural network. You can use this Google Colab notebook based on this tutorial to speed up your experiments, it has all the working code in this tutorial. Happy training.
