Overview
Comet has a sophisticated system for logging, registering, versioning, and deploying machine learning "models". A model can be anything you want it to be---Comet makes no assumptions of what composes a model.
The steps of the Comet model pipeline are:
- Log a Model, via a Python SDK Experiment
- Register an Experiment Model
- Track Model Versions of the Registered Models
- (Optional) Configure webhooks to be alerted of model stage's updates
- Deploy a Registered Model
We'll go through each of these steps in the following sections.
1. Log a Model
To Comet, a model can be composed of any files or folders in the file system. That is, a model can be any collection of files.
The first step in the model pipeline is to log all of the associated
files with a model name via an Experiment (e.g., Experiment,
OfflineExperiment, or ExistingExperiment).
If all of the files connected to a model are in a single folder (and all of the files there are related to the model), you can simply log the model with the path to the folder:
```python from comet_ml import Experiment
experiment = Experiment()
experiment.log_model("MNIST CNN", "../models/run-026") ```
However, if the files that compose a model are separated, you can also log each file individually:
```python from comet_ml import Experiment
experiment = Experiment()
experiment.log_model("NLP Model", "run4/layer1-weights.pickle") experiment.log_model("NLP Model", "run6/layer2-weights.pickle") experiment.log_model("NLP Model", "run9/layer3-weights.pickle") ```
In fact, you can also log multiple folders and multiple files as a single model. For more information, please see Experiment.log_model().
After you log a model, you will see the model and all of its individual files in the Experiment's Assets Tab.
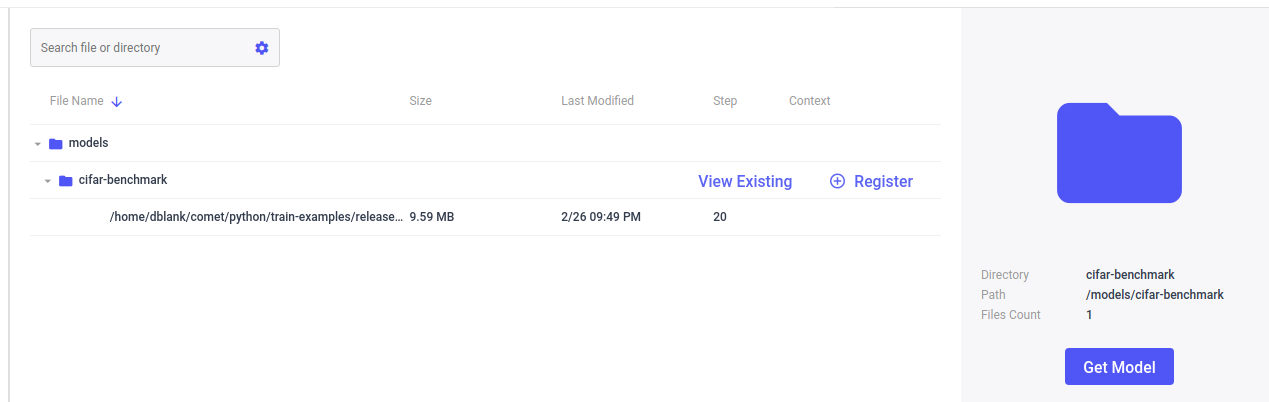
From the Experiment's Assets tab, you can download the model, see if it has been registered before, or register it as a new model, or a new version of an existing model. We'll explore the details of that process next.
You can see exactly the Registry Models that have been made with this Experiment Model by clicking the "View Existing" link next to the asset model entry:
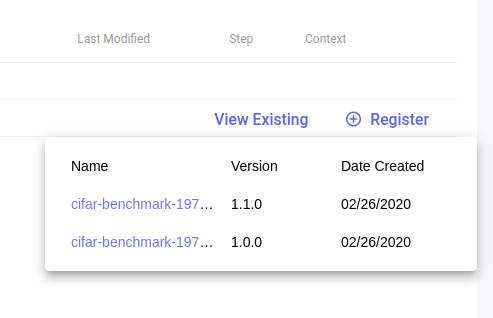
Clicking the name of the registered model will take you to the Registry view, which we'll explore next.
2. Register a Model
After you log a model through an Experiment through the SDK, you can then register it. Registered Models belong to a workspace, and are shared with your team there.
You can register an Experiment's model in two ways:
- Through the Experiment's Asset Tab in the Comet User Interface
- Programmatically through the Comet Python SDK
To register an experiment's model via the Comet User Interface, simply
go the Experiment's Asset tab, locate the model in the asset list, and
click on the Register link.
If no model has been registered before in this workspace, then you will see the following dialog:
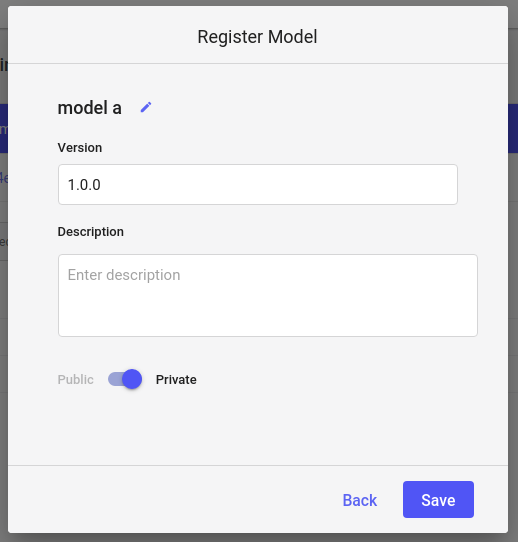
Here, you can give the registered model a name, a version, and set its
visibility to Public or Private. Note that registered model names
must be all lowercase, and version strings must use proper semantic
versioning. Semantic versioning are strings like
"1.0.0", "2.1.5", or "1.0.0-alpha". For more examples of "semver", see, for example,
Understanding Semantic Versioning Specification.
On the other hand, if you have registered a model in this workspace before, then you will see the following dialog:
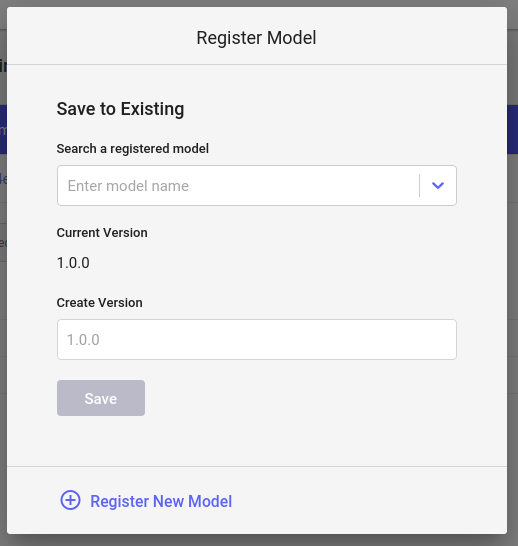
Here, you will select one of the previous registered model names from the list, and again provide proper semantic versioning. Click on "Register New Model".
You can also register an experiment's model via the Python API. That would look similar to:
```python from comet_ml import API
api = API()
experiment = api.get("workspace-name/project-name/experiment-name") experiment.register_model("MNIST CNN") ```
That's it! The "MNIST CNN" is the name of the Experiment model, and if you don't provide a registry model name, it will serve as the foundation for it as well. However, since registered model names have more constraints than Experiment Model names, the registered model name becomes "mnist-cnn". Likewise, since we did not provide a version number, the string "1.0.0" was used as the default.
For more details, please see: APIExperiment.register_model().
We'll now explore the details of your registered models.
3. Track Model Versions
Registered models belong to the workspace. In this manner, you can share your models with the workspace team. At the workspace view, you can select between viewing the Projects or the Registered Models:
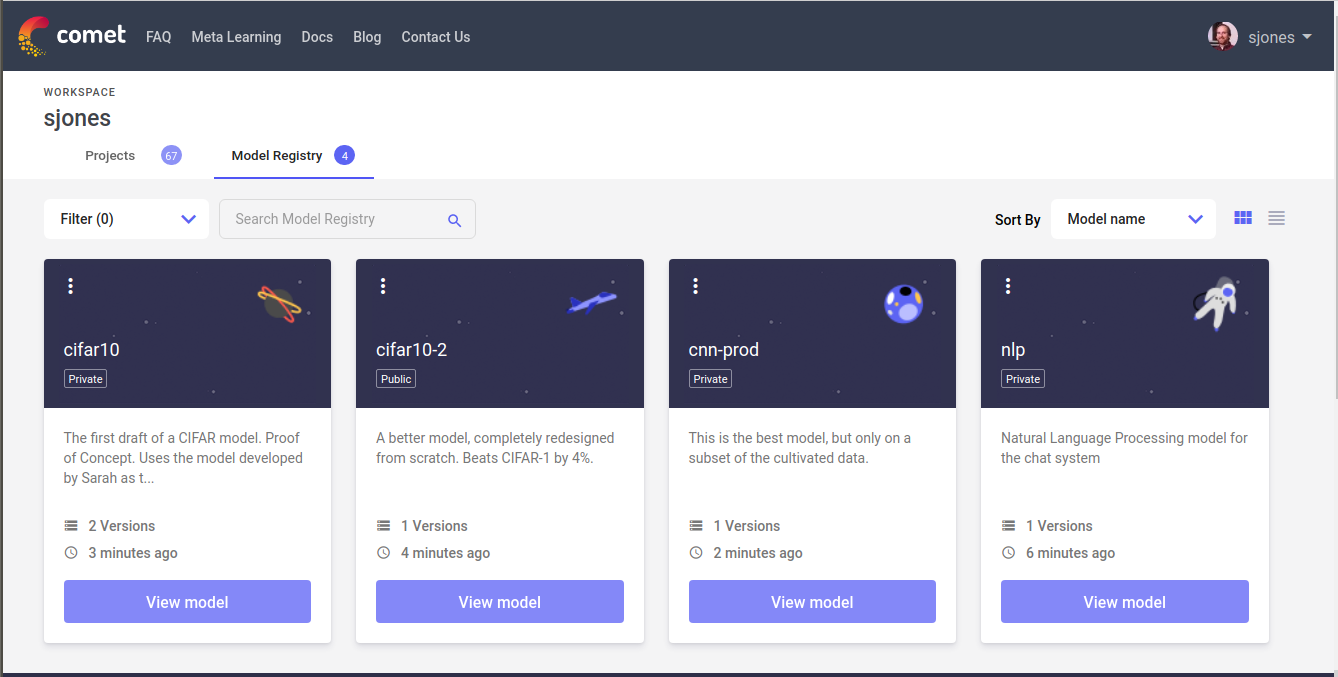
Selecting a registered model's card in the Model Registry will take you to the detailed view of the registered model:
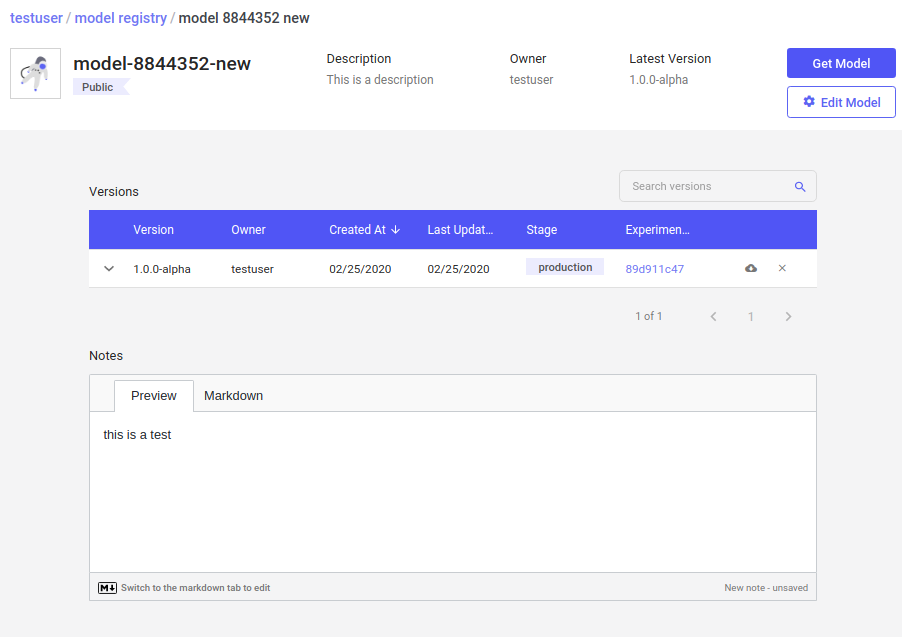
Here you can see the latest version of the registered model, and all previous versions as well. Registered models contain the following properties, which can all be edited here:
- registered name
- description
- visibility setting (public vs. private)
- notes
You can edit these properties by clicking on the "Edit Model" button.
You can also alter these settings programmatically using the Python API:
python
api.update_registry_model(workspace, registry_name,
                          new_name=None, description=None, public=None)
api.update_registry_model_notes(workspace, registry_name, notes)
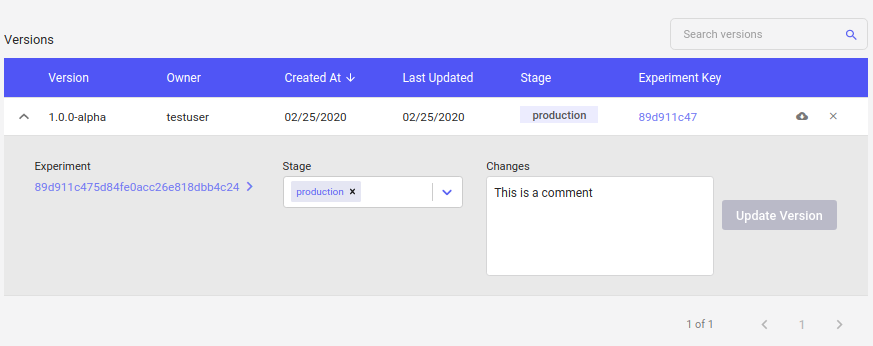
Each version of a registered model contains the following items:
- semantic version string
- comment
- a list of stages, such as "production" or "development"
The stages is a list of tags. You can add to, or delete tags from the versioned registered model on this page.
You can programmatically update these items via the Python API:
```python api.add_registry_model_version_stage(workspace, registry_name, version, stage)
api.update_registry_model_version(workspace, registry_name, version, comment=None, stages=None) ```
From the Registry Model view, you can also delete a version by clicking the delete icon.
Programmatically, you can delete these as well:
python
api.delete_registry_model(workspace, registry_name)
api.delete_registry_model_version(workspace, registry_name, version)
4. (Optional) Configure webhooks to be alerted of model stage's updates
Webhooks let you integrate the Comet model registry with your CI/CD pipeline.
Specifically, you can enable a notification to an external web server whenever a change is made to the status of a model that is registered with Comet.
Comet POSTs the notification in real-time. The POSTs are in the form of JSON documents that contain data relating to the webhook you have configured.
The webhook is implemented by the web server as a URL that can accept the POST requests and pass on the data that they deliver for further processing.
You can set a webhook for several registered models, across several workspaces. Notifications can be delivered to several URLs.
All you need to do is specify the URL to which Comet should deliver the requests.
Note
Currently, this feature supports only changes in the Stage status of a specific registered model, or of any registered model in a specific workspace.
To configure, issue an HTTP POST request to your full Comet domain URL, using the following syntax:
POST {http/https}://{your-comet-domain}/api/rest/v2/webhooks/config
The payload body structure follows this format:
json
{
    "workspaceName": "some-workspace",
    "modelName": "some-model",
    "webhookUrls": [{
        "url": "https://{customer-webhook-url-a}",
        "header": {
            "Authorization": "secret_token",
            "Other": "other_info"
        }
To retrieve the current configuration, issue an HTTP GET request to your full Comet domain URL, using the following syntax:
GET {http/https}://{your-comet-domain}/api/rest/v2/webhooks/config?workspaceName=<workspace>&modelName=<model>
For a full list of endpoints provided with Comet, see:
4. Deploy Models
To download a registered model as a zip file, click on the "Get Model" button. The zip file will contain all of the files that were logged with the Experiment model via the Python SDK.
You can download the latest versioned registered model, or any of the versions. Simply click on their download icon.
You can also down and deploy your model programmatically, using the Python API:
```python from comet_ml import API
api = API()
experiment = api.get("workspace-name/project-name/experiment-name", output_path="./", expand=True)
Download an Experiment Model:
experiment.download_model("Model A", output_path="./", expand=True)
Download a Registry Model:
api.download_registry_model("workspace-name", "model-a", "1.0.0", output_path="./", expand=True) ```
You can select where you would like to download it to using the
output_path parameter (using a relative or an absolute path), and
determine if the zip file is expanded or not using the expand parameter.