> For clean Markdown of any page, append .md to the page URL.
> For a complete documentation index, see https://www.comet.com/docs/opik/llms.txt.
# Text and chat prompts
The Prompt Library supports two prompt structures:
* [**Text prompts**](#text-prompts) — Simple string templates with variable substitution. Good for one-shot generations.
* [**Chat prompts**](#chat-prompts) — Structured message lists in OpenAI format with system, user, and assistant roles. Good for multi-turn or system+user agents, and supports multimodal content (text, images, videos).
> **Note**
>
> The prompt structure is fixed at creation time. A prompt created with `create_prompt` (text)
> cannot later be turned into a chat prompt, and vice versa — attempting it raises
> `PromptTemplateStructureMismatch`.
## Text prompts
A text prompt is a single string template with `{{variable}}` substitution. They are ideal for
single-turn interactions or when you need to generate a single piece of text.
### Creating a text prompt
#### Python
```python
import opik
client = opik.Opik()
prompt = client.create_prompt(
name="prompt-summary",
prompt="Write a summary of the following text: {{text}}",
metadata={"environment": "development"},
project_name="my-agent",
)
# Render the template
print(prompt.format(text="Hello, world!"))
```
#### TypeScript
```typescript
import { Opik } from "opik";
const client = new Opik();
const prompt = await client.createPrompt({
name: "prompt-summary",
prompt: "Write a summary of the following text: {{text}}",
metadata: { environment: "development" },
projectName: "my-agent",
});
// Render the template
console.log(prompt?.format({ text: "Hello, world!" }));
```
#### Using the UI
You can create a prompt in the UI by navigating to the Prompt library and clicking
**Create new prompt**. This opens a dialog where you can enter the prompt name, the prompt
text, and an optional description:

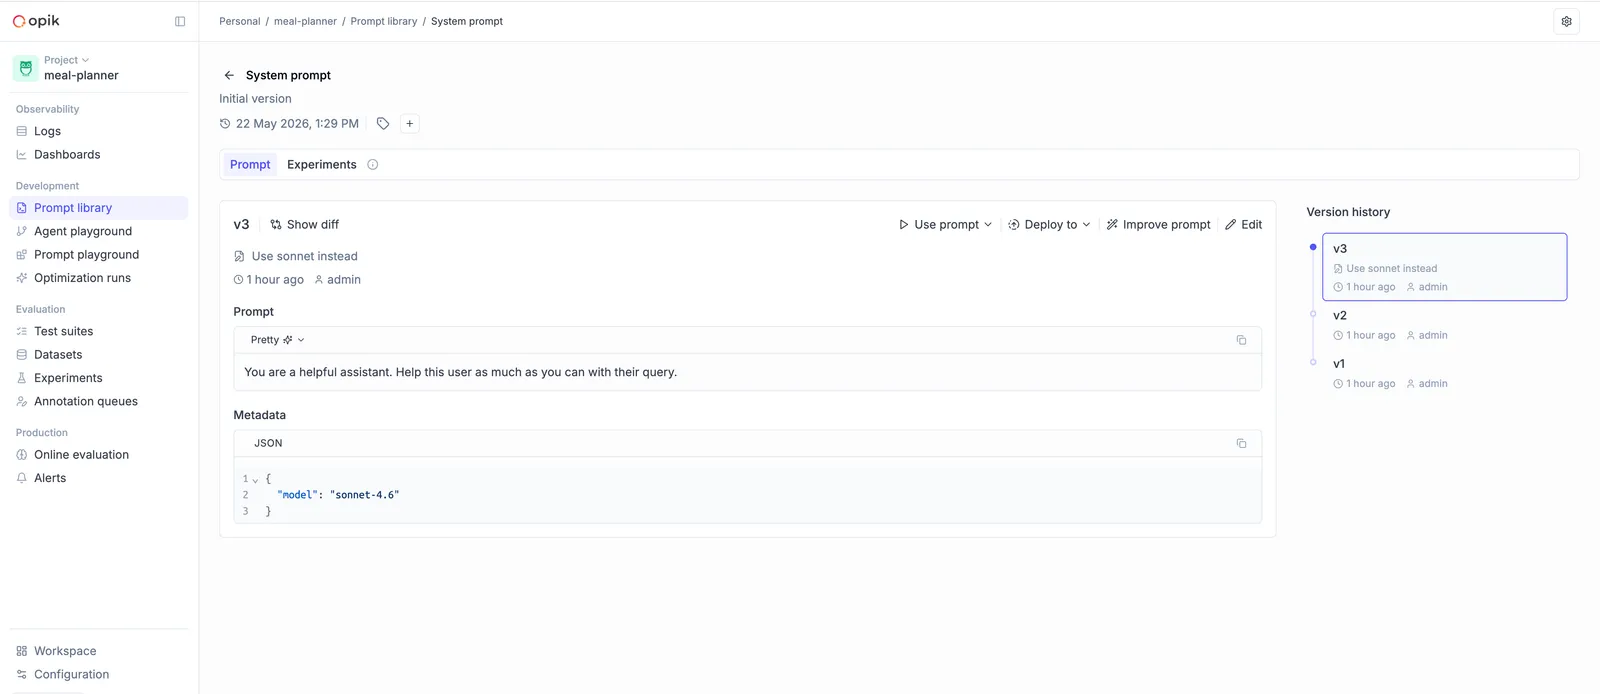
You can edit a prompt later by clicking on its name in the library and choosing **Edit prompt**.
Each call with new content creates a new version, which is visible in the library:
### Fetching a text prompt
#### Python
```python
import opik
client = opik.Opik()
prompt = client.get_prompt(name="prompt-summary", project_name="my-agent")
# Render the template
print(prompt.format(text="Hello, world!"))
```
#### TypeScript
```typescript
import { Opik } from "opik";
const client = new Opik();
const prompt = await client.getPrompt({
name: "prompt-summary",
projectName: "my-agent",
});
if (prompt) {
console.log(prompt.format({ text: "Hello, world!" }));
}
```
If you are not using the SDK, you can also fetch a prompt through the
[REST API](/reference/rest-api/overview).
## Chat prompts
A chat prompt is a structured list of messages with roles (`system`, `user`, `assistant`), in
the same shape that OpenAI-compatible chat completion APIs accept. They are the right choice
when your agent has a multi-turn message structure.
### Key features
* **Structured messages** — Organize prompts as a list of messages with roles (system, user, assistant)
* **Multimodal support** — Include images, videos, and text in the same prompt
* **Variable substitution** — Use Mustache (`{{variable}}`) or Jinja2 syntax
* **Version control** — Automatic versioning when messages change
### Creating a chat prompt
#### Python
```python
import opik
client = opik.Opik()
messages = [
{"role": "system", "content": "You are a helpful assistant specializing in {{domain}}."},
{"role": "user", "content": "Explain {{topic}} in simple terms."},
]
chat_prompt = client.create_chat_prompt(
name="educational-assistant",
messages=messages,
metadata={"category": "education"},
project_name="my-agent",
)
# Render the messages with variables
formatted_messages = chat_prompt.format(
variables={
"domain": "physics",
"topic": "quantum entanglement",
}
)
print(formatted_messages)
# [
# {"role": "system", "content": "You are a helpful assistant specializing in physics."},
# {"role": "user", "content": "Explain quantum entanglement in simple terms."},
# ]
```
#### TypeScript
```typescript
import { Opik } from "opik";
const client = new Opik();
const messages = [
{
role: "system",
content: "You are a helpful assistant specializing in {{domain}}.",
},
{ role: "user", content: "Explain {{topic}} in simple terms." },
];
const chatPrompt = await client.createChatPrompt({
name: "educational-assistant",
messages,
metadata: { category: "education" },
projectName: "my-agent",
});
// Render the messages with variables
const formattedMessages = chatPrompt?.format({
domain: "physics",
topic: "quantum entanglement",
});
console.log(formattedMessages);
// [
// { role: "system", content: "You are a helpful assistant specializing in physics." },
// { role: "user", content: "Explain quantum entanglement in simple terms." },
// ]
```
#### Using the UI
To create a chat prompt in the UI, navigate to the Prompt Library and click **Create new
prompt**. Select **Chat prompt** as the prompt type, then add your messages with their
roles (system, user, assistant):

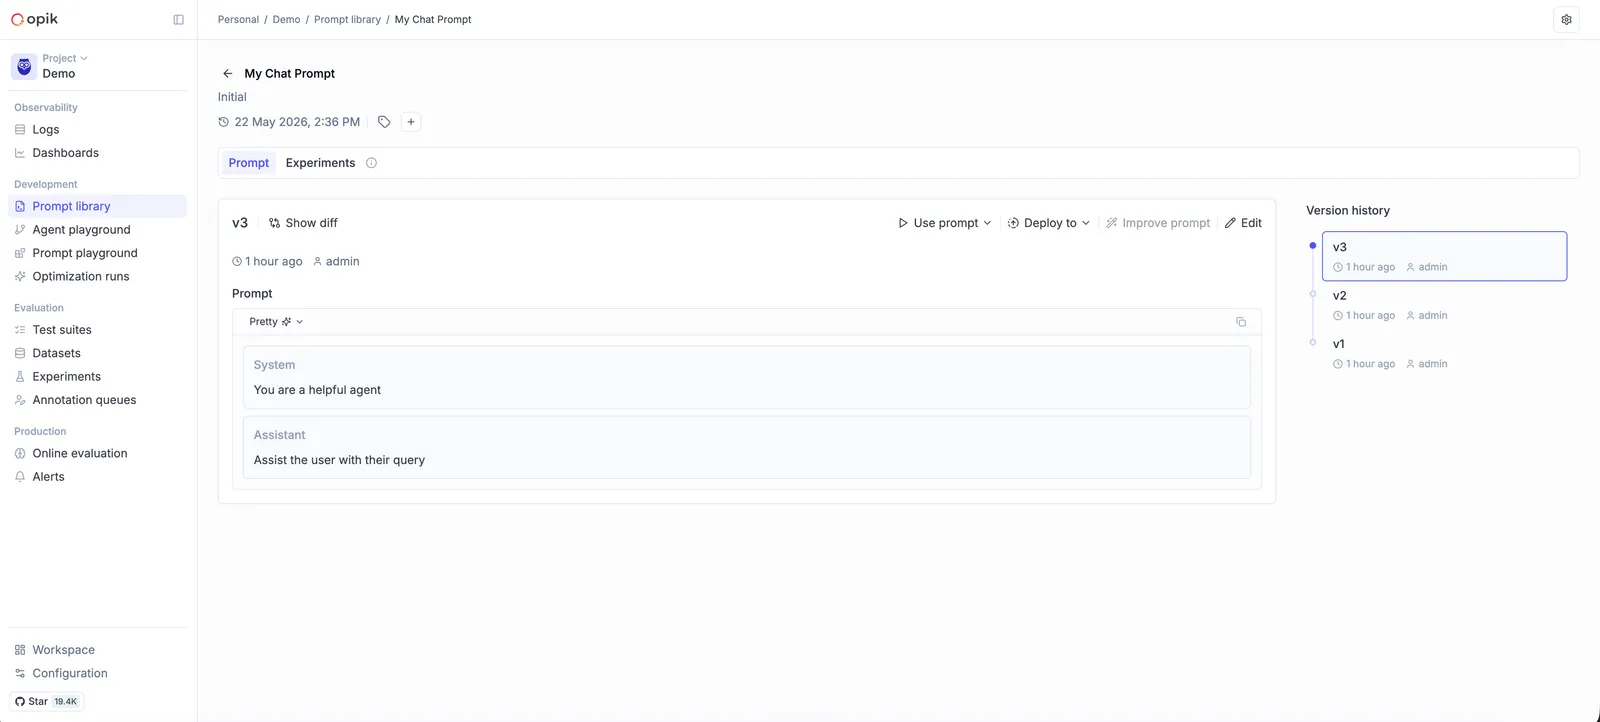
Once saved, a chat prompt has its own view in the Prompt Library:
### Using chat prompts with the OpenAI API
The output of `chat_prompt.format()` is already in the shape the OpenAI chat completion API
expects:
#### Python
```python
import opik
from openai import OpenAI
client = opik.Opik()
openai_client = OpenAI()
chat_prompt = client.get_chat_prompt(
name="educational-assistant",
project_name="my-agent",
)
formatted_messages = chat_prompt.format(
variables={"domain": "physics", "topic": "quantum entanglement"},
)
response = openai_client.chat.completions.create(
model="gpt-4o-mini",
messages=formatted_messages,
)
print(response.choices[0].message.content)
```
#### TypeScript
```typescript
import { Opik } from "opik";
import OpenAI from "openai";
const client = new Opik();
const openai = new OpenAI();
const chatPrompt = await client.getChatPrompt({
name: "educational-assistant",
projectName: "my-agent",
});
const formattedMessages = chatPrompt?.format({
domain: "physics",
topic: "quantum entanglement",
});
const response = await openai.chat.completions.create({
model: "gpt-4o-mini",
messages: formattedMessages,
});
console.log(response.choices[0].message.content);
```
### Multi-turn templates
Chat prompts can capture a multi-turn flow, with assistant turns inline and variables anywhere
in the conversation:
#### Python
```python
import opik
client = opik.Opik()
messages = [
{"role": "system", "content": "You are a customer support agent for {{company}}."},
{"role": "user", "content": "I have an issue with {{product}}."},
{"role": "assistant", "content": "I'd be happy to help with your {{product}}. Can you describe the issue?"},
{"role": "user", "content": "{{issue_description}}"},
]
chat_prompt = client.create_chat_prompt(
name="customer-support-flow",
messages=messages,
project_name="my-agent",
)
formatted = chat_prompt.format(
variables={
"company": "Acme Corp",
"product": "Widget Pro",
"issue_description": "It won't turn on",
}
)
```
#### TypeScript
```typescript
import { Opik } from "opik";
const client = new Opik();
const messages = [
{
role: "system",
content: "You are a customer support agent for {{company}}.",
},
{ role: "user", content: "I have an issue with {{product}}." },
{
role: "assistant",
content:
"I'd be happy to help with your {{product}}. Can you describe the issue?",
},
{ role: "user", content: "{{issue_description}}" },
];
const chatPrompt = await client.createChatPrompt({
name: "customer-support-flow",
messages,
projectName: "my-agent",
});
const formatted = chatPrompt?.format({
company: "Acme Corp",
product: "Widget Pro",
issue_description: "It won't turn on",
});
```
### Multimodal content
Chat prompts can include images and videos alongside text — useful for vision-enabled models.
#### Image analysis
#### Python
```python
import opik
client = opik.Opik()
messages = [
{"role": "system", "content": "You analyze images and provide detailed descriptions."},
{
"role": "user",
"content": [
{"type": "text", "text": "What's in this image of {{subject}}?"},
{
"type": "image_url",
"image_url": {
"url": "{{image_url}}",
"detail": "high",
},
},
],
},
]
chat_prompt = client.create_chat_prompt(
name="image-analyzer",
messages=messages,
project_name="my-agent",
)
formatted = chat_prompt.format(
variables={
"subject": "a sunset",
"image_url": "https://example.com/sunset.jpg",
},
supported_modalities={"vision": True},
)
```
#### TypeScript
```typescript
import { Opik } from "opik";
const client = new Opik();
const messages = [
{
role: "system",
content: "You analyze images and provide detailed descriptions.",
},
{
role: "user",
content: [
{ type: "text", text: "What's in this image of {{subject}}?" },
{
type: "image_url",
image_url: {
url: "{{image_url}}",
detail: "high",
},
},
],
},
];
const chatPrompt = await client.createChatPrompt({
name: "image-analyzer",
messages,
projectName: "my-agent",
});
const formatted = chatPrompt?.format(
{
subject: "a sunset",
image_url: "https://example.com/sunset.jpg",
},
{ vision: true },
);
```
#### Video analysis
#### Python
```python
import opik
client = opik.Opik()
messages = [
{"role": "system", "content": "You analyze videos and provide insights."},
{
"role": "user",
"content": [
{"type": "text", "text": "Analyze this video: {{description}}"},
{
"type": "video_url",
"video_url": {
"url": "{{video_url}}",
"mime_type": "video/mp4",
},
},
],
},
]
chat_prompt = client.create_chat_prompt(
name="video-analyzer",
messages=messages,
project_name="my-agent",
)
formatted = chat_prompt.format(
variables={
"description": "traffic analysis",
"video_url": "https://example.com/traffic.mp4",
},
supported_modalities={"vision": True},
)
```
#### TypeScript
```typescript
import { Opik } from "opik";
const client = new Opik();
const messages = [
{
role: "system",
content: "You analyze videos and provide insights.",
},
{
role: "user",
content: [
{ type: "text", text: "Analyze this video: {{description}}" },
{
type: "video_url",
video_url: {
url: "{{video_url}}",
mime_type: "video/mp4",
},
},
],
},
];
const chatPrompt = await client.createChatPrompt({
name: "video-analyzer",
messages,
projectName: "my-agent",
});
const formatted = chatPrompt?.format(
{
description: "traffic analysis",
video_url: "https://example.com/traffic.mp4",
},
{ vision: true, video: true },
);
```
#### Mixed content
You can combine multiple content blocks in a single message — e.g. two images with text around
them:
#### Python
```python
import opik
client = opik.Opik()
messages = [
{
"role": "user",
"content": [
{"type": "text", "text": "Compare these two images:"},
{"type": "image_url", "image_url": {"url": "{{image1_url}}"}},
{"type": "text", "text": "and"},
{"type": "image_url", "image_url": {"url": "{{image2_url}}"}},
{"type": "text", "text": "What are the main differences?"},
],
},
]
chat_prompt = client.create_chat_prompt(
name="image-comparison",
messages=messages,
project_name="my-agent",
)
formatted = chat_prompt.format(
variables={
"image1_url": "https://example.com/before.jpg",
"image2_url": "https://example.com/after.jpg",
},
supported_modalities={"vision": True},
)
```
#### TypeScript
```typescript
import { Opik } from "opik";
const client = new Opik();
const messages = [
{
role: "user",
content: [
{ type: "text", text: "Compare these two images:" },
{ type: "image_url", image_url: { url: "{{image1_url}}" } },
{ type: "text", text: "and" },
{ type: "image_url", image_url: { url: "{{image2_url}}" } },
{ type: "text", text: "What are the main differences?" },
],
},
];
const chatPrompt = await client.createChatPrompt({
name: "image-comparison",
messages,
projectName: "my-agent",
});
const formatted = chatPrompt?.format(
{
image1_url: "https://example.com/before.jpg",
image2_url: "https://example.com/after.jpg",
},
{ vision: true },
);
```
> **Note**
>
> When formatting multimodal prompts, you can specify `supported_modalities` to control how
> content is rendered:
>
> * If a modality is supported (e.g. `{"vision": True}`), the structured content is preserved.
> * If a modality is not supported, it's replaced with text placeholders (e.g. `<<>><<>>`).
>
> This lets you reuse the same template with different models that may or may not support
> certain modalities.
## Template engines
Both text and chat prompts support two template engines for variable substitution:
### Mustache (default)
Mustache is simple, portable, and covers the common case of substituting variables into a
template.
#### Python
```python
import opik
from opik.api_objects.prompt import PromptType
client = opik.Opik()
chat_prompt = client.create_chat_prompt(
name="mustache-example",
messages=[
{"role": "user", "content": "Hello {{name}}, you live in {{city}}."},
],
type=PromptType.MUSTACHE, # Default
project_name="my-agent",
)
formatted = chat_prompt.format(variables={"name": "Alice", "city": "Paris"})
# [{"role": "user", "content": "Hello Alice, you live in Paris."}]
```
#### TypeScript
```typescript
import { Opik, PromptType } from "opik";
const client = new Opik();
const chatPrompt = await client.createChatPrompt({
name: "mustache-example",
messages: [
{ role: "user", content: "Hello {{name}}, you live in {{city}}." },
],
type: PromptType.MUSTACHE, // Default
projectName: "my-agent",
});
const formatted = chatPrompt?.format({ name: "Alice", city: "Paris" });
// [{ role: "user", content: "Hello Alice, you live in Paris." }]
```
### Jinja2
Jinja2 supports conditionals, loops, and filters, which makes it a better fit when your prompt
needs to branch on input values.
#### Python
```python
import opik
from opik.api_objects.prompt import PromptType
client = opik.Opik()
chat_prompt = client.create_chat_prompt(
name="jinja-example",
messages=[
{
"role": "user",
"content": """
{% if is_premium %}
Hello {{ name }}, welcome to our premium service!
{% else %}
Hello {{ name }}, welcome!
{% endif %}
""",
},
],
type=PromptType.JINJA2,
project_name="my-agent",
)
# Premium user
chat_prompt.format(variables={"name": "Alice", "is_premium": True})
# Regular user
chat_prompt.format(variables={"name": "Bob", "is_premium": False})
```
#### TypeScript
```typescript
import { Opik, PromptType } from "opik";
const client = new Opik();
const chatPrompt = await client.createChatPrompt({
name: "jinja-example",
messages: [
{
role: "user",
content: `
{% if is_premium %}
Hello {{ name }}, welcome to our premium service!
{% else %}
Hello {{ name }}, welcome!
{% endif %}
`,
},
],
type: PromptType.JINJA2,
projectName: "my-agent",
});
// Premium user
chatPrompt?.format({ name: "Alice", is_premium: true });
// Regular user
chatPrompt?.format({ name: "Bob", is_premium: false });
```
> **Note**
>
> Jinja2 is more powerful for branching prompt logic; Mustache is simpler and more portable
> across other tools that consume the same template. Pick the one that fits your prompt.
## Searching prompts
To discover prompts by name substring or filter expression, use `search_prompts` /
`searchPrompts`. Filters use Opik Query Language (OQL), the same syntax used elsewhere in Opik:
#### Python
```python
import opik
client = opik.Opik()
# Search by name substring
summaries = client.search_prompts(
filter_string='name contains "summary"'
)
# Combine name + tags
filtered = client.search_prompts(
filter_string='name contains "summary" AND tags contains "alpha" AND tags contains "beta"',
)
# Only text prompts
text_prompts = client.search_prompts(
filter_string='template_structure = "text"'
)
# Only chat prompts
chat_prompts = client.search_prompts(
filter_string='template_structure = "chat" AND name contains "assistant"'
)
for prompt in filtered:
print(prompt.name, prompt.version, prompt.prompt)
```
#### TypeScript
```typescript
import { Opik } from "opik";
const client = new Opik();
// Search by name substring
const summaries = await client.searchPrompts(
'name contains "summary"'
);
// Combine name + tags
const filtered = await client.searchPrompts(
'name contains "summary" AND tags contains "alpha" AND tags contains "beta"'
);
// Only text prompts
const textPrompts = await client.searchPrompts(
'template_structure = "text"'
);
// Only chat prompts
const chatPrompts = await client.searchPrompts(
'template_structure = "chat" AND name contains "assistant"'
);
for (const prompt of filtered) {
console.log(prompt.name, prompt.version, prompt.prompt);
}
```
`search_prompts` returns the **latest** version for each matching prompt. To explore the full
version history of a single prompt, see [Version control](/development/prompt-library/version-control).
### Filter syntax
The `filter_string` parameter takes one or more ` ` clauses joined
with `AND`:
| Column | Type | Operators |
| -------------------- | ------ | --------------------------------------------------------------------------- |
| `id` | String | `=`, `!=`, `contains`, `not_contains`, `starts_with`, `ends_with`, `>`, `<` |
| `name` | String | `=`, `!=`, `contains`, `not_contains`, `starts_with`, `ends_with`, `>`, `<` |
| `created_by` | String | `=`, `!=`, `contains`, `not_contains`, `starts_with`, `ends_with`, `>`, `<` |
| `tags` | List | `contains` |
| `template_structure` | String | `=`, `!=` (values: `"text"`, `"chat"`) |
**Examples:**
* `tags contains "production"` — Filter by tag
* `name contains "summary"` — Filter by name substring
* `created_by = "user@example.com"` — Filter by creator
* `tags contains "alpha" AND tags contains "beta"` — Multiple tag filtering (AND)
* `template_structure = "text"` — Only text prompts
* `template_structure = "chat"` — Only chat prompts